The Valentine’s Day cookie exchange was in less than twelve hours and I’d completely forgotten. I mean, completely. I was scrolling through Instagram at 10 PM, saw someone’s post about their “finished cookie box,” and felt my stomach drop. Everyone else would be bringing these elaborate, multi-day creations—the kind with hand-piped royal icing and edible glitter. I had a half-used bag of flour, a bottle of red food coloring that was probably expired, and about 45 minutes before I needed to be in bed to function the next day. Not exactly a promising start.
I remember standing in my kitchen, staring into the pantry like it might magically produce something impressive. My husband walked in, saw my face, and just said, “Uh oh.” That’s when I spotted the box of cocoa powder pushed way in the back. Red velvet. That was the answer. I’d made crinkle cookies before, but never a red velvet version. Honestly, I was just hoping they’d look festive enough to pass as intentional. I threw everything together in a panic, crossed my fingers, and prayed the red color would actually show up.
The next day, I walked into that cookie exchange with a tin of slightly lopsided, powdered sugar-dusted cookies, feeling like I’d brought a store-bought cake to a baking competition. But here’s the thing—by the end of the night, my tin was completely empty. And not just empty. People were asking for the recipe. One woman actually tracked me down in the parking lot. These red velvet crinkle cookies, born from a moment of pure panic and zero planning, completely stole the show. Maybe you’ve been there—that feeling when something thrown together last minute somehow turns out better than anything you planned for weeks. That’s this recipe. And now, I make them every single Valentine’s Day, on purpose, with plenty of time to spare.
Why You’ll Love This Recipe
Let me tell you, after years of testing and tweaking, this isn’t just another cookie recipe. I’ve made these for Valentine’s Day parties, Galentine’s brunches, and even just a random Tuesday when I needed a little red velvet pick-me-up. They never disappoint.
- Quick & Easy : From start to finish, these cookies come together in about 30 minutes. No chilling required, which is a lifesaver when you’re short on time or patience.
- Simple Ingredients : You probably have most of these in your pantry right now. Cocoa powder, flour, sugar, eggs—nothing fancy, nothing hard to find.
- Perfect for Valentine’s Day : That gorgeous red color and snowy powdered sugar coating make them look like you spent hours. They’re made for sharing with someone you love.
- Crowd-Pleaser : I’ve watched kids and adults alike grab three or four of these before I could even put the plate down. They’re soft, fudgy, and totally addictive.
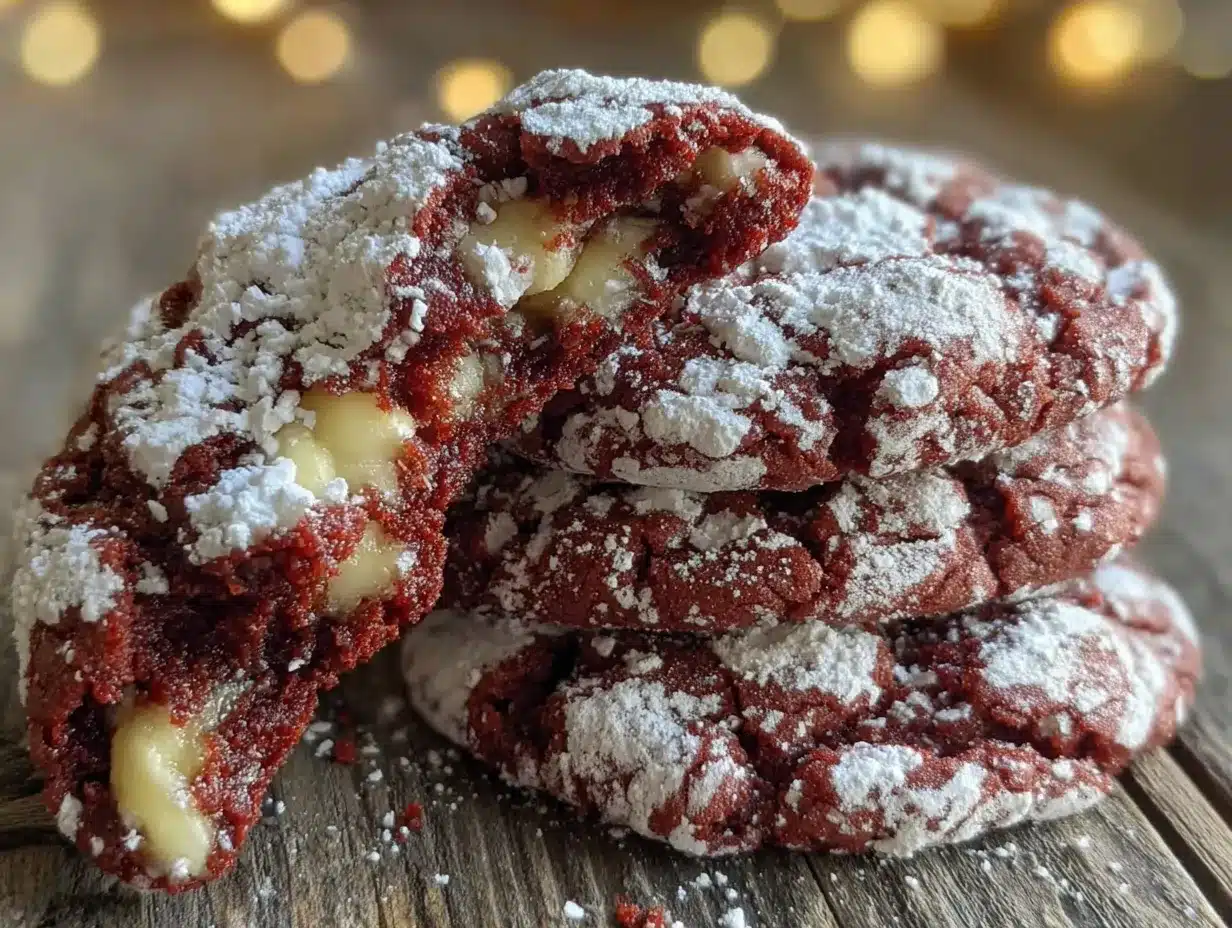
- Unbelievably Delicious : The texture is this perfect combination—crispy, crackly outside and soft, almost brownie-like inside. The hint of cocoa with the sweet powdered sugar is just, honestly, perfect.
What makes these different from every other red velvet cookie out there? It’s the balance. I’ve tested versions that were too cakey, too dry, or that lost their red color after baking. This recipe nails the texture—chewy but tender—and keeps that vibrant red hue that makes them so festive. It’s comfort food reimagined for a holiday, faster and simpler but with the same soul-soothing satisfaction. Perfect for impressing your Valentine without the stress, or turning a simple Tuesday into something memorable.
What Ingredients You Will Need
This recipe uses simple, wholesome ingredients to deliver that classic red velvet flavor and that irresistible crackly texture. Most of these are pantry staples, which makes this recipe perfect for last-minute baking.
- All-purpose flour (1 ½ cups, 190g) — The base of the cookie. I use Gold Medal or King Arthur for consistent results. Spoon and level it into your measuring cup for accuracy.
- Unsweetened cocoa powder (¼ cup, 20g) — Gives that subtle chocolate flavor. I prefer Hershey’s Special Dark for a richer taste, but any brand works. Don’t use Dutch-process here; natural cocoa is best for the texture.
- Baking powder (1 teaspoon) — Helps the cookies puff up and create those beautiful cracks. Make sure it’s fresh—test it by dropping a little in hot water; it should bubble.
- Salt (¼ teaspoon) — Balances the sweetness and enhances the chocolate flavor. Fine sea salt is my go-to.
- Unsalted butter (½ cup, 1 stick, 113g), softened — Brings richness and tenderness. Let it sit on the counter for about 30 minutes before starting. If you’re in a rush, cut it into small cubes and microwave for 10-second bursts until soft but not melted.
- Granulated sugar (¾ cup, 150g) — Sweetens the cookies and helps create that crackly top. I’ve used organic cane sugar with great results.
- Large egg (1) — Binds everything together. Room temperature is best—place it in a bowl of warm water for 5 minutes if you forgot to take it out.
- Vanilla extract (1 teaspoon) — Adds warmth and depth. Pure vanilla extract makes a difference, but imitation works in a pinch.
- Red gel food coloring (1 tablespoon, or more to desired color) — This is the star for Valentine’s Day. I use Americolor Super Red gel. Liquid food coloring won’t give you the same vibrant color without adding too much liquid, so stick with gel.
- White vinegar (1 teaspoon) — This is the secret ingredient! It reacts with the cocoa powder to create that classic red velvet tang and helps keep the cookies tender. Don’t skip it—you won’t taste it, I promise.
- Powdered sugar (½ cup, 60g, for rolling) — Creates that signature crinkle look. Sift it first to avoid clumps on your cookies.
For substitutions: If you need a dairy-free option, use plant-based butter like Earth Balance. For a gluten-free version, replace the all-purpose flour with a 1-to-1 gluten-free baking blend. The texture will be slightly more delicate but still delicious.
Equipment Needed
You don’t need a fancy bakery setup for these cookies. Here’s what you’ll need:
- Mixing bowls (one medium, one large) — I use glass or stainless steel. Plastic can hold onto grease.
- Electric hand mixer or stand mixer — A hand mixer works perfectly. I’ve made these with a whisk before, but your arm will thank you for using a mixer.
- Measuring cups and spoons — For accuracy, especially with the flour and cocoa powder.
- Rubber spatula — For scraping down the bowl and folding in the dry ingredients.
- Baking sheet (1 or 2) — A light-colored, rimmed baking sheet works best for even baking. Dark sheets can cause the bottoms to brown too fast.
- Parchment paper or silicone baking mat — Prevents sticking and makes cleanup a breeze. I prefer parchment for these cookies.
- Small bowl — For the powdered sugar for rolling.
- Cooling rack — Lets the cookies cool evenly and keeps them from getting soggy on the bottom.
- Cookie scoop (about 1.5 tablespoons) — Ensures evenly sized cookies. If you don’t have one, use two spoons to portion the dough.
Budget-friendly tip: skip the stand mixer and use a hand mixer. And honestly, a cookie scoop is worth the few dollars it costs—it makes portioning so much faster and your cookies will bake more evenly.
Preparation Method
Alright, let’s get baking. This is straightforward, but I’ll walk you through every step so you get that perfect crinkle.
- Preheat and prep. Preheat your oven to 350°F (175°C). Line your baking sheet with parchment paper or a silicone mat. Set it aside.
- Whisk dry ingredients. In a medium bowl, whisk together the flour, cocoa powder, baking powder, and salt. Make sure there are no lumps of cocoa—those will show up as bitter spots in your cookies. Set the bowl aside.
- Cream butter and sugar. In a large bowl, beat the softened butter and granulated sugar together with your electric mixer on medium speed until light and fluffy. This takes about 2-3 minutes. You want it to look pale and a little airy. Scrape down the sides of the bowl with your spatula once during mixing.
- Add wet ingredients. Beat in the egg and vanilla extract until combined. The mixture might look a little separated at this point, and that’s okay.
- Add color and vinegar. Add the red gel food coloring and the white vinegar. Beat on low speed until the color is evenly distributed. The dough should be a vibrant red—don’t be shy with the coloring. I usually add a little more than 1 tablespoon to get that deep Valentine’s red. Scrape the bowl again.
- Combine wet and dry. Gradually add the flour mixture to the wet ingredients, mixing on low speed. Add it in two additions, mixing just until the flour disappears. Overmixing will make the cookies tough. The dough will be soft and slightly sticky—that’s exactly what you want.
- Prepare the coating. Place the powdered sugar in a small bowl. Using your cookie scoop or a spoon, portion out about 1.5 tablespoons of dough. Roll it into a ball between your palms. The dough is sticky, so lightly wet your hands if needed. Drop the dough ball into the powdered sugar and roll it around until it’s completely coated. Don’t skimp here—the sugar coating is what creates those beautiful cracks.
- Place on baking sheet. Place the sugar-coated dough balls on the prepared baking sheet, spacing them about 2 inches apart. They will spread, so give them room. I usually fit 9 cookies per standard baking sheet.
- Bake. Bake for 10-12 minutes. The cookies will look puffed and cracked, and the edges will be set but the centers will still look slightly soft. That’s the sweet spot. For softer, fudgier cookies, bake for 10 minutes. For slightly crispier edges, go for 12. My oven runs hot, so I check at 10 minutes.
- Cool. Let the cookies cool on the baking sheet for 5 minutes. This allows them to set up. Then transfer them to a cooling rack to cool completely. The cracks will become more pronounced as they cool.
Troubleshooting tip: If your cookies didn’t crack enough, it usually means the dough was too dry or the oven wasn’t hot enough. Make sure your butter is properly softened and your baking powder is fresh. Also, don’t skip the powdered sugar coating—it’s essential for the crackle effect.
Cooking Tips & Techniques
I’ve learned a few things the hard way so you don’t have to. Here are my best tips for perfect red velvet crinkle cookies every time.
Don’t overmix the dough. This is the number one mistake I see. Once you add the flour, mix just until it’s incorporated. Overmixing develops gluten, and that leads to tough, cakey cookies instead of soft, fudgy ones. I learned this the hard way when I made a batch that came out more like hockey pucks. Not ideal for Valentine’s Day.
Use gel food coloring, not liquid. Liquid food coloring will add too much moisture to the dough, which can throw off the texture and make the cookies spread too much. Gel coloring gives you that intense red color without messing with the dough consistency. I’ve used both, and the difference is night and day. Trust me on this one.
Chill if you have time, but it’s not required. This recipe works perfectly without chilling, which is why I love it for last-minute baking. However, if you have an extra 30 minutes, chilling the dough balls before baking can help them spread less and crack more dramatically. I’ve done it both ways, and honestly, the difference is subtle. Do what works for your schedule.
Bake one sheet at a time. If you’re making a double batch, resist the urge to put two sheets in the oven at once. The heat won’t circulate properly, and your cookies will bake unevenly. I know it takes longer, but the results are worth it. Your Valentine will thank you.
Check for doneness by look, not time. Ovens vary wildly. The first time I made these in my friend’s oven, they were done in 8 minutes. In my own oven, it takes 11. Look for puffed, cracked tops and set edges. The centers should still look a little soft. They’ll continue to cook on the hot baking sheet after you pull them out.
Variations & Adaptations
One of the best things about this recipe is how easily it adapts. Here are some of my favorite variations.
White Chocolate Chunk Red Velvet Cookies. Fold in ½ cup of white chocolate chips or chopped white chocolate chunks before rolling the dough balls. The creamy sweetness of white chocolate pairs beautifully with the subtle cocoa and tangy red velvet flavor. I made these for a Galentine’s brunch and they disappeared in minutes.
Vegan Red Velvet Crinkle Cookies. Use plant-based butter (like Miyoko’s or Earth Balance), a flax egg (1 tablespoon ground flaxseed mixed with 3 tablespoons water, let sit for 5 minutes), and ensure your sugar is vegan-friendly. The texture is slightly different—a bit more delicate—but the flavor is spot on. I’ve tested this version for a friend with dietary restrictions, and she said they were better than the “real” thing.
Heart-Shaped Crinkle Cookies. For an extra festive touch, roll the dough into a log, chill for 30 minutes, slice into rounds, and then gently press a small heart-shaped cookie cutter into the center of each round before baking. The powdered sugar will crack around the heart shape. It’s a little extra effort, but for Valentine’s Day, it’s totally worth it.
Spiced Red Velvet. Add ½ teaspoon of cinnamon and a pinch of nutmeg to the dry ingredients. This gives the cookies a warm, cozy flavor that’s perfect for a chilly February evening. I stumbled on this combination when I accidentally reached for the cinnamon instead of the cocoa one time. Best mistake I ever made.
Gluten-Free Version. Substitute the all-purpose flour with a 1-to-1 gluten-free baking blend that contains xanthan gum. I’ve used Bob’s Red Mill 1-to-1 Baking Flour with great results. The cookies will be slightly more tender, so handle them gently when transferring to the cooling rack.
Serving & Storage Suggestions
These cookies are best served at room temperature. The powdered sugar coating stays perfectly snowy, and the texture is at its peak—soft and fudgy on the inside with that delicate crackly exterior. I love arranging them on a pretty plate with fresh strawberries and a dusting of extra powdered sugar for a Valentine’s Day dessert board.
They pair beautifully with a glass of cold milk, a cup of hot coffee, or a rich hot chocolate. For a grown-up twist, serve them alongside a glass of red wine or a creamy stout. The chocolate notes in the cookies complement both beautifully.
Storage: Store these cookies in an airtight container at room temperature for up to 5 days. Place a slice of bread in the container to keep them soft—the cookies will absorb the moisture from the bread. It’s an old trick my grandmother taught me, and it works like a charm. Just replace the bread slice every other day.
Freezing: These cookies freeze beautifully. You can freeze the baked cookies in a single layer on a baking sheet, then transfer them to a freezer-safe bag or container for up to 3 months. Thaw at room temperature for about 30 minutes before serving.
You can also freeze the unbaked dough balls. Roll them, coat them in powdered sugar, and place them on a baking sheet in the freezer until solid. Then transfer to a freezer bag. When you’re ready to bake, place the frozen dough balls on a baking sheet and bake for an extra 2-3 minutes. Fresh cookies anytime you want them!
Flavor development: Honestly, these cookies taste even better the next day. The flavors meld together, and the texture becomes even more tender. So if you can resist eating them all on day one, you’re in for a treat on day two.
Nutritional Information & Benefits
Here’s the estimated nutritional information for one cookie (based on a batch of 18 cookies):
- Calories: 145
- Fat: 6g
- Saturated Fat: 3.5g
- Carbohydrates: 22g
- Sugar: 14g
- Protein: 2g
- Fiber: 0.5g
- Sodium: 55mg
While these are definitely a treat, they do offer a few small benefits. Cocoa powder is rich in antioxidants, particularly flavonoids, which are known to support heart health. That’s right—these Valentine’s cookies are practically a health food! (Okay, maybe not, but it’s nice to know there’s a little something good in there.)
The butter provides a small amount of vitamin A, and the egg adds protein. If you’re looking to lighten them up, you can reduce the sugar by a couple of tablespoons without affecting the texture too much, though the crinkle effect might be slightly less dramatic.
These cookies are not gluten-free, dairy-free, or vegan as written, but as I mentioned in the variations section, they can be adapted. They do contain dairy (butter) and eggs, so keep that in mind for any allergies.
From my perspective, these cookies are about joy, not nutrition. They’re for celebrating love, sharing with friends, and treating yourself. And honestly, a little bit of joy is good for your health too.
FAQs
Why didn’t my cookies crack?
The most common reason is that the dough was too dry. Make sure your butter is properly softened and you’re measuring your flour correctly—spoon it into the measuring cup and level it off. Also, make sure your baking powder is fresh. And don’t skimp on the powdered sugar coating; that’s what creates the cracks.
Can I use liquid food coloring instead of gel?
You can, but I don’t recommend it. Liquid food coloring adds extra moisture to the dough, which can make the cookies spread too much and affect the texture. Gel food coloring gives you a much more vibrant color without changing the dough consistency. I’ve tried both, and gel is definitely the way to go.
Can I make these cookies ahead of time?
Absolutely! You can bake them up to 5 days in advance and store them in an airtight container at room temperature. They actually taste even better the next day. You can also freeze the baked cookies or the unbaked dough balls for up to 3 months.
Why do I need vinegar in red velvet cookies?
The vinegar reacts with the cocoa powder to enhance the red color and create that classic red velvet tang. It also helps tenderize the gluten in the flour, making the cookies softer. Don’t worry—you won’t taste it at all. It’s a little trick that makes a big difference.
Can I double this recipe?
Yes, this recipe doubles beautifully. Just make sure you have enough baking sheets to avoid overcrowding. Bake one sheet at a time for the best results. If you’re making a double batch, you might want to invest in a second cookie scoop to speed things up.
Conclusion
These Valentine’s Day Red Velvet Crinkle Cookies are everything I want in a holiday treat—beautiful, delicious, and surprisingly simple. They came from a moment of panic, but they’ve become a tradition I look forward to every single year. That first bite, with the crackly powdered sugar top giving way to that soft, fudgy, red velvet center, never gets old.
I hope you’ll make these for someone you love this Valentine’s Day. Or, honestly, for yourself on a random Tuesday. They’re that good. Don’t be afraid to make them your own—add white chocolate chips, play with the spice level, or shape them into hearts. The best recipes are the ones you make your own.
I’d love to hear how yours turn out! Drop a comment below and let me know if you tried any variations or if these cookies stole the show at your Valentine’s celebration. And if you loved them, share the recipe with a friend. After all, cookies are meant to be shared. Happy baking, and Happy Valentine’s Day!
Pin This Recipe!

The Best Valentine’s Red Velvet Crinkle Cookies Recipe

These red velvet crinkle cookies are soft, fudgy, and perfectly festive for Valentine’s Day. Made with simple ingredients and no chilling required, they come together in about 30 minutes for a crowd-pleasing treat.
- Prep Time: 15 minutes
- Cook Time: 12 minutes
- Total Time: 27 minutes
- Yield: 18 cookies 1x
- Category: Dessert
- Cuisine: American
Ingredients
- 1 ½ cups (190g) all-purpose flour
- ¼ cup (20g) unsweetened cocoa powder
- 1 teaspoon baking powder
- ¼ teaspoon salt
- ½ cup (1 stick, 113g) unsalted butter, softened
- ¾ cup (150g) granulated sugar
- 1 large egg
- 1 teaspoon vanilla extract
- 1 tablespoon red gel food coloring (or more to desired color)
- 1 teaspoon white vinegar
- ½ cup (60g) powdered sugar, for rolling
Instructions
- Preheat your oven to 350°F (175°C). Line a baking sheet with parchment paper or a silicone mat.
- In a medium bowl, whisk together the flour, cocoa powder, baking powder, and salt until no lumps remain.
- In a large bowl, beat the softened butter and granulated sugar with an electric mixer on medium speed until light and fluffy, about 2-3 minutes. Scrape down the sides of the bowl.
- Beat in the egg and vanilla extract until combined.
- Add the red gel food coloring and white vinegar. Beat on low speed until the color is evenly distributed. Scrape the bowl again.
- Gradually add the flour mixture to the wet ingredients in two additions, mixing on low speed just until the flour disappears. Do not overmix. The dough will be soft and slightly sticky.
- Place the powdered sugar in a small bowl. Using a cookie scoop or spoon, portion out about 1.5 tablespoons of dough. Roll into a ball between your palms. Drop the dough ball into the powdered sugar and roll until completely coated.
- Place the sugar-coated dough balls on the prepared baking sheet, spacing them about 2 inches apart.
- Bake for 10-12 minutes. The cookies will look puffed and cracked, with set edges and slightly soft centers.
- Let the cookies cool on the baking sheet for 5 minutes, then transfer to a cooling rack to cool completely.
Notes
For best results, use gel food coloring instead of liquid to avoid adding extra moisture. If you have time, chilling the dough balls for 30 minutes before baking can help them spread less and crack more dramatically. Store in an airtight container at room temperature for up to 5 days. These cookies freeze well for up to 3 months.
Nutrition
- Serving Size: 1 cookie
- Calories: 145
- Sugar: 14
- Sodium: 55
- Fat: 6
- Saturated Fat: 3.5
- Carbohydrates: 22
- Fiber: 0.5
- Protein: 2
Keywords: red velvet crinkle cookies, Valentine's Day cookies, easy cookie recipe, red velvet dessert, crinkle cookies