I was standing in line at the post office—of all places—when the woman ahead of me, clutching a stack of shipping boxes and a single cookie tin, turned around and said, “You look like someone who bakes. Take this.” I barely had time to process what was happening before she pressed the tin into my hands, explaining that her grandmother had been a mail carrier for thirty years and had developed a whole philosophy around cookies that could survive a delivery truck. “They have to be sturdy,” she said, “but still soft enough that somebody feels loved when they open the package.” And then she was gone, leaving me holding a dented tin full of the most perfect peanut butter blossom cookies I had ever seen.
Now, I don’t normally accept baked goods from strangers at government buildings, but honestly, the smell coming through that tin was undeniable. I opened it right there in the parking lot, and let me tell you—the combination of soft, peanut buttery cookie and that dark chocolate star pressed into the center hit me like a memory I didn’t even know I had. I mean, I’ve made peanut butter blossoms before. We all have. But these were different. The chocolate wasn’t just a Hershey’s Kiss—it was a dark chocolate star, and it made everything feel a little more special, a little more intentional.
I spent the next week trying to recreate that cookie, texting the post office lady’s daughter (yes, I tracked her down) for clarification on a few details. She laughed and said her grandmother had been “not exactly precise with measurements,” which explained the three different attempts I made before getting it right. But once I did? These became the cookie I bring to every school bake sale, every holiday gathering, every Tuesday that just needs a little something sweet. If you’ve ever had a peanut butter blossom cookie that was dry or crumbly, I promise—this version is different.
Why You’ll Love This Recipe
Let’s be honest—finding a cookie that pleases both your picky five-year-old and your in-laws who claim they “don’t really eat sweets” is no small feat. These peanut butter blossom cookies with dark chocolate stars somehow manage to bridge that gap. Here’s why they work so well for busy families:
- Simple Pantry Ingredients – You probably already have peanut butter, butter, sugar, flour, and eggs in your kitchen. No fancy extracts or expensive add-ins required. The dark chocolate stars are easy to find at most grocery stores, but you can also use regular chocolate kisses if that’s what you have on hand.
- Comes Together in Under 30 Minutes – From mixing to baking, you can have a full batch done in about 25 minutes. That’s faster than ordering takeout in some neighborhoods, and way more satisfying.
- Kids Can Help Make Them – Rolling the dough into balls and pressing the chocolate stars into the warm cookies is the kind of hands-on task that even toddlers can manage (with supervision, obviously). My youngest loves being the official “star presser.”
- Perfect for Packed Lunches and Bake Sales – These cookies hold up beautifully in lunchboxes. They don’t crumble apart, the chocolate stays put, and they taste just as good at room temperature the next day.
- Crowd-Pleasing Flavor Combo – The salty-sweet peanut butter dough paired with rich, slightly bitter dark chocolate is a match made in cookie heaven. Even people who claim they don’t like dark chocolate have been converted by these.
What makes this recipe different from the dozens of other peanut butter blossom recipes out there? For starters, the ratio of peanut butter to butter is carefully balanced so the cookies stay soft without spreading too thin. And the dark chocolate stars? They add a sophistication that plain milk chocolate kisses just can’t match. It’s the kind of cookie that makes you close your eyes after the first bite—comfort food, but elevated just enough to feel special.
What Ingredients You Will Need
This recipe uses simple, everyday ingredients to create something genuinely memorable. Most of these are pantry staples, which means you can whip up a batch without a last-minute trip to the store. Here’s what you’ll need and why each one matters:
- 1 cup (250 g) creamy peanut butter – I recommend using a standard brand like Jif or Skippy for the best texture. Natural peanut butter that separates can make the cookies greasy and crumbly. The creamy style gives you that smooth, uniform dough that holds together perfectly.
- 1/2 cup (113 g) unsalted butter, softened – Butter adds richness and helps the cookies spread just the right amount. If you only have salted butter, reduce the added salt to 1/4 teaspoon.
- 1/2 cup (100 g) granulated sugar – This provides sweetness and structure. You’ll also need extra sugar for rolling the dough balls, so set aside about 1/4 cup in a shallow bowl.
- 1/2 cup (110 g) packed light brown sugar – Brown sugar adds moisture and a subtle molasses flavor that deepens the peanut butter taste. Don’t skip it—the cookies won’t be as soft without it.
- 1 large egg – The egg binds everything together and gives the cookies structure. Make sure it’s at room temperature so it incorporates smoothly into the creamed butter and sugars.
- 1 teaspoon vanilla extract – Pure vanilla extract adds warmth and rounds out the flavors. Imitation vanilla works in a pinch, but pure is noticeably better here.
- 1 1/2 cups (190 g) all-purpose flour – Standard all-purpose flour gives these cookies the perfect texture—not too cakey, not too dense. Spoon and level your flour for accuracy; scooping directly from the bag can pack in too much.
- 1 teaspoon baking soda – This helps the cookies rise slightly and stay tender. Make sure your baking soda isn’t expired, or the cookies won’t spread properly.
- 1/2 teaspoon salt – Salt balances the sweetness and enhances the peanut butter flavor. If you used salted butter, reduce this to 1/4 teaspoon.
- 36 to 40 dark chocolate stars – These are the showstoppers. You can find dark chocolate stars in the baking aisle near the chocolate chips, or order them online. If you can’t find stars, dark chocolate kisses or even chocolate chunks work beautifully.
Ingredient Selection Tip: For the best texture, look for peanut butter that has a consistent, non-greasy texture. I’ve tested this with both regular and natural peanut butter, and the natural version produced cookies that spread too much and crumbled easily. Stick with the creamy processed kind for reliable results every time.
Equipment Needed
You don’t need a fancy kitchen to make these cookies. Here’s what you’ll need:
- Electric mixer – A stand mixer or hand mixer works great for creaming the butter and sugars. You can do it by hand with a wooden spoon, but it takes some elbow grease to get the mixture light and fluffy.
- Large mixing bowl – Any medium-to-large bowl will do. I prefer glass or stainless steel because they don’t retain odors.
- Measuring cups and spoons – Accurate measurements matter in baking. Use dry measuring cups for the flour and sugars, and liquid measuring cups for the vanilla.
- Baking sheets – Two standard 13×18-inch baking sheets work well. Line them with parchment paper or silicone baking mats for easy cleanup.
- Cookie scoop or tablespoon – A 1.5-tablespoon cookie scoop makes perfectly uniform dough balls. If you don’t have one, a regular tablespoon works fine.
- Shallow bowl for rolling sugar – Any small bowl will do for the granulated sugar you’ll roll the dough balls in.
- Cooling rack – A wire rack allows the cookies to cool evenly after baking, which keeps the bottoms from getting soggy.
Budget-Friendly Alternative: If you don’t have a cookie scoop, just use two spoons to portion the dough. It takes a little longer, but the cookies will taste just as good. And if you don’t have a cooling rack, a clean kitchen towel laid flat works in a pinch—just flip the cookies halfway through cooling.
Preparation Method
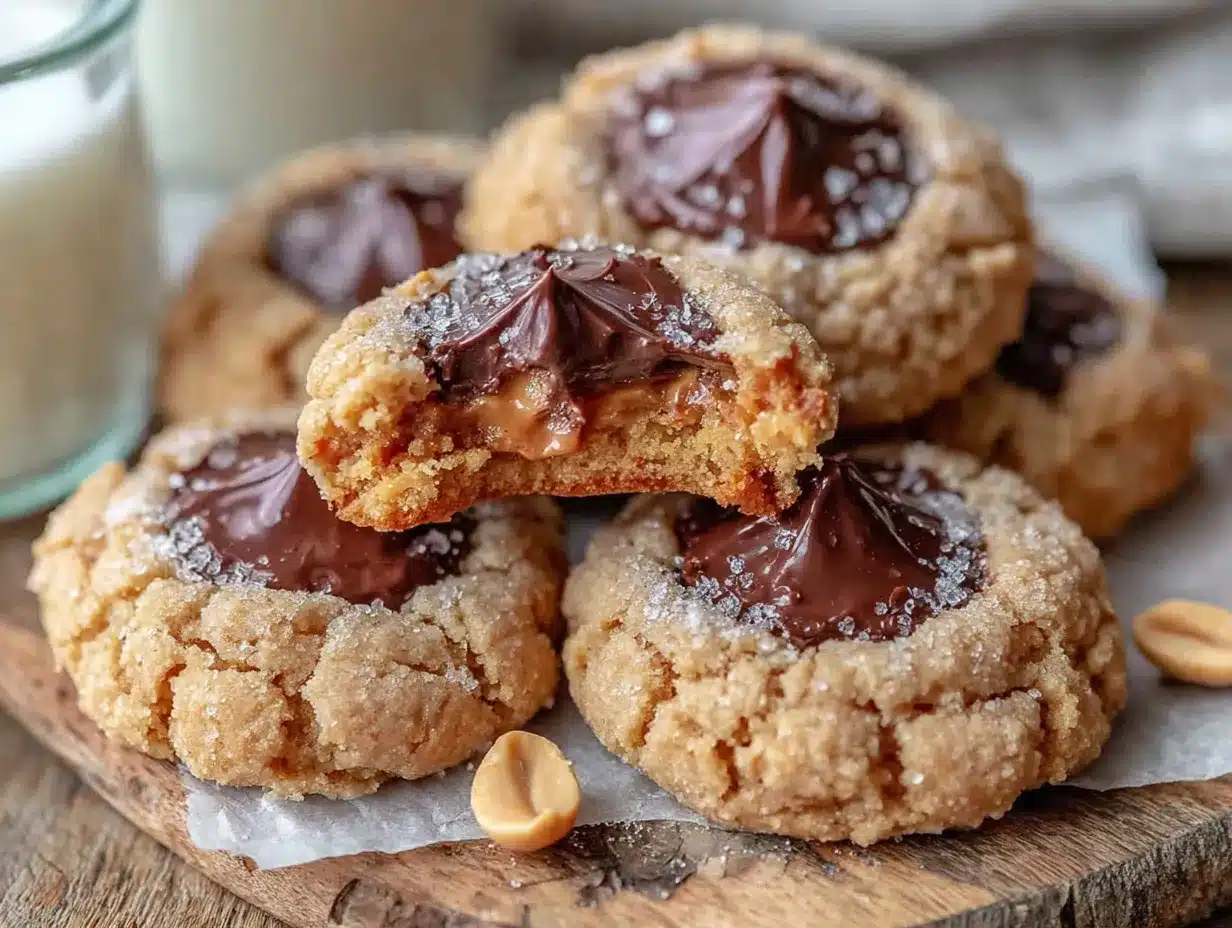
Follow these steps carefully, and you’ll have a batch of perfect peanut butter blossom cookies in about 25 minutes. Trust me on the order of things—it matters.
- Preheat your oven to 375°F (190°C). Line two baking sheets with parchment paper or silicone baking mats. This prevents sticking and makes cleanup a breeze.
- Cream the butter and sugars. In a large mixing bowl, beat the softened butter, granulated sugar, and brown sugar together on medium speed until light and fluffy—about 2 to 3 minutes. Scrape down the sides of the bowl halfway through. The mixture should look pale and slightly airy.
- Add the peanut butter, egg, and vanilla. Beat in the peanut butter until fully combined, then add the egg and vanilla extract. Mix on low speed until everything is incorporated. Don’t overmix at this stage—just until you don’t see any streaks of egg.
- Combine the dry ingredients. In a separate small bowl, whisk together the flour, baking soda, and salt. This ensures the baking soda is evenly distributed throughout the dough.
- Add the dry ingredients to the wet mixture. Gradually add the flour mixture to the peanut butter mixture, mixing on low speed. Stop as soon as the flour disappears—overmixing here will make the cookies tough. The dough should be soft but not sticky.
- Chill the dough (optional but recommended). If your kitchen is warm or your butter was very soft, pop the dough in the refrigerator for 15 minutes. This prevents the cookies from spreading too much during baking. I’ve skipped this step many times and still gotten good results, but chilling makes them more consistent.
- Roll the dough balls. Using a 1.5-tablespoon cookie scoop or your hands, portion the dough into 1-inch balls. Roll each ball between your palms until smooth. Place the granulated sugar for rolling in a shallow bowl, and roll each dough ball in the sugar until fully coated.
- Arrange on baking sheets. Place the sugared dough balls about 2 inches apart on the prepared baking sheets. They will spread slightly, so give them room.
- Bake for 8 to 10 minutes. Bake one sheet at a time in the center of the oven. The cookies are done when the edges are set and lightly golden, but the centers still look slightly soft and puffy. They will continue to set as they cool.
- Press in the chocolate stars immediately. As soon as the cookies come out of the oven, gently press a dark chocolate star into the center of each cookie. Press firmly enough that the star stays put, but not so hard that the cookie cracks. The heat from the cookie will soften the chocolate slightly, creating that perfect seal.
- Cool on the baking sheet for 5 minutes. Let the cookies rest on the hot baking sheet for about 5 minutes. This allows the chocolate to set slightly and the cookies to firm up enough to transfer.
- Transfer to a wire rack to cool completely. Use a spatula to move the cookies to a cooling rack. Let them cool completely before storing—about 20 minutes. The chocolate will be fully set by then.
Sensory Cue: When the cookies are done, your kitchen will smell like toasted peanut butter and warm chocolate. The edges should look set and slightly golden, while the centers remain pale and soft. If you gently touch the top of a cookie, it should feel firm but give slightly under pressure.
Cooking Tips & Techniques
I’ve made these peanut butter blossom cookies more times than I can count, and I’ve learned a few things the hard way. Here are my best tips for getting them right every time:
- Don’t overbake. This is the most common mistake I see. The cookies will look underdone when you pull them out of the oven, but that’s exactly what you want. They continue to bake on the hot baking sheet as they cool. If you wait until they look fully golden, they’ll be dry and crumbly.
- Use room-temperature ingredients. Cold butter won’t cream properly with the sugars, and a cold egg can cause the dough to seize up. Let your butter and egg sit on the counter for about 30 minutes before you start baking.
- Press the chocolate stars in while the cookies are hot. If you wait too long, the cookies will cool and the chocolate won’t stick. I usually press the stars in as soon as the baking sheet comes out of the oven, working quickly before the cookies start to set.
- Rotate your baking sheet halfway through. If your oven has hot spots, rotate the sheet 180 degrees after 4 to 5 minutes of baking. This ensures even browning.
- Let the cookies cool completely before storing. Warm cookies in an airtight container will release steam and become soggy. Give them at least 20 minutes on a wire rack before moving them to a storage container.
Personal Failure Story: The first time I made these, I used natural peanut butter because it’s what I had in the pantry. The cookies spread into flat, greasy discs that looked nothing like the beautiful blossoms I was aiming for. I was so disappointed that I almost gave up on the recipe entirely. But I tried again with creamy processed peanut butter, and the difference was night and day. So learn from my mistake—save the natural peanut butter for your toast and use the good stuff for baking.
Variations & Adaptations
One of the best things about this recipe is how easily it adapts to different tastes and dietary needs. Here are a few variations I’ve tried and loved:
- Gluten-Free Version: Substitute the all-purpose flour with a 1:1 gluten-free baking flour blend. I’ve tested this with Bob’s Red Mill and King Arthur brands, and both worked beautifully. The cookies are slightly more delicate, so handle them gently when pressing in the chocolate stars.
- Milk Chocolate Swap: If your family prefers milk chocolate, use milk chocolate stars or kisses instead of dark chocolate. The cookies will be sweeter, but just as delicious. My kids actually prefer this version.
- Add Some Crunch: For extra texture, stir 1/2 cup of chopped peanuts or mini chocolate chips into the dough before rolling. This adds a nice crunch that contrasts with the soft cookie and smooth chocolate star.
- Holiday Twist: Use seasonal chocolate shapes instead of stars—pumpkins for fall, hearts for Valentine’s Day, or trees for Christmas. The cookie base stays the same, so you can switch up the look for any occasion.
- Lower Sugar Option: Reduce the granulated sugar to 1/4 cup and the brown sugar to 1/4 cup. The cookies will be less sweet, but the dark chocolate stars will provide enough sweetness to balance the peanut butter flavor.
Personal Variation I Love: I once made a batch with a teaspoon of cinnamon added to the flour mixture, and it was surprisingly good. The warmth of the cinnamon paired beautifully with the peanut butter and dark chocolate. It’s not something I do every time, but when I want a little something different, it’s my go-to twist.
Serving & Storage Suggestions
These cookies are best served at room temperature, which means you can make them ahead of time and not worry about reheating. Here’s how to serve and store them for maximum freshness:
- Serving Temperature: Serve the cookies at room temperature. The chocolate stars should be firm but not hard, and the cookies should be soft and tender. If you’ve stored them in the refrigerator, let them sit out for about 10 minutes before serving.
- Presentation Ideas: Arrange the cookies on a simple white platter to let the dark chocolate stars stand out. For a bake sale or holiday party, stack them in a decorative tin lined with parchment paper. The stars add a beautiful visual element that makes them look professionally made.
- Complementary Pairings: These cookies are wonderful with a cold glass of milk, a hot cup of coffee, or a warm mug of hot chocolate. For a grown-up twist, serve them alongside a glass of bourbon or a dark stout beer—the flavors complement each other beautifully.
- Storage Instructions: Store the cookies in an airtight container at room temperature for up to 5 days. Layer them between sheets of parchment paper to prevent the chocolate stars from sticking together. Do not refrigerate them unless your kitchen is very warm—the cold can make the cookies dry out faster.
- Freezing Tips: These cookies freeze exceptionally well. Place the cooled cookies in a single layer in a freezer-safe container, separating layers with parchment paper. They will keep for up to 3 months. To thaw, let them sit at room temperature for about 30 minutes. The chocolate stars may develop a slight bloom (white spots) after freezing, but they’ll still taste perfect.
Flavor Development Note: These cookies actually taste better the day after baking. The flavors meld together overnight, and the texture becomes even softer. So don’t be afraid to make them a day ahead—they’ll be even more delicious.
Nutritional Information & Benefits
While these peanut butter blossom cookies are definitely a treat, they do offer some nutritional benefits worth noting. Here’s an approximate breakdown per cookie (based on 36 cookies):
- Calories: 145
- Total Fat: 8g
- Saturated Fat: 3.5g
- Carbohydrates: 17g
- Sugar: 11g
- Protein: 3g
- Fiber: 1g
- Sodium: 95mg
Health Highlights: Peanut butter provides a good source of protein and healthy monounsaturated fats, which can help keep you feeling full and satisfied. Dark chocolate is rich in antioxidants called flavonoids, which have been linked to heart health benefits. While these cookies are still a sugary indulgence, they offer a bit more nutritional value than a plain sugar cookie.
Dietary Considerations: This recipe contains peanuts, wheat (gluten), dairy, and eggs. For a nut-free version, substitute sunflower seed butter for the peanut butter. For a dairy-free option, use vegan butter and dairy-free chocolate stars. Always check your ingredient labels if you’re cooking for someone with allergies.
Conclusion
I still think about that day at the post office sometimes—how a stranger’s grandmother’s recipe ended up becoming one of my family’s most-requested cookies. It’s funny how the best recipes often come from the most unexpected places. These peanut butter blossom cookies with dark chocolate stars have earned a permanent spot in my baking rotation, and I have a feeling they’ll earn one in yours too.
What I love most about this recipe is how adaptable it is. You can make them exactly as written, or you can tweak them to suit your family’s tastes—swap the chocolate, add some nuts, or go gluten-free. The base recipe is forgiving enough that even beginner bakers get great results. And honestly, there’s something deeply satisfying about pulling a tray of these out of the oven, pressing those chocolate stars into the warm centers, and watching them disappear within minutes.
So go ahead—give these a try. Make a batch for your next family movie night, your kid’s classroom party, or just because it’s Tuesday and you deserve something sweet. And when you do, come back and let me know how they turned out. Did your kids love pressing in the stars? Did you try a fun variation? I’d love to hear about it in the comments below. Happy baking!
Frequently Asked Questions
Can I use natural peanut butter for these cookies?
I don’t recommend it. Natural peanut butter that separates can make the cookies greasy and cause them to spread too much. Stick with creamy processed peanut butter like Jif or Skippy for the best texture and consistency.
Can I freeze the dough instead of baking all the cookies at once?
Absolutely. Roll the dough into balls, coat them in sugar, and place them on a baking sheet in the freezer until solid. Transfer the frozen dough balls to a freezer bag and store for up to 3 months. Bake directly from frozen, adding 1 to 2 minutes to the baking time.
Why did my cookies spread too much?
This usually happens for one of three reasons: your butter was too soft or melted, your dough wasn’t chilled before baking, or you used natural peanut butter. Make sure your butter is softened but not melted, and chill the dough for 15 minutes if your kitchen is warm.
Can I use chocolate kisses instead of dark chocolate stars?
Yes, you can use any chocolate candy that’s roughly the same size. Dark chocolate kisses, milk chocolate stars, or even chocolate chunks work well. Just make sure to press them into the warm cookies immediately after baking.
How do I keep the chocolate stars from melting too much?
Press the stars into the cookies gently—just enough to secure them without pushing them all the way into the hot dough. If the stars start to melt and lose their shape, let the cookies cool on the baking sheet for an extra minute before pressing them in. The slightly cooler surface will prevent excessive melting.
Pin This Recipe!

Easy Peanut Butter Blossom Cookies with Dark Chocolate Stars

Soft, peanut buttery cookies topped with a dark chocolate star that melts perfectly into the center. These crowd-pleasing treats come together in under 30 minutes and are sturdy enough for lunchboxes and bake sales.
- Prep Time: 15 minutes
- Cook Time: 10 minutes
- Total Time: 25 minutes
- Yield: 36 to 40 cookies 1x
- Category: Dessert
- Cuisine: American
Ingredients
- 1 cup (250 g) creamy peanut butter (e.g., Jif or Skippy)
- 1/2 cup (113 g) unsalted butter, softened
- 1/2 cup (100 g) granulated sugar (plus extra for rolling)
- 1/2 cup (110 g) packed light brown sugar
- 1 large egg, at room temperature
- 1 teaspoon vanilla extract
- 1 1/2 cups (190 g) all-purpose flour, spooned and leveled
- 1 teaspoon baking soda
- 1/2 teaspoon salt (reduce to 1/4 teaspoon if using salted butter)
- 36 to 40 dark chocolate stars
Instructions
- Preheat your oven to 375°F (190°C). Line two baking sheets with parchment paper or silicone baking mats.
- In a large mixing bowl, beat the softened butter, granulated sugar, and brown sugar together on medium speed until light and fluffy, about 2 to 3 minutes. Scrape down the sides of the bowl halfway through.
- Beat in the peanut butter until fully combined, then add the egg and vanilla extract. Mix on low speed until just incorporated.
- In a separate small bowl, whisk together the flour, baking soda, and salt.
- Gradually add the flour mixture to the peanut butter mixture, mixing on low speed until the flour disappears. The dough should be soft but not sticky.
- If your kitchen is warm or your butter was very soft, chill the dough in the refrigerator for 15 minutes (optional but recommended).
- Using a 1.5-tablespoon cookie scoop or your hands, portion the dough into 1-inch balls. Roll each ball between your palms until smooth. Roll each dough ball in granulated sugar until fully coated.
- Place the sugared dough balls about 2 inches apart on the prepared baking sheets.
- Bake one sheet at a time in the center of the oven for 8 to 10 minutes, until the edges are set and lightly golden but the centers still look slightly soft and puffy.
- Immediately after removing from the oven, gently press a dark chocolate star into the center of each cookie. Press firmly enough that the star stays put, but not so hard that the cookie cracks.
- Let the cookies rest on the hot baking sheet for 5 minutes.
- Transfer to a wire rack to cool completely, about 20 minutes.
Notes
For best results, use creamy processed peanut butter (not natural). The cookies will look underdone when you pull them out—they continue to bake on the hot sheet. Press chocolate stars in while cookies are hot. Store in an airtight container at room temperature for up to 5 days. Freeze for up to 3 months.
Nutrition
- Serving Size: 1 cookie
- Calories: 145
- Sugar: 11
- Sodium: 95
- Fat: 8
- Saturated Fat: 3.5
- Carbohydrates: 17
- Fiber: 1
- Protein: 3
Keywords: peanut butter blossom cookies, dark chocolate stars, easy cookie recipe, bake sale cookies, peanut butter cookies


