This was supposed to be a pumpkin cheesecake. I had the cans of pumpkin puree lined up on the counter, the cream cheese softening on the counter, and my grandmother’s springform pan ready to go. It was the Tuesday before Thanksgiving, and I was feeling smugly ahead of schedule. Then I opened the pantry and realized I had exactly zero cans of pumpkin. Not one. I must have used them in a different recipe and never restocked. So I stood there, staring at the gingersnap cookies meant for the crust, the bottle of eggnog I bought on a whim, and a rapidly softening block of cream cheese. I had about thirty minutes before I needed to start the turkey brine, and I was already annoyed at myself. I almost just shut the pantry door and ordered pizza. But I grabbed the eggnog instead, figured I’d make something up, and hoped for the best. What came out was nothing like the plan — and better.
That first bite was genuinely confusing. I was expecting something heavy, maybe too sweet, or just weird. But the tangy cream cheese, the warm spices from the eggnog, and that crunchy, buttery gingersnap crust came together in a way that made me stop chewing and just sit there for a second. Honestly, I think I said, “Wait, what?” out loud to an empty kitchen. It wasn’t a compromise dessert. It was the dessert I should have been making all along. The texture was silky, not dense, and the flavor hit all those cozy holiday notes without screaming “PUMPKIN” at you. I brought it to Thanksgiving anyway, just as a backup, and it disappeared faster than the pecan pie. My aunt asked for the recipe three times. I kept saying, “It was an accident,” and she kept saying, “I don’t care.”
Maybe you’ve been there — you’re missing a key ingredient, the clock is ticking, and you have to make a call. You can give up, or you can just try something different and see what happens. This is what happens. This easy eggnog cheesecake with gingersnap crust is now the only holiday cheesecake I make. It’s not a second-best option. It’s the one I actually look forward to. And the best part? It’s genuinely simple. No water bath, no complicated steps, no stressing over cracks. It comes together fast, looks beautiful on a table, and tastes like you spent hours on it. Let me tell you, that kind of win feels really good.
Why You’ll Love This Easy Eggnog Cheesecake
I’ve tested this recipe more times than I care to admit, tweaking the ratios, trying different cream cheese brands, and even experimenting with homemade versus store-bought eggnog. The version I’m sharing with you is the one that works every single time. It’s been family-approved, neighbor-tested, and even survived a toddler’s birthday party without a single complaint. Here’s why it’s a keeper:
- Quick & Easy: This cheesecake comes together in about 20 minutes of active prep time. The oven does the rest. Perfect for a busy weeknight when you still want a showstopper dessert for a holiday gathering or just because it’s Tuesday.
- Simple Ingredients: You likely have most of these in your kitchen already. Cream cheese, eggs, sugar, vanilla — and the eggnog and gingersnaps are easy to find at any grocery store during the holidays. No fancy shopping trips required.
- Perfect for the Holidays: This is the dessert that bridges the gap between a classic pumpkin pie and a rich cheesecake. It’s festive without being fussy, and it pairs beautifully with coffee, tea, or a glass of something bubbly.
- Crowd-Pleaser: I’ve served this at Thanksgiving, Christmas Eve, and a casual New Year’s brunch. It gets rave reviews from everyone — the kids who love the cookie crust, the adults who appreciate the sophisticated flavor, and even the relatives who claim they “don’t really like cheesecake.”
- Unbelievably Delicious: The texture is the real star here. It’s creamy and dense but not heavy, with a subtle spiced flavor from the eggnog that’s perfectly balanced by the tangy cream cheese. The gingersnap crust adds a warm, molasses-y crunch that makes every bite interesting.
What makes this recipe different from all the other eggnog cheesecakes out there? It’s the ratio. A lot of recipes use too much eggnog, which makes the filling watery and prone to cracking. I spent a few frustrating batches learning that lesson. This version uses just the right amount — enough to infuse the cheesecake with that classic holiday flavor without compromising its structure. It’s also incredibly forgiving. You don’t need a water bath. You don’t need to worry about over-mixing. You just need to follow a few simple steps, and you’ll get a perfect cheesecake every time. It’s comfort food reimagined — faster, easier, but with the same soul-soothing satisfaction that makes a homemade dessert feel special.
Ingredients You Will Need
This recipe uses simple, wholesome ingredients to deliver bold flavor and satisfying texture without the fuss. Most of these are pantry staples during the holiday season, and the few that aren’t are easy to find. Let’s break down what you’ll need and why each ingredient matters.
For the Gingersnap Crust
- 2 cups (about 200g) gingersnap cookie crumbs — I recommend using store-bought gingersnaps for convenience. Nabisco’s “Old-Fashioned” Gingersnaps are my go-to because they have a strong molasses and ginger flavor that stands up to the creamy filling. You can crush them in a food processor or place them in a zip-top bag and crush them with a rolling pin. Both methods work fine.
- 5 tablespoons (70g) unsalted butter, melted — The butter binds the crumbs together and adds richness. Use unsalted butter so you can control the salt level. If you only have salted butter, reduce the added salt in the crust by a pinch.
- 2 tablespoons (25g) granulated sugar — Just a touch of sweetness to balance the spicy cookies. You can skip this if your gingersnaps are already very sweet, but I find the extra sugar helps the crust caramelize slightly during baking.
- 1/4 teaspoon ground cinnamon — This is optional, but I love adding a little extra warmth to the crust. It complements the gingersnaps and the eggnog filling beautifully.
For the Eggnog Cheesecake Filling
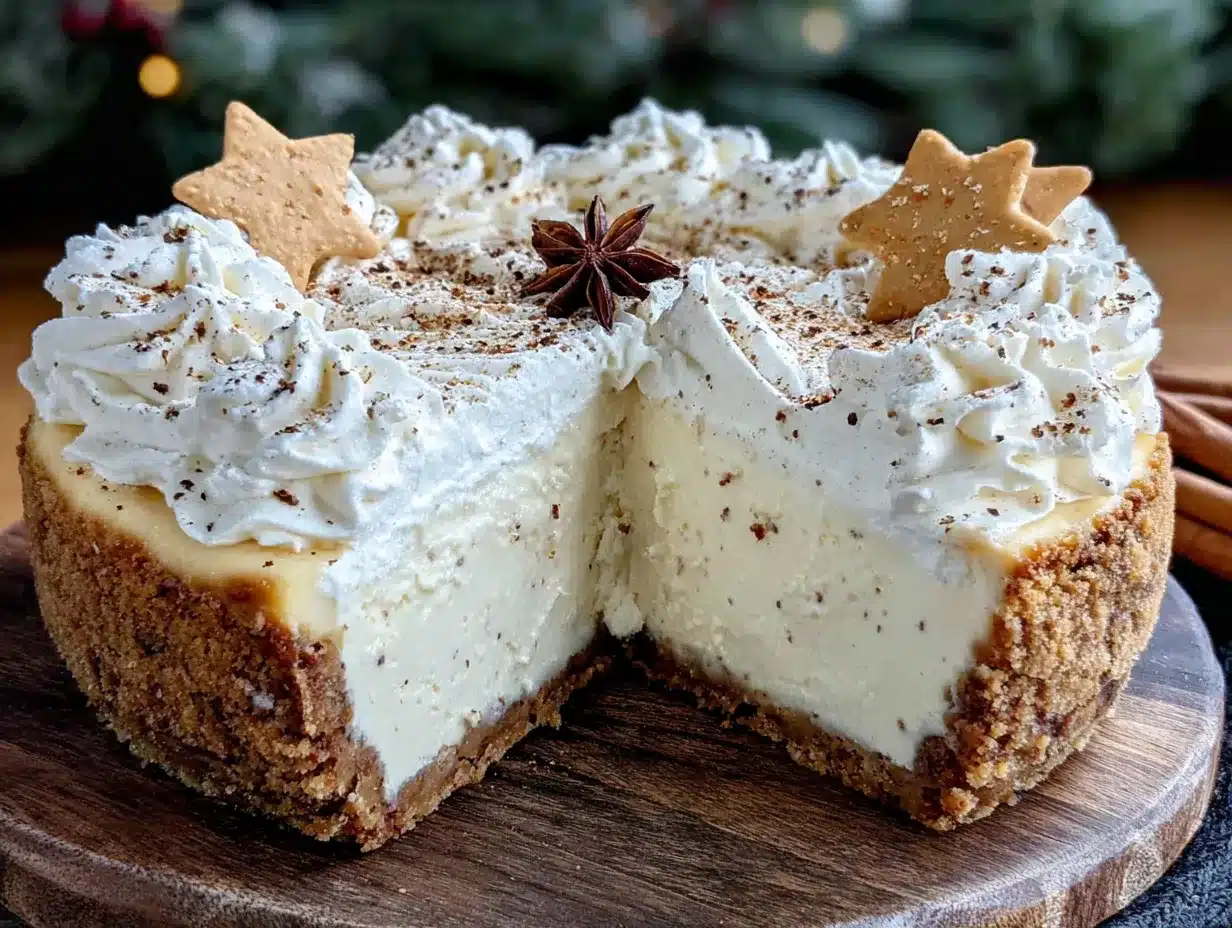
- 32 ounces (about 900g) cream cheese, softened to room temperature — This is non-negotiable. Cold cream cheese will leave you with a lumpy filling. I always use full-fat Philadelphia cream cheese for the best texture and flavor. Let it sit on the counter for at least an hour before you start. If you’re in a hurry, you can cut it into cubes and microwave it in 10-second bursts, but be careful not to melt it.
- 1 cup (200g) granulated sugar — Standard white sugar works perfectly here. It dissolves easily and doesn’t compete with the eggnog flavor.
- 3 large eggs, room temperature — Room temperature eggs incorporate more easily into the batter, creating a smoother texture. Place them in a bowl of warm water for 5 minutes if you forgot to take them out ahead of time.
- 1 1/4 cups (about 300ml) eggnog — Use the full-fat, classic eggnog for the richest flavor. I don’t recommend light or low-fat eggnog here, as it has a thinner consistency and less flavor. My favorite brand is Hood, but any good-quality eggnog will work. Shake the carton well before measuring.
- 1 teaspoon vanilla extract — Pure vanilla extract adds depth and rounds out the flavors. Avoid imitation vanilla if you can.
- 1/4 cup (30g) all-purpose flour — This helps stabilize the filling and prevents cracking. It’s a small amount, but it makes a big difference. You can substitute cornstarch if you’re gluten-sensitive.
- 1/4 teaspoon ground nutmeg, plus more for garnish — Freshly grated nutmeg is a game-changer here. It has a much more aromatic, complex flavor than pre-ground. If you only have pre-ground, it will still work, but try to get a whole nutmeg and grate it yourself if you can. It’s worth the extra 30 seconds.
- 1/4 teaspoon salt — A little salt enhances all the other flavors and balances the sweetness. Don’t skip it.
Equipment Needed
- 9-inch springform pan — This is essential for easy removal. A regular cake pan will make it very difficult to get the cheesecake out in one piece. I’ve learned this the hard way.
- Electric hand mixer or stand mixer — You need a mixer to get the cream cheese smooth and fluffy. A whisk and a strong arm might work, but it will take forever and you’ll probably end up with lumps.
- Large mixing bowls — One for the crust, one for the filling.
- Measuring cups and spoons — Accuracy matters in baking, even for a forgiving recipe like this.
- Rubber spatula — For scraping down the sides of the bowl and making sure everything is evenly mixed.
- Food processor or zip-top bag and rolling pin — To crush the gingersnaps. A food processor is faster, but the bag-and-rolling-pin method works just fine and requires less cleanup.
- Baking sheet — Place the springform pan on a baking sheet to catch any potential drips from the butter in the crust. Trust me, it’s better to be safe.
- Cooling rack — For cooling the cheesecake evenly.
Preparation Method
- Preheat your oven to 325°F (160°C). Position a rack in the center of the oven. While the oven is heating, start on the crust. I like to do this first so the crust can chill slightly while I make the filling.
- Make the crust: In a medium bowl, combine the gingersnap crumbs, melted butter, sugar, and cinnamon. Stir with a fork until the mixture looks like wet sand and all the crumbs are evenly coated. It should hold together when you squeeze a handful. If it seems too dry, add another tablespoon of melted butter. If it’s too wet, add a few more crumbs.
- Press the crust into the pan: Pour the crumb mixture into the springform pan. Use the bottom of a measuring cup or a flat-bottomed glass to press it firmly and evenly into the bottom and about an inch up the sides. Make sure it’s compact — a loose crust will fall apart when you slice the cheesecake. Place the pan in the refrigerator while you prepare the filling.
- Beat the cream cheese: In a large mixing bowl, beat the softened cream cheese with an electric mixer on medium speed until it’s completely smooth and free of lumps. This should take about 2 minutes. Scrape down the sides and bottom of the bowl with a rubber spatula halfway through. Don’t rush this step — lumps now mean lumps later.
- Add the sugar: With the mixer on low speed, gradually add the sugar. Mix until combined, then increase the speed to medium and beat for another minute until the mixture is light and fluffy. Scrape down the bowl again.
- Add the eggs one at a time: Crack the first egg into a small bowl (to avoid shell fragments) and add it to the cream cheese mixture. Mix on low speed just until the yolk disappears. Repeat with the remaining two eggs, mixing each one until just combined. Over-mixing at this stage can incorporate too much air, which can cause cracks.
- Add the eggnog and vanilla: Pour in the eggnog and vanilla extract. Mix on low speed until the liquid is fully incorporated. The batter will look thin and slightly runny at this point — that’s normal.
- Add the flour, nutmeg, and salt: Sprinkle the flour, nutmeg, and salt over the batter. Mix on low speed just until you can’t see any white streaks of flour. Scrape down the bowl one last time and give it a gentle stir with the spatula to make sure everything is evenly distributed. The batter should be smooth, creamy, and pale yellow.
- Pour the filling into the crust: Remove the springform pan from the refrigerator. Pour the filling over the crust. It will fill the pan nearly to the top. Gently tap the pan on the counter a few times to release any air bubbles. Use a toothpick to pop any bubbles that rise to the surface.
- Bake the cheesecake: Place the springform pan on a baking sheet and transfer it to the preheated oven. Bake for 55 to 65 minutes, or until the edges are set and the center is still slightly jiggly — it should wobble like Jell-O, not slosh like soup. The top might develop a few small cracks, but don’t panic. That’s normal and can be covered with a dollop of whipped cream later.
- Cool the cheesecake slowly: Turn off the oven, crack the door open, and let the cheesecake sit inside for one hour. This gentle cooling helps prevent the top from cracking. After an hour, remove the cheesecake from the oven and place it on a cooling rack. Run a thin knife around the edge of the pan to loosen the cheesecake (this also helps prevent cracking as it cools). Let it cool completely at room temperature, about 2 hours.
- Chill the cheesecake: Once the cheesecake is at room temperature, cover it loosely with plastic wrap and refrigerate for at least 6 hours, but preferably overnight. This is the hardest part — waiting. But the texture really sets and develops during this time. Patience pays off here.
- Serve and enjoy: When you’re ready to serve, remove the sides of the springform pan. Slice the cheesecake with a sharp knife, wiping the blade clean between cuts for neat slices. Garnish with a sprinkle of freshly grated nutmeg, a dollop of whipped cream, or a few extra crushed gingersnaps.
Cooking Tips & Techniques
I’ve made this cheesecake more times than I can count, and I’ve definitely made my share of mistakes along the way. Here are the things I’ve learned so you don’t have to learn them the hard way.
The biggest mistake people make is over-mixing the batter. I know it’s tempting to keep beating until everything is perfectly smooth, but too much air in the batter will cause it to puff up in the oven and then collapse, leaving you with a cracked, sunken cheesecake. Mix on low speed, and stop as soon as the ingredients are combined. It’s okay if there’s a tiny streak of flour — just fold it in gently with a spatula.
Don’t skip the room temperature ingredients. I’ve been impatient plenty of times and used cold cream cheese straight from the fridge. The result was a lumpy batter that never smoothed out, no matter how long I beat it. Room temperature cream cheese and eggs blend together seamlessly, creating that silky texture you’re after. Set everything out an hour before you start. It makes a real difference.
The water bath debate. A lot of cheesecake recipes insist on a water bath to prevent cracking. I’ve tried it with this recipe, and honestly, it’s not necessary. The flour in the batter provides enough stability, and the slow cooling method works just as well. Plus, a water bath is a hassle — wrapping the pan in foil, worrying about leaks, dealing with a hot, heavy pan of water. Skip it. You’ll save time and stress.
Timing and multitasking. This recipe is perfect for a weeknight because the active time is short. Make the crust while the oven preheats. Make the filling while the crust chills. The baking time is hands-off, so you can clean up the kitchen or start on dinner. The hardest part is the waiting — the cooling and chilling — but that’s all passive time. You can make this cheesecake a day or two ahead of when you need it, which is a huge win for holiday planning.
Check for doneness by the jiggle, not the clock. Ovens vary, so the baking time is a guideline. Start checking at 50 minutes. The center should still wobble when you gently shake the pan. If it’s completely firm, it’s overbaked and will likely crack. If it’s still liquid, give it another 5 to 10 minutes. The residual heat will finish cooking the center after you turn off the oven.
Variations & Adaptations
This recipe is wonderfully adaptable. Here are a few ways I’ve changed it up depending on the occasion, the season, or just what I had on hand.
Gluten-Free Version: Substitute the all-purpose flour in the filling with an equal amount of cornstarch or a gluten-free all-purpose flour blend. For the crust, use gluten-free gingersnap cookies. I’ve tested this with Schär’s gluten-free graham crackers (mixed with a bit of ginger and molasses) and it worked beautifully. The texture is slightly more delicate, so be gentle when slicing.
Bourbon or Rum Spiked Eggnog Cheesecake: For an adults-only version, add 2 to 3 tablespoons of bourbon or dark rum to the filling along with the eggnog. The alcohol adds a warm, boozy depth that pairs perfectly with the spices. Just don’t add too much, or the filling might not set properly. I made this mistake once with a heavy hand — the cheesecake was delicious but refused to firm up. Stick to 2 tablespoons.
White Chocolate Eggnog Cheesecake: Melt 4 ounces of good-quality white chocolate and let it cool slightly. Fold it into the batter after adding the flour. The white chocolate adds a creamy sweetness that complements the eggnog beautifully. I did this for a Christmas party last year, and it was the first dessert to disappear. Use a high-quality white chocolate like Ghirardelli or Lindt for the best results.
Spiced Cranberry Topping: While the cheesecake chills, make a quick cranberry compote. Simmer 2 cups of fresh or frozen cranberries with 1/2 cup of sugar, 1/4 cup of orange juice, and a cinnamon stick until the berries burst and the mixture thickens. Let it cool completely, then spoon it over the cheesecake just before serving. The tart, tangy cranberries cut through the richness of the cheesecake perfectly. It’s my favorite variation for Thanksgiving.
Mini Cheesecakes: Line a muffin tin with paper liners. Press a spoonful of the crust mixture into the bottom of each liner, then fill with the batter. Bake at 325°F for about 18 to 22 minutes, until the edges are set and the centers are slightly jiggly. Cool completely, then refrigerate. These are perfect for parties or portion control — and they bake much faster than a full cheesecake.
Serving & Storage Suggestions
This cheesecake is best served cold, straight from the refrigerator. I like to take it out about 15 to 20 minutes before slicing to take the chill off slightly, which makes the texture even creamier. For the cleanest slices, use a sharp, thin-bladed knife and wipe it clean with a damp paper towel between each cut. If you’re feeling fancy, you can dip the knife in hot water and dry it before slicing — the heat helps the knife glide through the cheesecake without dragging.
For presentation, I keep it simple. A light dusting of freshly grated nutmeg over the top, maybe a few whole gingersnaps arranged around the base of the cheesecake, and a dollop of lightly sweetened whipped cream on each slice. If I’m feeling extra festive, I’ll add a few sugared cranberries or a sprig of rosemary. It looks beautiful without being fussy.
This cheesecake pairs wonderfully with a cup of strong black coffee, a spiced chai latte, or a glass of cold milk. For a holiday gathering, a glass of sparkling wine or a creamy eggnog cocktail on the side is a lovely touch.
Storage: Leftover cheesecake keeps well in the refrigerator, covered, for up to 5 days. The flavor actually deepens and improves after a day or two. To freeze, wrap the completely cooled cheesecake (or individual slices) tightly in plastic wrap, then in a layer of aluminum foil. Freeze for up to 3 months. Thaw overnight in the refrigerator before serving. I’ve done this many times for holiday prep, and the texture remains excellent. Just don’t freeze a cheesecake that’s been sitting out for a few days — freeze it fresh for the best results.
Reheating: I don’t recommend reheating this cheesecake. It’s meant to be served cold. If you’ve stored it in the freezer, thaw it in the fridge overnight and serve it chilled. The texture will be just as creamy and delicious as the day you made it.
Nutritional Information & Benefits
Let’s be honest — cheesecake is a treat. It’s not a health food, and that’s okay. But there are a few bright spots in this recipe worth mentioning. The cream cheese provides a good amount of protein and calcium, and the eggs add additional protein and essential nutrients like vitamin D and choline. The eggnog itself is a source of milk, which contributes calcium and vitamin A. The gingersnaps contain ginger, which has anti-inflammatory properties and can aid digestion — a nice bonus after a heavy holiday meal.
Here are the estimated nutritional values per slice (based on 12 servings):
- Calories: Approximately 420-450
- Fat: 28g
- Saturated Fat: 16g
- Carbohydrates: 38g
- Sugar: 28g
- Protein: 8g
- Calcium: 10% of the Daily Value
- Iron: 6% of the Daily Value
Dietary Considerations: This recipe contains gluten, dairy, and eggs. For a gluten-free option, use gluten-free gingersnaps and substitute the flour with cornstarch. For a dairy-free version, you can try using a dairy-free cream cheese alternative and a plant-based eggnog, but I haven’t tested this myself, so results may vary. This recipe is not suitable for a vegan diet due to the eggs and cream cheese.
My personal perspective? This cheesecake is about joy, not nutrition. It’s a dessert for celebrations, for gathering around a table with people you love, for creating a moment that feels special. One slice of this won’t derail your wellness goals. It’ll just make your Tuesday (or your Thanksgiving) a little bit brighter. And honestly, that’s a pretty good thing.
Conclusion
This easy eggnog cheesecake with gingersnap crust started as a pantry failure and became my most-requested holiday dessert. It’s proof that sometimes the best recipes come from the moments when things don’t go according to plan. The creamy, spiced filling, the crunchy, buttery crust, the way it looks so impressive on a plate — it’s everything I want in a holiday dessert, without the stress.
I hope you give this recipe a try, whether you’re making it for a big family gathering or just because you want a slice of something cozy on a cold December night. Don’t be afraid to make it your own — add the bourbon if that’s your thing, pile on the cranberry compote, or keep it simple with just a dusting of nutmeg. There’s no wrong way to enjoy it.
If you do make it, I’d love to hear how it turns out. Leave a comment below and let me know if you made any tweaks or if it became a new tradition in your home. And if you’re looking for more holiday dessert inspiration, you might also enjoy my easy pumpkin pie bars or my gingerbread trifle. Happy baking, and here’s to happy accidents that turn into something wonderful!
Frequently Asked Questions
Can I use low-fat cream cheese or eggnog?
I don’t recommend it. Low-fat cream cheese has a higher water content, which can make the filling watery and prone to cracking. Similarly, low-fat eggnog is thinner and has less flavor. For the best results, stick with full-fat versions. Your taste buds will thank you.
My cheesecake cracked on top. What did I do wrong?
Don’t worry — cracks happen to everyone. They’re usually caused by over-mixing the batter, over-baking, or cooling the cheesecake too quickly. The good news is that cracks are purely cosmetic. You can cover them with whipped cream, a dusting of nutmeg, or a fruit topping, and no one will ever know. This recipe is designed to minimize cracking, but if it happens, just roll with it.
Can I make this cheesecake ahead of time?
Absolutely. In fact, I recommend it. This cheesecake needs at least 6 hours to chill, but it’s even better after 24 hours. You can make it up to 2 days in advance and keep it covered in the refrigerator. You can also freeze it for up to 3 months. It’s a perfect make-ahead dessert for busy holiday weeks.
Do I have to use a springform pan?
Yes, I really recommend it. A springform pan has removable sides, which makes it easy to release the cheesecake without damaging it. If you don’t have one, you can use a deep 9-inch cake pan lined with parchment paper, but getting the cheesecake out in one piece will be much more difficult. A springform pan is a worthwhile investment if you make cheesecakes regularly.
Can I use a different type of cookie for the crust?
Definitely. While gingersnaps are my favorite for their warm, spicy flavor, you can use graham crackers, vanilla wafers, shortbread cookies, or even chocolate cookies. Just keep the quantities the same — 2 cups of crumbs and 5 tablespoons of melted butter. If you use a sweeter cookie, you might want to reduce the sugar in the crust. I’ve tried it with speculoos cookies (the ones that taste like cinnamon and brown sugar) and it was fantastic.
Pin This Recipe!
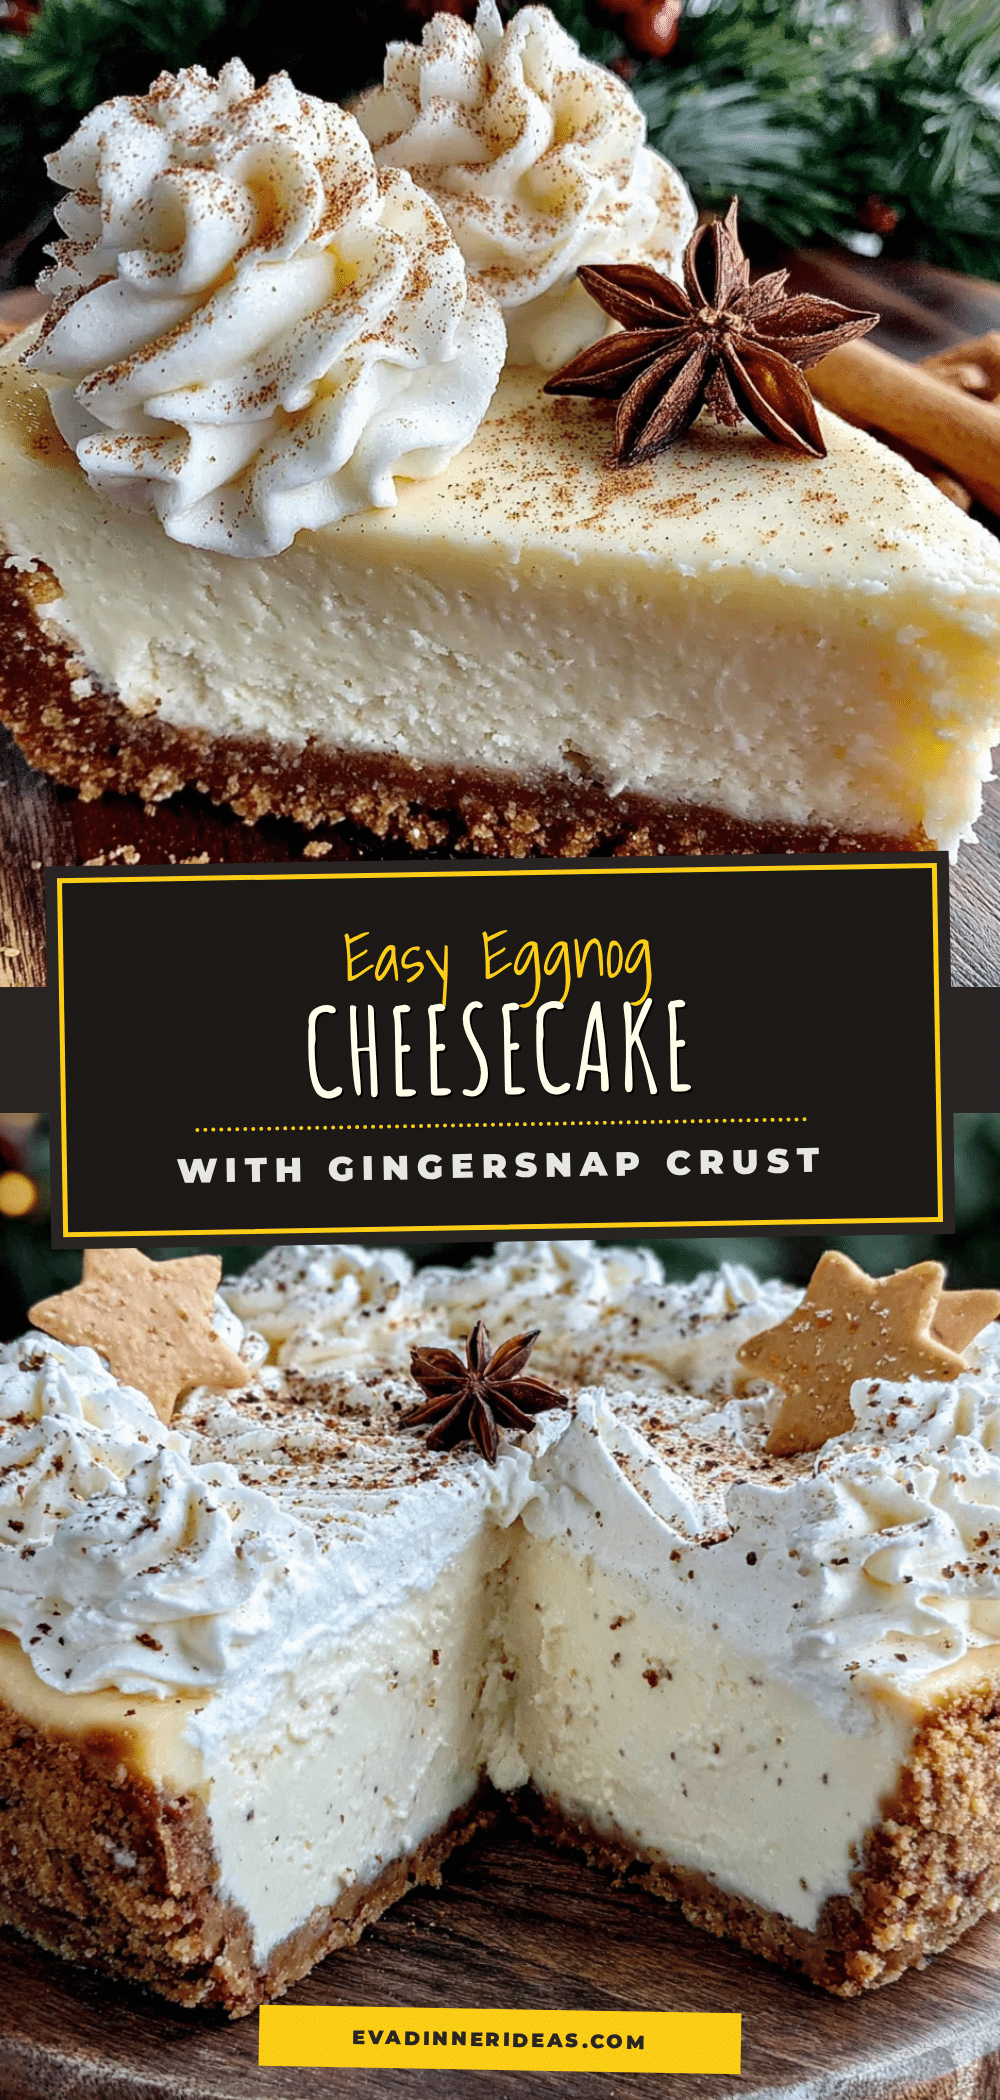
Easy Eggnog Cheesecake with Gingersnap Crust: The Best Holiday Dessert
This easy eggnog cheesecake with a crunchy gingersnap crust is a creamy, spiced holiday dessert that started as a happy accident. It’s simple to make, requires no water bath, and is perfect for Thanksgiving, Christmas, or any festive gathering.
- Prep Time: 20 minutes
- Cook Time: 55-65 minutes
- Total Time: 1 hour 20 minutes (plus 6 hours chilling)
- Yield: 12 servings 1x
- Category: Dessert
- Cuisine: American
Ingredients
- 2 cups (about 200g) gingersnap cookie crumbs
- 5 tablespoons (70g) unsalted butter, melted
- 2 tablespoons (25g) granulated sugar
- 1/4 teaspoon ground cinnamon
- 32 ounces (about 900g) cream cheese, softened to room temperature
- 1 cup (200g) granulated sugar
- 3 large eggs, room temperature
- 1 1/4 cups (about 300ml) eggnog
- 1 teaspoon vanilla extract
- 1/4 cup (30g) all-purpose flour
- 1/4 teaspoon ground nutmeg, plus more for garnish
- 1/4 teaspoon salt
Instructions
- Preheat your oven to 325°F (160°C). Position a rack in the center of the oven.
- Make the crust: In a medium bowl, combine the gingersnap crumbs, melted butter, sugar, and cinnamon. Stir with a fork until the mixture looks like wet sand and all the crumbs are evenly coated. It should hold together when you squeeze a handful.
- Press the crust into the pan: Pour the crumb mixture into a 9-inch springform pan. Use the bottom of a measuring cup or a flat-bottomed glass to press it firmly and evenly into the bottom and about an inch up the sides. Place the pan in the refrigerator while you prepare the filling.
- Beat the cream cheese: In a large mixing bowl, beat the softened cream cheese with an electric mixer on medium speed until it’s completely smooth and free of lumps, about 2 minutes. Scrape down the sides and bottom of the bowl with a rubber spatula halfway through.
- Add the sugar: With the mixer on low speed, gradually add the sugar. Mix until combined, then increase the speed to medium and beat for another minute until the mixture is light and fluffy. Scrape down the bowl again.
- Add the eggs one at a time: Crack the first egg into a small bowl and add it to the cream cheese mixture. Mix on low speed just until the yolk disappears. Repeat with the remaining two eggs, mixing each one until just combined.
- Add the eggnog and vanilla: Pour in the eggnog and vanilla extract. Mix on low speed until the liquid is fully incorporated. The batter will look thin and slightly runny at this point.
- Add the flour, nutmeg, and salt: Sprinkle the flour, nutmeg, and salt over the batter. Mix on low speed just until you can’t see any white streaks of flour. Scrape down the bowl one last time and give it a gentle stir with the spatula.
- Pour the filling into the crust: Remove the springform pan from the refrigerator. Pour the filling over the crust. Gently tap the pan on the counter a few times to release any air bubbles. Use a toothpick to pop any bubbles that rise to the surface.
- Bake the cheesecake: Place the springform pan on a baking sheet and transfer it to the preheated oven. Bake for 55 to 65 minutes, or until the edges are set and the center is still slightly jiggly.
- Cool the cheesecake slowly: Turn off the oven, crack the door open, and let the cheesecake sit inside for one hour. After an hour, remove the cheesecake from the oven and place it on a cooling rack. Run a thin knife around the edge of the pan to loosen the cheesecake. Let it cool completely at room temperature, about 2 hours.
- Chill the cheesecake: Once the cheesecake is at room temperature, cover it loosely with plastic wrap and refrigerate for at least 6 hours, but preferably overnight.
- Serve and enjoy: When you’re ready to serve, remove the sides of the springform pan. Slice the cheesecake with a sharp knife, wiping the blade clean between cuts for neat slices. Garnish with a sprinkle of freshly grated nutmeg, a dollop of whipped cream, or a few extra crushed gingersnaps.
Notes
This cheesecake is best served cold. For the cleanest slices, use a sharp knife and wipe it clean between cuts. The cheesecake can be made up to 2 days in advance and stored covered in the refrigerator. It can also be frozen for up to 3 months. For a gluten-free version, use gluten-free gingersnaps and substitute the flour with cornstarch. For an adults-only version, add 2 to 3 tablespoons of bourbon or dark rum to the filling.
Nutrition
- Serving Size: 1 slice
- Calories: 420450
- Sugar: 28
- Sodium: 350
- Fat: 28
- Saturated Fat: 16
- Carbohydrates: 38
- Protein: 8
Keywords: eggnog cheesecake, gingersnap crust, holiday dessert, easy cheesecake, no water bath, Christmas dessert, Thanksgiving dessert


