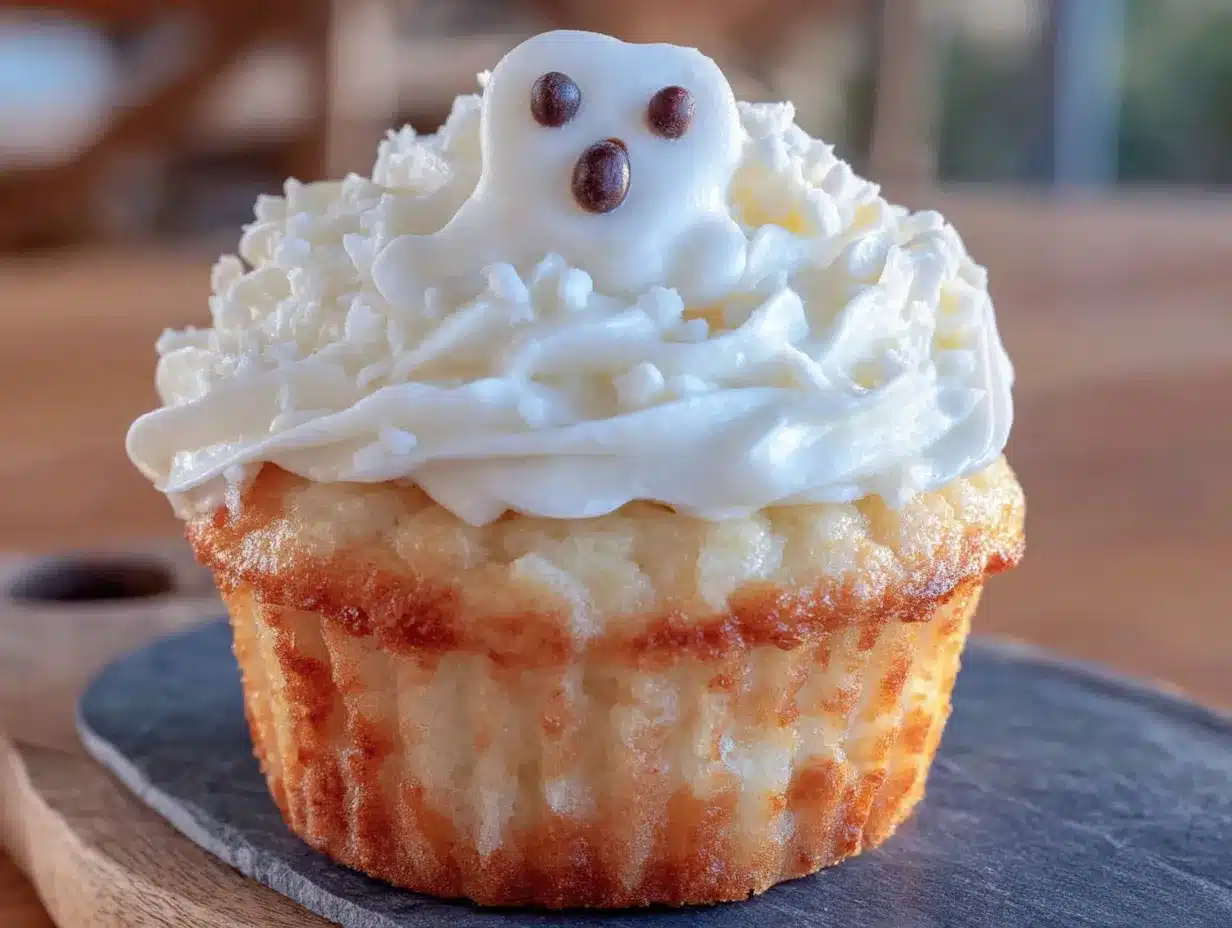
There used to be a tiny bakery on the corner of Elm and 3rd in my old neighborhood called “The Whimsy Cup.” It was the kind of place with mismatched chairs and a chalkboard menu that changed daily. They made these ghost cupcakes every October that were honestly the most charming things I’d ever seen—not scary, not gory, just sweet little vanilla ghosts with the happiest buttercream faces you could imagine. When they closed their doors two summers ago (the landlord tripled the rent, the nerve), I was genuinely heartbroken. I mean, I’d stop in every single Friday in October just to grab one before the weekend.
After about seven tries—some where the ghosts looked more like sad blobs, others where the buttercream slid right off—I finally cracked the code. The secret is in the consistency of the frosting and the way you angle the piping tip. Let me tell you, there was a lot of frosting wasted in the name of “research.” But now? I can make these cozy ghosts in my sleep, and honestly, they taste even better than I remember from that little bakery.
These aren’t your typical Halloween cupcakes covered in fake blood and gummy worms. These are the ones you make for a cozy night in, when you want something that feels a little magical without being terrifying. Maybe you’ve been there—you want to celebrate the season but you’re not really into the horror movie vibe. These little ghosts are perfect for that. They’re sweet, they’re soft, and they have the most adorable faces. This recipe stayed with me because it captures that feeling of stepping into a warm, candlelit bakery on a chilly October evening, and that’s a feeling worth recreating.
Why You’ll Love These Cozy Ghost Vanilla Cupcakes
Let me be honest with you—I’ve tested a lot of cupcake recipes in my time. Some are too dry, some are too dense, and some just don’t hold up to a good swirl of frosting. These ghost vanilla cupcakes hit that sweet spot where the cake is light and fluffy but sturdy enough to hold a generous pile of buttercream. Here’s why they keep showing up on my counter every October:
- Quick & Easy: From start to finish, you’re looking at about 45 minutes. That’s less time than it takes to find a costume online. Perfect for last-minute Halloween parties or a spontaneous baking session with the kids.
- Simple Ingredients: You probably have most of these in your pantry right now. No weird extracts, no specialty flours—just good old-fashioned baking staples. I tested this with both name-brand and store-brand butter, and honestly, it works beautifully either way.
- Perfect for Halloween Gatherings: These ghosts are the star of any fall party. They’re not too spooky for the little ones, but they’re cute enough for adults to fight over the last one. I brought a batch to my neighbor’s pumpkin carving party and they vanished in ten minutes flat.
- Crowd-Pleaser: Kids love decorating them, adults love eating them, and everyone loves how adorable they look on a plate. I’ve had friends who swear they can’t bake pull these off without a hitch.
- Unbelievably Delicious: The vanilla flavor is rich without being overpowering, and the buttercream is silky smooth. That first bite where the soft cake meets the creamy frosting? Pure comfort.
What makes these different from every other ghost cupcake recipe out there? It’s the technique. I spent weeks perfecting the buttercream consistency so it holds its shape but stays soft and luscious on the tongue. The cake itself uses a reverse-creaming method that gives it a finer crumb and a more tender texture. This isn’t just another Halloween recipe—it’s the one you’ll come back to year after year.
What Ingredients You Will Need
This recipe calls for simple, wholesome ingredients that work together to create the perfect vanilla cupcake base. The magic happens when you use room-temperature ingredients—trust me on this one, it makes a real difference in how the batter comes together.
For the Cupcakes
- 1 ½ cups all-purpose flour (I prefer Gold Medal for consistent results, but any brand works fine)
- 1 cup granulated sugar (adds sweetness and helps with browning)
- 1 ½ teaspoons baking powder (make sure it’s fresh—test it by dropping a bit in hot water; if it fizzes, you’re good)
- ½ teaspoon salt (balances the sweetness and enhances flavor)
- ½ cup unsalted butter, softened to room temperature (this is crucial—cold butter won’t cream properly)
- 2 large eggs, room temperature (if you forget to take them out, place them in warm water for 5 minutes)
- 2 teaspoons vanilla extract (use pure vanilla extract, not imitation, for the best flavor)
- ½ cup whole milk, room temperature (I’ve used 2% in a pinch and it still works, but whole milk gives a richer crumb)
For the Buttercream Frosting
- 1 cup unsalted butter, softened (let it sit out for at least an hour—it should be soft but not melty)
- 3 ½ cups powdered sugar, sifted (sifting prevents lumps and gives that silky texture)
- 2 teaspoons vanilla extract (yes, more vanilla—this is what makes it irresistible)
- 2-3 tablespoons heavy cream (or whole milk if that’s what you have; heavy cream makes it extra luxurious)
- Pinch of salt (don’t skip this—it cuts the sweetness and makes the flavors pop)
For the Ghost Faces
- Black gel food coloring (I recommend Wilton brand—it’s concentrated and doesn’t thin out the frosting)
- Small piping bag or zip-top bag (for drawing the faces)
- Round piping tip #2 or #3 (for precise faces, but you can snip a tiny corner off a bag in a pinch)
For the best texture, I recommend using Land O’Lakes butter—it has a consistent fat content that gives reliable results. And please, please use room temperature ingredients. I know it’s tempting to rush, but cold ingredients don’t emulsify properly and you’ll end up with a denser cake. If you need a dairy-free option, swap the butter for a high-quality vegan butter like Miyoko’s and use oat milk instead of whole milk. The texture will be slightly different but still delicious.
Equipment Needed
You don’t need a professional bakery setup to make these ghost cupcakes. Here’s what you’ll need:
- 12-cup standard muffin tin (non-stick is nice, but I always use paper liners anyway)
- Paper cupcake liners (white ones look best for the ghost theme, but any color works)
- Electric hand mixer or stand mixer (you can do this by hand, but your arm will get a workout—I’ve been there)
- Large mixing bowl (at least 4-quart capacity)
- Medium mixing bowl (for dry ingredients)
- Whisk (for combining dry ingredients evenly)
- Rubber spatula (for scraping down the bowl—this is non-negotiable for even mixing)
- Cooling rack (a wire rack lets air circulate so your cupcakes don’t get soggy bottoms)
- Piping bags (disposable ones are fine; I buy the 12-inch size)
- Large round piping tip (I use a Wilton 1A for the ghost bodies)
- Small round piping tip #2 or #3 (for the faces)
- Offset spatula (optional but helpful for smoothing frosting)
If you don’t have piping bags, you can use a sturdy zip-top bag with the corner snipped off. It won’t be as precise, but it’ll work in a pinch. I’ve done it more times than I’d like to admit. Just make sure the bag doesn’t split—I learned that one the hard way when I ended up with frosting all over my hands right before a party.
Preparation Method
Step 1: Preheat and Prep
Preheat your oven to 350°F (175°C). Line your muffin tin with 12 paper liners. This seems obvious, but I’ve forgotten to preheat the oven before and then stood there holding a bowl of batter like an idiot. Set a timer so you don’t space out.
Step 2: Mix Dry Ingredients
In your medium bowl, whisk together the flour, baking powder, and salt. Whisk for about 20 seconds—this aerates the flour and distributes the leavening agents evenly. You’ll thank yourself later when every cupcake rises to the same height.
Step 3: Cream Butter and Sugar
In your large mixing bowl, beat the softened butter and sugar together on medium speed for about 3-4 minutes. You’re looking for a light, fluffy, pale yellow mixture. Scrape down the sides of the bowl halfway through. Don’t rush this step—proper creaming is what gives your cupcakes that tender crumb. I usually put on a song and just let the mixer do its thing.
Step 4: Add Eggs and Vanilla
Add the eggs one at a time, beating well after each addition (about 30 seconds each). Then add the vanilla extract and beat until combined. The mixture might look a little curdled at this point—that’s normal, don’t panic. It’ll come together when you add the flour.
Step 5: Alternate Dry and Wet Ingredients
With the mixer on low speed, add the flour mixture in three additions, alternating with the milk in two additions. Start and end with the flour. So: flour, milk, flour, milk, flour. Mix just until combined after each addition—overmixing develops gluten and makes tough cupcakes. I usually stop the mixer when there are still a few streaks of flour and finish mixing by hand with a spatula. This is the secret to tender cupcakes, I swear by it.
Step 6: Fill the Liners
Divide the batter evenly among the 12 liners. Each should be about ⅔ full—use a cookie scoop or measuring cup for accuracy. I use a ¼ cup measure and level it off. This gives you perfectly even cupcakes every time. Tap the pan gently on the counter to release any air bubbles.
Step 7: Bake
Bake for 18-22 minutes, or until a toothpick inserted in the center comes out clean or with a few moist crumbs. The tops should be lightly golden and spring back when touched. My oven runs hot, so I check at 18 minutes. Rotate the pan halfway through if your oven has hot spots. Let the cupcakes cool in the pan for 5 minutes, then transfer to a wire rack to cool completely. Don’t even think about frosting them while they’re warm—the buttercream will melt into a sad puddle.
Step 8: Make the Buttercream
While the cupcakes cool, make the frosting. Beat the softened butter on medium speed for 2 minutes until smooth and creamy. Sift the powdered sugar (yes, you have to do this—lumpy frosting is not cute) and add it gradually, about ½ cup at a time, beating on low speed. Add the vanilla, salt, and 2 tablespoons of heavy cream. Beat on medium-high for 3-4 minutes until light and fluffy. If it’s too thick, add the remaining tablespoon of cream. If it’s too thin, add more powdered sugar, ¼ cup at a time.
Step 9: Color and Fill Piping Bags
Transfer about ½ cup of the buttercream to a small bowl and mix in the black gel food coloring until you get a deep black. Spoon this into a small piping bag fitted with the #2 or #3 round tip. Fill a large piping bag fitted with the large round tip with the remaining white buttercream.
Step 10: Pipe the Ghosts
Pipe a tall swirl of white buttercream on each cooled cupcake. Start from the outside and work your way in, building up height as you go. The ghost should be about 2 inches tall—think of a soft-serve ice cream cone shape. Use the black frosting to pipe two small eyes and a little “o” mouth on each ghost. Don’t overthink the faces—imperfect ghosts are actually cuter. I made one with crossed eyes once and it was everyone’s favorite.
Cooking Tips & Techniques
After making these ghost cupcakes at least twenty times (I’m not exaggerating), I’ve picked up a few tricks that make the process smoother and the results more consistent.
Room temperature ingredients aren’t optional. I know, I know, you’re busy. But cold butter doesn’t cream properly, cold eggs can make your batter curdle, and cold milk won’t emulsify with the butter. The result is a denser, less tender cupcake. Take everything out of the fridge an hour before you start baking. Set a timer on your phone—I always forget and then I’m running around trying to warm eggs in a bowl of hot water like a maniac.
Don’t overmix the batter. This is the number one mistake I see home bakers make. Once you add the flour, mix just until it disappears. Overmixing develops gluten, which makes your cupcakes tough and rubbery. You want them light and fluffy, like a little vanilla cloud. I stop mixing while there are still a few streaks of flour and finish by folding gently with a spatula.
The buttercream consistency is everything. If your frosting is too soft, the ghost will slump into a blob. If it’s too stiff, it’ll look lumpy and unappealing. The perfect consistency is like a thick peanut butter—it should hold its shape but still be spreadable. If you’re piping and the ghost starts to droop, pop the frosting in the fridge for 10 minutes to firm up. I’ve had to do this more times than I care to admit, especially on humid days.
Chill your piping bags. This is a pro tip I picked up from a pastry chef friend. If your hands are warm (which they probably are if you’ve been baking), the heat can soften the buttercream in the piping bag. Pop the filled bag in the fridge for 5-10 minutes before you start piping. It makes a noticeable difference in how cleanly the ghosts hold their shape.
Practice on a plate first. Before you pipe on the actual cupcakes, do a few practice ghosts on a plate or piece of parchment paper. This lets you adjust your pressure and speed without ruining a cupcake. You can scrape up the practice frosting and reuse it—no waste, just practice.
Variations & Adaptations
One of the best things about this recipe is how adaptable it is. Here are some variations I’ve tried and loved:
Gluten-Free Ghost Cupcakes: Substitute the all-purpose flour with a 1:1 gluten-free baking flour blend (I like Bob’s Red Mill). Add ¼ teaspoon of xanthan gum if your blend doesn’t already include it. The texture will be slightly more delicate, but the flavor is still spot-on. I made these for my gluten-sensitive sister-in-law and she couldn’t tell the difference.
Chocolate Ghost Cupcakes: Replace ¼ cup of the flour with ¼ cup of unsweetened cocoa powder. You’ll also want to increase the milk by 2 tablespoons since cocoa powder absorbs more liquid. These look adorable with white ghosts on top of dark chocolate cupcakes—the contrast is stunning. I did this for a Halloween party and people went crazy for them.
Pumpkin Spice Ghost Cupcakes: Add ½ cup of pumpkin puree and 1 teaspoon of pumpkin pie spice to the batter. Reduce the milk by 2 tablespoons to compensate for the extra moisture from the pumpkin. These taste like autumn in cupcake form and the orange-brown cake peeking out from under the white ghost is just perfect.
Vegan Ghost Cupcakes: Use vegan butter (Miyoko’s is my favorite), flax eggs (1 tablespoon ground flaxseed mixed with 3 tablespoons water per egg), and oat milk. The texture is a bit more dense but still delicious. I tested this version for a friend’s vegan birthday party and they disappeared faster than the regular ones.
Mini Ghost Cupcakes: Use a mini muffin tin and bake for 10-12 minutes instead of 18-22. These are perfect for parties where people want to try multiple treats. You’ll get about 24 mini cupcakes from this recipe, and they’re absolutely adorable—like a whole ghost family.
Serving & Storage Suggestions
These ghost cupcakes are best served at room temperature. Take them out of the fridge about 30 minutes before serving to let the buttercream soften slightly. The cake will taste more flavorful and the frosting will be perfectly creamy.
For presentation, I like to arrange them on a white cake stand or a wooden board. If you want to get fancy, sprinkle some edible glitter or silver star sprinkles around the base of each ghost. It gives them a magical, twinkly look that’s perfect for Halloween. I did this for a “Not-So-Spooky” Halloween party and everyone thought I bought them from a bakery.
These pair beautifully with warm apple cider, hot chocolate, or a pumpkin spice latte. For an adult gathering, they’re lovely with a glass of cold milk or a vanilla stout. The sweetness of the cupcake balances nicely with a slightly bitter or tart drink.
Storage: Store unfrosted cupcakes in an airtight container at room temperature for up to 3 days. Frosted cupcakes should be stored in the refrigerator in an airtight container for up to 5 days. The buttercream will firm up in the fridge, so let them sit at room temperature for 15-20 minutes before serving.
Freezing: You can freeze unfrosted cupcakes for up to 3 months. Wrap each one individually in plastic wrap, then place in a freezer bag. Thaw at room temperature before frosting. I do this every October—I bake a double batch, freeze half, and then I have ghost cupcakes ready to go whenever the craving strikes. The frosting doesn’t freeze well, so always make that fresh.
One thing I’ve noticed—these cupcakes actually taste better the day after baking. The flavors meld together and the cake becomes even more moist. So if you’re making them for a party, bake them the day before, store them unfrosted, and frost them the morning of the event. Your future self will thank you.
Nutritional Information & Benefits
Let’s be real—these are a treat, not a health food. But they’re made with real ingredients, and there’s something to be said for that. Here’s the approximate nutritional breakdown per cupcake (based on 12 servings):
| Nutrient | Amount Per Cupcake |
|---|---|
| Calories | 385 |
| Total Fat | 22g |
| Saturated Fat | 14g |
| Cholesterol | 85mg |
| Sodium | 195mg |
| Total Carbohydrates | 46g |
| Sugars | 35g |
| Protein | 3g |
The vanilla extract in this recipe actually has some surprising benefits—it’s been shown to have antioxidant properties and can help reduce anxiety (the smell of vanilla is naturally calming, which is probably why baking feels so therapeutic). The butter provides vitamin A and healthy fats, and the eggs contribute high-quality protein.
If you’re looking to make these a bit lighter, you can reduce the sugar in the frosting by using a sugar-free powdered sugar alternative, or swap half the butter in the frosting for Greek yogurt (though the texture will be less stable for piping). I’ve tried the Greek yogurt swap and honestly, it works fine for a casual bake but the ghosts don’t hold their shape as well.
These cupcakes are vegetarian but not vegan (unless you use the vegan adaptations). They contain dairy, eggs, and gluten. For allergen-friendly versions, check out the variations section above.
Conclusion
These cozy ghost vanilla cupcakes with buttercream faces are more than just a Halloween treat—they’re a little piece of comfort you can hold in your hand. Every time I make them, I think about that little bakery on Elm Street and how good it felt to walk in on a cold October evening. The bell would jingle, the warm vanilla smell would hit you, and for a moment, everything felt right in the world.
Now I get to recreate that feeling in my own kitchen, and honestly? It’s even better. There’s something special about making these with your own hands, about piping those silly little faces and watching them come to life. They’re not perfect—some ghosts are a little lopsided, some have googly eyes—but that’s what makes them charming.
I’d love to see your ghost creations! Tag me when you make them, tell me about your own bakery memory, or share how you customized the faces. Did you give them little blush cheeks? A tiny bow tie? A ghost with a party hat? The possibilities are endless, and that’s the fun part. So grab your apron, preheat that oven, and let’s make some ghosts. Happy baking, friend!
Frequently Asked Questions
Can I make these cupcakes ahead of time?
Absolutely! Bake the cupcakes up to 2 days in advance and store them unfrosted in an airtight container at room temperature. Make the buttercream fresh on the day you plan to serve them for the best texture and appearance. If you need to prep even further ahead, you can freeze the unfrosted cupcakes for up to 3 months.
Why did my ghost faces bleed into the white frosting?
This usually happens when the black gel coloring isn’t fully incorporated into the frosting, or when the white frosting hasn’t had time to set. Let the piped ghosts sit at room temperature for 10-15 minutes before adding the faces. Also, make sure your black frosting is smooth and free of streaks before piping.
Can I use cream cheese frosting instead of buttercream?
You can, but I don’t recommend it for this recipe. Cream cheese frosting is softer and less stable, so the ghosts won’t hold their shape as well. The buttercream also gives a cleaner white color that looks better against the dark chocolate or pumpkin variations. Save the cream cheese frosting for carrot cake.
My cupcakes came out dense and heavy. What went wrong?
This is usually caused by overmixing the batter or using cold ingredients. Make sure your butter, eggs, and milk are all at room temperature before you start. Mix the batter just until the flour disappears—stop the moment you don’t see any more white streaks. Also, check that your baking powder is fresh; old baking powder won’t give your cupcakes the lift they need.
How do I get perfectly round ghost shapes?
Practice makes perfect, but here’s a trick: use a large round piping tip (Wilton 1A or similar) and pipe in one continuous motion, starting from the outside and spiraling inward while building height. Keep steady pressure on the piping bag and pull straight up at the end. If the peak is too pointy, gently tap it down with a damp finger. And don’t stress—imperfect ghosts have personality!
Pin This Recipe!
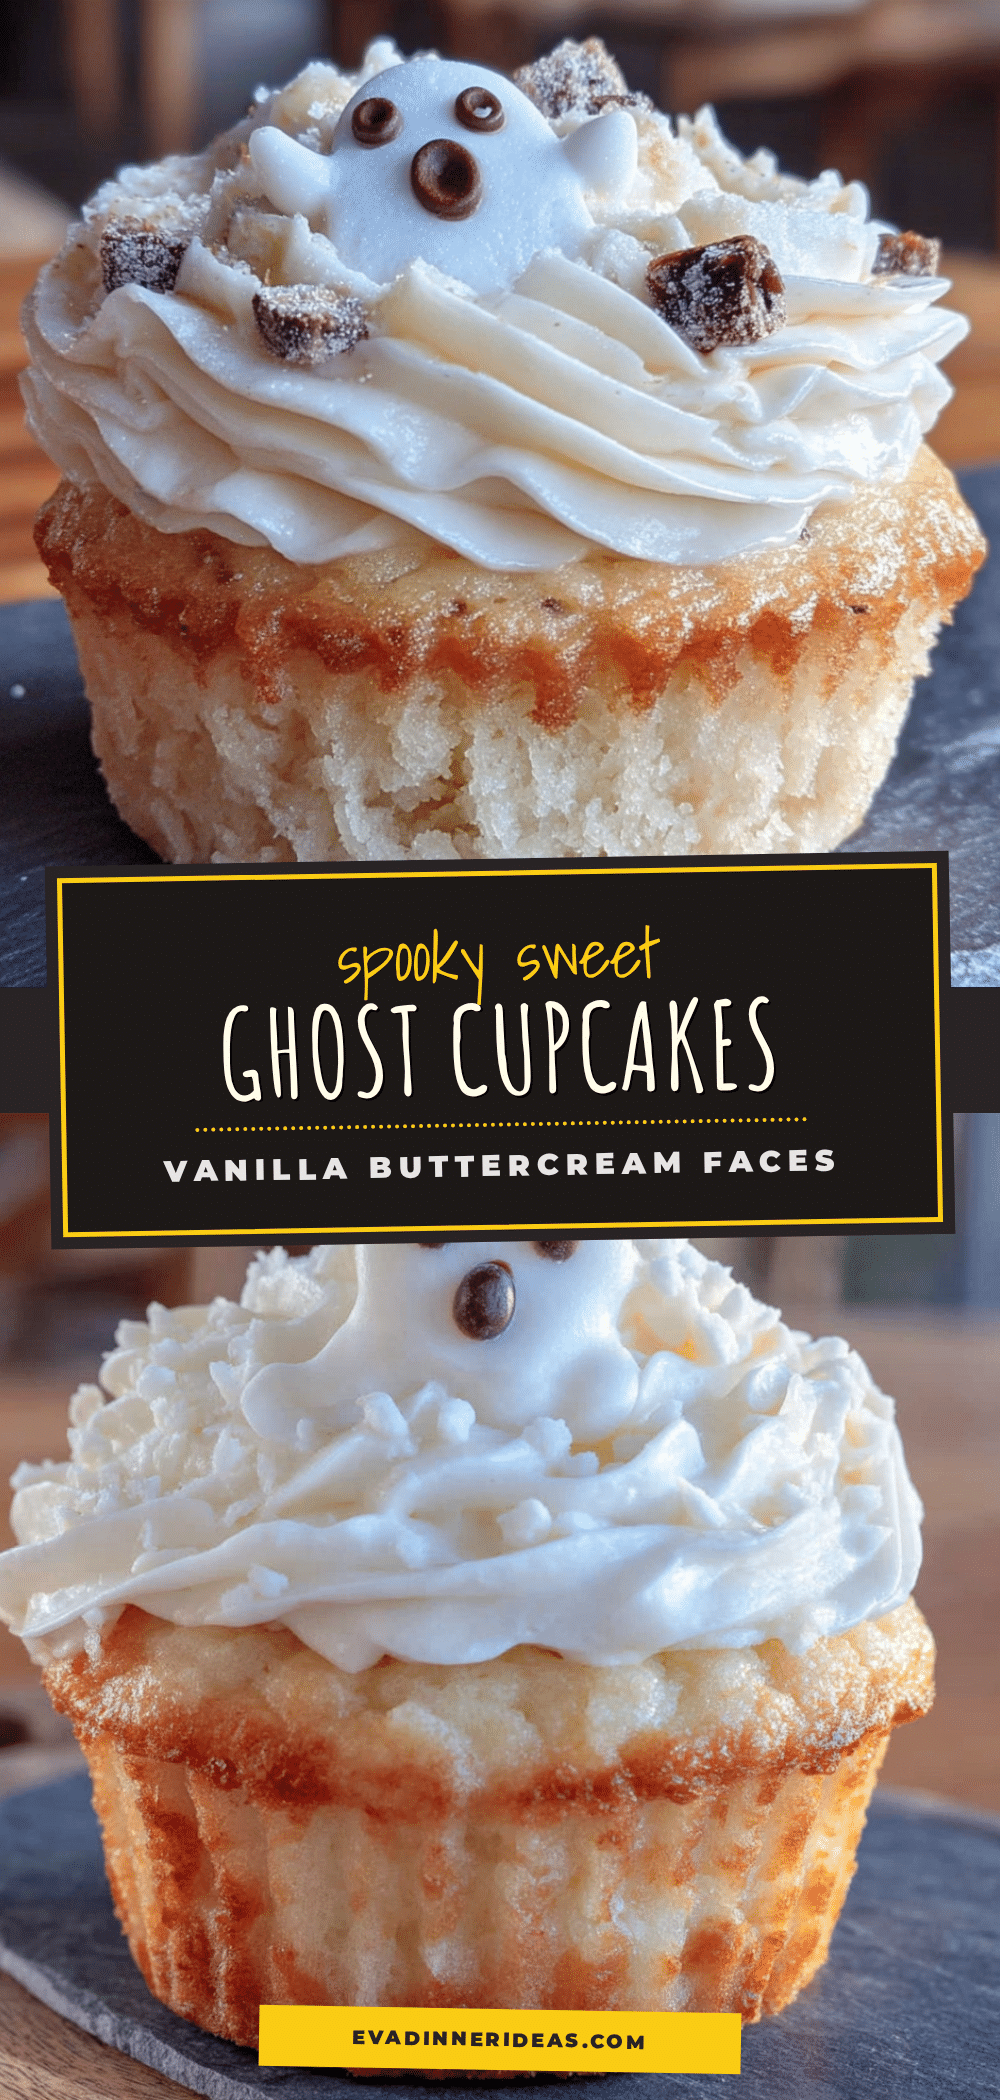
Cozy Ghost Vanilla Cupcakes with Buttercream Faces: Easy Halloween Treat
These adorable ghost vanilla cupcakes are the perfect Halloween treat—not scary, just sweet little vanilla ghosts with happy buttercream faces. Made with simple ingredients and a foolproof technique, they’re light, fluffy, and topped with silky buttercream that holds its shape beautifully.
- Prep Time: 15 minutes
- Cook Time: 20 minutes
- Total Time: 45 minutes
- Yield: 12 servings 1x
- Category: Dessert
- Cuisine: American
Ingredients
- 1 ½ cups all-purpose flour
- 1 cup granulated sugar
- 1 ½ teaspoons baking powder
- ½ teaspoon salt
- ½ cup unsalted butter, softened to room temperature
- 2 large eggs, room temperature
- 2 teaspoons vanilla extract
- ½ cup whole milk, room temperature
- 1 cup unsalted butter, softened (for frosting)
- 3 ½ cups powdered sugar, sifted
- 2 teaspoons vanilla extract (for frosting)
- 2–3 tablespoons heavy cream
- Pinch of salt
- Black gel food coloring
Instructions
- Preheat your oven to 350°F (175°C). Line your muffin tin with 12 paper liners.
- In a medium bowl, whisk together the flour, baking powder, and salt for about 20 seconds.
- In a large mixing bowl, beat the softened butter and sugar together on medium speed for 3-4 minutes until light, fluffy, and pale yellow. Scrape down the sides halfway through.
- Add the eggs one at a time, beating well after each addition (about 30 seconds each). Add the vanilla extract and beat until combined.
- With the mixer on low speed, add the flour mixture in three additions, alternating with the milk in two additions, starting and ending with flour. Mix just until combined after each addition. Finish mixing by hand with a spatula if needed.
- Divide the batter evenly among the 12 liners, filling each about ⅔ full. Tap the pan gently on the counter to release air bubbles.
- Bake for 18-22 minutes, or until a toothpick inserted in the center comes out clean or with a few moist crumbs. Let cool in the pan for 5 minutes, then transfer to a wire rack to cool completely.
- While the cupcakes cool, make the buttercream: Beat the softened butter on medium speed for 2 minutes until smooth and creamy. Sift the powdered sugar and add it gradually, about ½ cup at a time, beating on low speed. Add the vanilla, salt, and 2 tablespoons of heavy cream. Beat on medium-high for 3-4 minutes until light and fluffy. If too thick, add the remaining tablespoon of cream; if too thin, add more powdered sugar, ¼ cup at a time.
- Transfer about ½ cup of the buttercream to a small bowl and mix in the black gel food coloring until deep black. Spoon into a small piping bag fitted with a #2 or #3 round tip. Fill a large piping bag fitted with a large round tip with the remaining white buttercream.
- Pipe a tall swirl of white buttercream on each cooled cupcake, starting from the outside and working inward, building height to about 2 inches. Use the black frosting to pipe two small eyes and a little ‘o’ mouth on each ghost.
Notes
Room temperature ingredients are crucial for best results. Take butter, eggs, and milk out of the fridge an hour before baking. Don’t overmix the batter once flour is added. For perfect ghost shapes, chill the filled piping bag for 5-10 minutes before piping. Practice on a plate first. Unfrosted cupcakes can be stored at room temperature for up to 3 days; frosted cupcakes keep in the refrigerator for up to 5 days. Unfrosted cupcakes can be frozen for up to 3 months.
Nutrition
- Serving Size: 1 cupcake
- Calories: 385
- Sugar: 35
- Sodium: 195
- Fat: 22
- Saturated Fat: 14
- Carbohydrates: 46
- Protein: 3
Keywords: ghost cupcakes, Halloween cupcakes, vanilla cupcakes, buttercream frosting, Halloween treats, easy Halloween dessert, ghost cupcakes with buttercream faces, cozy Halloween baking