My sister asked why I couldn’t just use Greek yogurt instead of cream cheese. I was in the middle of explaining my latest “lightened-up” dessert project, and honestly, I almost laughed. Greek yogurt in cheesecake? That would be way too tangy, too thin, not nearly rich enough. I started explaining why that wouldn’t work—then stopped. She had this look, you know the one. The look that says “you’re being stubborn and you know it.” So I grabbed the tub of Greek yogurt from the fridge, muttered something about this being a waste of good ingredients, and got to work.
That was three Decembers ago, on a Tuesday afternoon when the light was already fading at 4 PM. I had a bag of candy canes left over from a party, a block of cream cheese that needed using, and a sudden, desperate need for something sweet that wouldn’t leave me feeling like I’d eaten a brick. The kitchen was a mess—there was flour on the counter from a failed cookie attempt, and I’d already broken two glasses that week. I wasn’t feeling particularly confident. But my sister was watching, and she’d called my bluff.
I blended the yogurt into the cream cheese mixture, held my breath, and tasted it. Honestly, I was ready to be right. I wanted to be right. But that first bite had this unexpected lightness—creamy but not heavy, sweet but with a subtle tang that kept it from being cloying. The crushed peppermint on top added this fresh, cool crunch that cut through everything perfectly. I had to admit it. She was right. And now, every year when the holidays roll around, I make these light no-bake peppermint cheesecake bars. They’ve become my go-to for every Christmas party, every cookie swap, every night when I want something festive without the food coma. Maybe you’ve been there—standing in your kitchen, convinced you know exactly how something will turn out, only to have a beginner’s instinct prove you completely wrong. That’s this recipe. It’s the one that taught me to shut up and trust the process.
Why You’ll Love This Recipe
These light no-bake peppermint cheesecake bars aren’t just another holiday dessert. They are the result of dozens of trials, a few spectacular failures, and that one moment of humble pie I mentioned. I’ve tested this with full-fat, low-fat, and non-dairy alternatives, and I can tell you with confidence—this version is the sweet spot.
- Quick & Easy: No oven required. No water baths. No fussing with a springform pan. These come together in about 20 minutes of active work, then the fridge does the rest. Perfect for when you’re already juggling a thousand holiday tasks.
- Simple Ingredients: You likely have most of these in your kitchen right now. No trips to specialty stores for obscure peppermint extracts or expensive European butter. Just real, recognizable ingredients.
- Perfect for Holiday Gatherings: These bars are a total crowd-pleaser. Kids love the peppermint crunch, adults appreciate the lighter texture, and everyone goes back for seconds. They travel well, too—just pop the pan in a cooler and you’re set.
- Unbelievably Delicious: The texture is what gets everyone. It’s creamy but not dense, rich but not heavy. The Greek yogurt trick (yes, I’m calling it a trick now) creates a mousse-like consistency that feels indulgent but won’t weigh you down. That crushed peppermint on top? It adds a fresh, festive pop that makes every bite feel like a celebration.
- Healthier Without Sacrifice: This is comfort food reimagined. You get all the satisfaction of a classic cheesecake bar, but with less fat, fewer calories, and a boost of protein from the yogurt. It’s the kind of dessert that makes you feel good about eating it—and that’s a rare thing during the holiday season.
This isn’t just another no-bake cheesecake recipe. It’s the one you’ll come back to year after year, the one that fits into your healthy eating goals without feeling like a compromise. It’s the one that makes you close your eyes after the first bite and just… enjoy.
What Ingredients You Will Need
This recipe uses simple, wholesome ingredients to deliver that perfect balance of creamy, crunchy, cool, and sweet. Here’s what you’ll need, along with a few notes from my years of testing.
For the Crust
- 1 ½ cups (150g) graham cracker crumbs – About 10-12 full sheets. I prefer the classic Honey Maid brand for consistent texture. You can crush them in a food processor or seal them in a bag and go to town with a rolling pin—both work great.
- ¼ cup (50g) granulated sugar – Just enough to add a touch of sweetness to the crust.
- 6 tablespoons (85g) unsalted butter, melted – Salted butter works in a pinch, just reduce the added salt elsewhere. I like using European-style butter like Kerrygold for a richer flavor, but any unsalted butter is fine.
- Pinch of salt – Balances the sweetness and enhances the graham flavor.
For the Cheesecake Filling
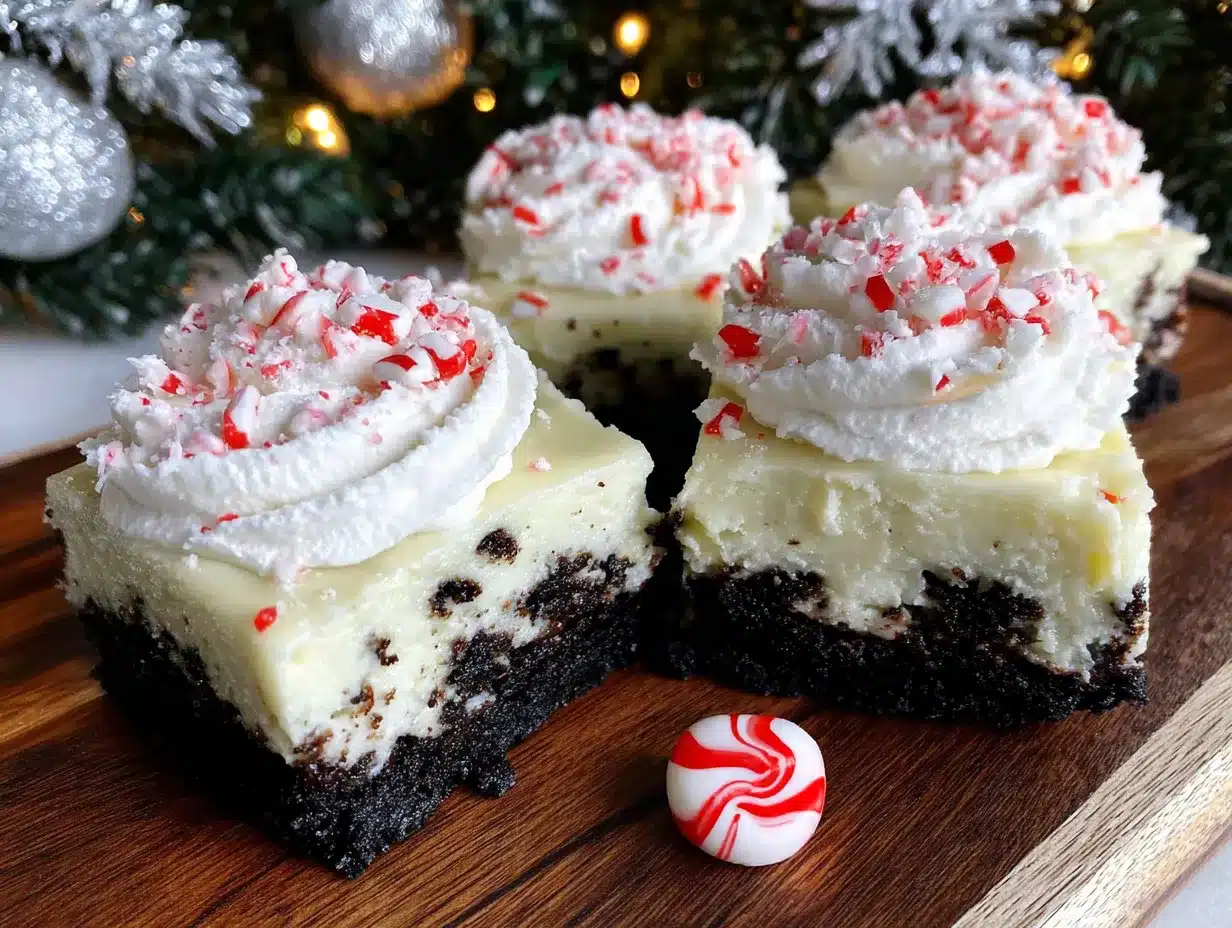
- 16 oz (450g) block cream cheese, softened – This is non-negotiable. Use full-fat or reduced-fat (I’ve tested both), but do NOT use whipped or spreadable cream cheese. It has too much air and water, and the bars won’t set properly. Let it sit on the counter for at least an hour before starting.
- 1 cup (240g) plain Greek yogurt – I recommend full-fat or 2% for the creamiest texture. Fage Total is my go-to—it’s thick, tangy, and has no added gums. Avoid non-fat Greek yogurt here; it can make the filling taste a bit chalky.
- ½ cup (100g) granulated sugar – Or substitute with ⅓ cup (80ml) honey or maple syrup for a refined-sugar-free option. If using a liquid sweetener, the bars will be slightly softer.
- 1 teaspoon vanilla extract – Pure vanilla extract makes a difference. Skip the imitation stuff for this one.
- ½ teaspoon peppermint extract – This is where you need to be careful. Peppermint extract is potent. Start with ½ teaspoon, taste, and add more if you want a stronger mint kick. I once added a full teaspoon and the bars tasted like toothpaste. Learn from my mistake.
- 2 tablespoons (15g) powdered sugar – This helps stabilize the filling and gives it a silky texture. Don’t skip it.
For the Topping
- ½ cup (about 6-8) crushed peppermint candies or candy canes – You can buy pre-crushed peppermint, but honestly, crushing your own is more satisfying and gives you control over the texture. I like leaving some larger chunks for visual appeal. Just seal them in a bag and tap with a rolling pin—don’t pulverize them into dust.
- Optional: ½ cup (120ml) heavy cream, whipped with 1 tablespoon powdered sugar – For an extra-decadent topping. Completely optional, but if you’re serving these for a special occasion, it’s a lovely touch.
Equipment Needed
You don’t need a fancy kitchen to pull these off. Here’s what I use:
- 8×8-inch baking pan – This is the perfect size for these bars. A 9×9 will work, but the bars will be slightly thinner. Line it with parchment paper, leaving overhang on two sides for easy removal.
- Food processor or zip-top bag and rolling pin – For crushing the graham crackers and peppermint. I prefer the bag method for the peppermint—it’s oddly therapeutic.
- Electric hand mixer or stand mixer – A whisk and some elbow grease will work, but a mixer makes the filling much smoother. I’ve made these with a hand mixer for years and it’s perfect.
- Medium mixing bowls – One for the crust, one for the filling.
- Spatula – For spreading the filling evenly. A silicone spatula is my favorite—it’s flexible and doesn’t scratch the pan.
- Measuring cups and spoons – Precision matters, especially with the peppermint extract.
If you don’t have an 8×8 pan, a 9-inch pie plate works beautifully. The bars will be more like a pie, but the flavor is the same. Just adjust the chilling time slightly—a deeper dish needs an extra hour in the fridge.
Preparation Method
Let’s get to it. This is straightforward, but I’ll walk you through every step with the little details that make a difference.
- Prepare the crust: In a medium bowl, combine the graham cracker crumbs, granulated sugar, and a pinch of salt. Pour in the melted butter and stir with a fork until the mixture looks like wet sand—all the crumbs should be evenly moistened. Press this mixture firmly into the bottom of your parchment-lined 8×8 pan. Use the bottom of a flat measuring cup or glass to really compact it. An even, tight crust is key for clean slices later. Pop it in the fridge to set while you make the filling.
- Soften the cream cheese: This is the most important step. If your cream cheese is cold, your filling will be lumpy. Leave it on the counter for at least an hour. If you’re in a hurry, cut it into cubes and microwave on low power for 10-15 seconds. It should be soft to the touch but not warm.
- Beat the cream cheese: In a large bowl, beat the softened cream cheese with an electric mixer on medium speed until it’s completely smooth—about 2 minutes. Scrape down the sides and the bottom of the bowl with a spatula. You want zero lumps here.
- Add the sugars and extracts: Add the granulated sugar, powdered sugar, vanilla extract, and peppermint extract. Beat on medium-low until everything is combined and smooth. Again, scrape the bowl. Taste the mixture at this point. If you want a stronger peppermint flavor, add another ¼ teaspoon of extract. Remember, it will mellow slightly as it chills.
- Fold in the Greek yogurt: Add the Greek yogurt and fold it in gently with a spatula. Don’t beat it—you don’t want to incorporate too much air, which can cause cracks. Just fold until it’s fully combined and the mixture is smooth, thick, and glossy. This should take about 30 seconds of gentle folding.
- Assemble the bars: Take the crust out of the fridge. Spoon the cheesecake filling onto the crust and spread it evenly with your spatula. Give the pan a few gentle taps on the counter to release any air bubbles. Then, smooth the top as best you can.
- Add the topping: Sprinkle the crushed peppermint evenly over the top. Press it in very lightly with your fingers so it sticks to the filling. If you’re adding whipped cream, wait until after the bars have chilled to pipe or spread it on.
- Chill: This is the hardest part. Cover the pan with plastic wrap or foil and refrigerate for at least 6 hours, but overnight is better. The bars need time to set up properly. If you try to slice them too early, you’ll get a delicious but messy situation. I speak from experience.
- Slice and serve: Once fully chilled, use the parchment overhang to lift the entire block out of the pan. Place it on a cutting board. Use a sharp, clean knife to slice into 16 squares. Wipe the knife clean between cuts for the neatest edges. Serve cold, straight from the fridge.
Cooking Tips & Techniques
I’ve made these bars more times than I can count, and I’ve learned a few things the hard way. Here are my best tips for perfect results every time.
- Don’t overmix the filling: Once you add the yogurt, stop as soon as it’s combined. Overmixing incorporates too much air, which can cause the bars to puff up slightly and then crack as they settle. You want a dense, creamy texture, not a fluffy one.
- Use room temperature ingredients: Cold cream cheese and cold yogurt will give you a lumpy, grainy filling. Set everything out on the counter an hour before you start. Trust me on this—it’s the difference between silky smooth and disappointing.
- Line your pan properly: I cannot stress this enough. Use two long strips of parchment paper that cross in the middle, leaving overhang on all four sides. This makes lifting the bars out a breeze. I once forgot the parchment and spent 20 minutes trying to coax the bars out with a spatula. Never again.
- Crush the peppermint just before using: Crushed peppermint absorbs moisture from the air and can become sticky and clumpy. Crush it right before you sprinkle it on top for the best texture and brightest color.
- Patience is a virtue: The 6-hour minimum chill time is non-negotiable. If you’re in a rush, you can speed things up by placing the pan in the freezer for 2-3 hours, but the texture won’t be quite as creamy. For the best results, plan ahead and let them chill overnight.
- Clean slices every time: Run your knife under hot water, dry it off, then make your cut. Wipe the blade clean between each slice. This gives you those beautiful, Instagram-worthy edges.
Variations & Adaptations
This recipe is wonderfully flexible. Here are a few ways to make it your own.
- Gluten-Free Version: Swap the graham cracker crumbs for gluten-free graham crackers or use crushed gluten-free shortbread cookies. I’ve also used a mixture of almond flour and coconut flour with great results—just add an extra tablespoon of melted butter to help it bind.
- Dairy-Free Version: Use a dairy-free cream cheese alternative (I like Kite Hill or Miyoko’s) and a thick, plain coconut yogurt. The texture will be slightly softer, so add an extra tablespoon of powdered sugar to help stabilize it. Make sure your graham crackers are also dairy-free.
- Chocolate Peppermint Bars: Melt ½ cup of dark chocolate chips and drizzle it over the top after the bars have set. The combination of chocolate and peppermint is a classic for a reason. I did this for a Christmas party last year and they disappeared in minutes.
- Mint Chocolate Chip Version: Fold ½ cup of mini chocolate chips into the filling before spreading it over the crust. The little bits of chocolate add a nice texture contrast to the creamy filling.
- No-Sugar-Added Option: Use a sugar substitute like monk fruit or erythritol in place of the granulated sugar. The texture will be slightly different, but the flavor is still fantastic. I’ve tested this with Lakanto monk fruit sweetener and it worked beautifully.
- Individual Mini Bars: Press the crust into a mini muffin tin lined with paper liners, then spoon the filling on top. Chill for 4 hours, then top with crushed peppermint. These are perfect for parties or portion control.
Serving & Storage Suggestions
These bars are best served cold, straight from the fridge. The filling is firm but creamy, and the peppermint topping stays nice and crunchy. Here’s how to serve and store them.
- Serving Temperature: Serve chilled. If they sit out at room temperature for more than 15-20 minutes, they’ll start to soften. For a prettier presentation, let them sit for 5 minutes after slicing—the edges will be slightly less firm and the texture will be more luxurious.
- Presentation Ideas: Arrange the bars on a white platter for a festive look. Sprinkle a few extra crushed peppermint pieces around the plate. If you made the whipped cream topping, pipe a small rosette on each bar and top with a tiny piece of candy cane. It looks like something from a fancy bakery.
- Complementary Dishes: These bars pair beautifully with a cup of hot coffee or a mug of rich hot chocolate. For a dessert spread, serve them alongside gingerbread cookies, chocolate truffles, or a simple fruit salad. The cool, minty flavor is a perfect palate cleanser after a heavy holiday meal.
- Storage: Store the bars in an airtight container in the refrigerator for up to 5 days. Layer them between sheets of parchment paper to prevent sticking. The peppermint topping may soften slightly after a day or two, but the flavor will still be wonderful.
- Freezing: These bars freeze beautifully. Place the sliced bars on a baking sheet and freeze until solid, about 2 hours. Then transfer them to a freezer-safe container or zip-top bag, separating layers with parchment. They’ll keep for up to 3 months. Thaw in the refrigerator for 2-3 hours before serving. The texture is almost identical to fresh.
- Flavor Development: The peppermint flavor actually mellows and deepens after a day in the fridge. If you’re making these for a party, I recommend making them a day ahead. They’ll be even better.
Nutritional Information & Benefits
Here’s the estimated nutritional breakdown for one bar (based on 16 servings, without optional whipped cream).
- Calories: 195
- Fat: 12g
- Carbohydrates: 18g
- Protein: 5g
- Sugar: 14g
- Fiber: 0g
- Sodium: 160mg
These numbers are significantly lower than a traditional cheesecake bar, which can easily clock in at over 350 calories. The Greek yogurt is the hero here—it adds protein and creaminess without all the saturated fat of extra cream cheese. Peppermint also has some surprising benefits: it can aid digestion and help soothe an upset stomach, which is handy after a big holiday meal. Plus, the act of making these bars is itself a little moment of mindfulness. There’s something calming about crushing the candy canes and smoothing the filling into the pan. It’s a small act of creation in the middle of a chaotic season.
If you’re watching your sugar intake, you can easily reduce the sugar in the filling by a couple of tablespoons without affecting the texture. The peppermint flavor is strong enough to carry it.
Conclusion
These light no-bake peppermint cheesecake bars are more than just a recipe. They’re a reminder that sometimes the best ideas come from the most unexpected places—like a sister who calls your bluff and a kitchen full of broken glass and candy canes. They’re proof that you don’t need an oven, a ton of cream cheese, or hours of free time to create something truly special. They’re a dessert that fits into your life, not the other way around.
I hope you give these a try. Customize them however you like—add chocolate, swap the crust, make them dairy-free. The base recipe is forgiving and adaptable. And when you do make them, I’d love to hear about it. Leave a comment below and tell me how they turned out, or share your own variation. Did you add a drizzle of caramel? Use a different extract? I’m always looking for new ideas. Until then, happy holidays, and may your kitchen be filled with the smell of peppermint and the sound of laughter.
Frequently Asked Questions
Can I use low-fat or non-fat cream cheese?
You can, but the texture will be slightly less creamy and the bars may not set as firmly. If you use low-fat cream cheese, add an extra tablespoon of powdered sugar to help with stabilization. I don’t recommend non-fat cream cheese—it has a different water content and can make the filling a bit grainy.
Can I make these without a food processor?
Absolutely. For the graham cracker crust, place the crackers in a zip-top bag and crush them with a rolling pin or the bottom of a heavy pan. For the peppermint, the same method works perfectly. The filling comes together easily with a hand mixer or even a whisk and some elbow grease.
My filling turned out lumpy. What went wrong?
Most likely, your cream cheese was too cold. It needs to be at room temperature to blend smoothly. If you’re in a rush, cut the cream cheese into small cubes and let them sit for 15 minutes before mixing. You can also try warming the cream cheese very gently in the microwave—10 seconds at a time on low power—until it’s soft but not warm.
Can I use a different type of mint extract?
Yes, but be careful. Spearmint extract has a different flavor profile—it’s sweeter and less intense than peppermint. If you use spearmint, you may need to use a bit more to get the same level of mintiness. I’ve also used a combination of peppermint and vanilla extract for a more complex flavor.
How far in advance can I make these bars?
You can make them up to 3 days ahead of time. Store them in the refrigerator in an airtight container. The flavor actually improves after a day or two as the peppermint mellows and melds with the creamy filling. For best results, add the crushed peppermint topping no more than 24 hours before serving to keep it crunchy.
Pin This Recipe!
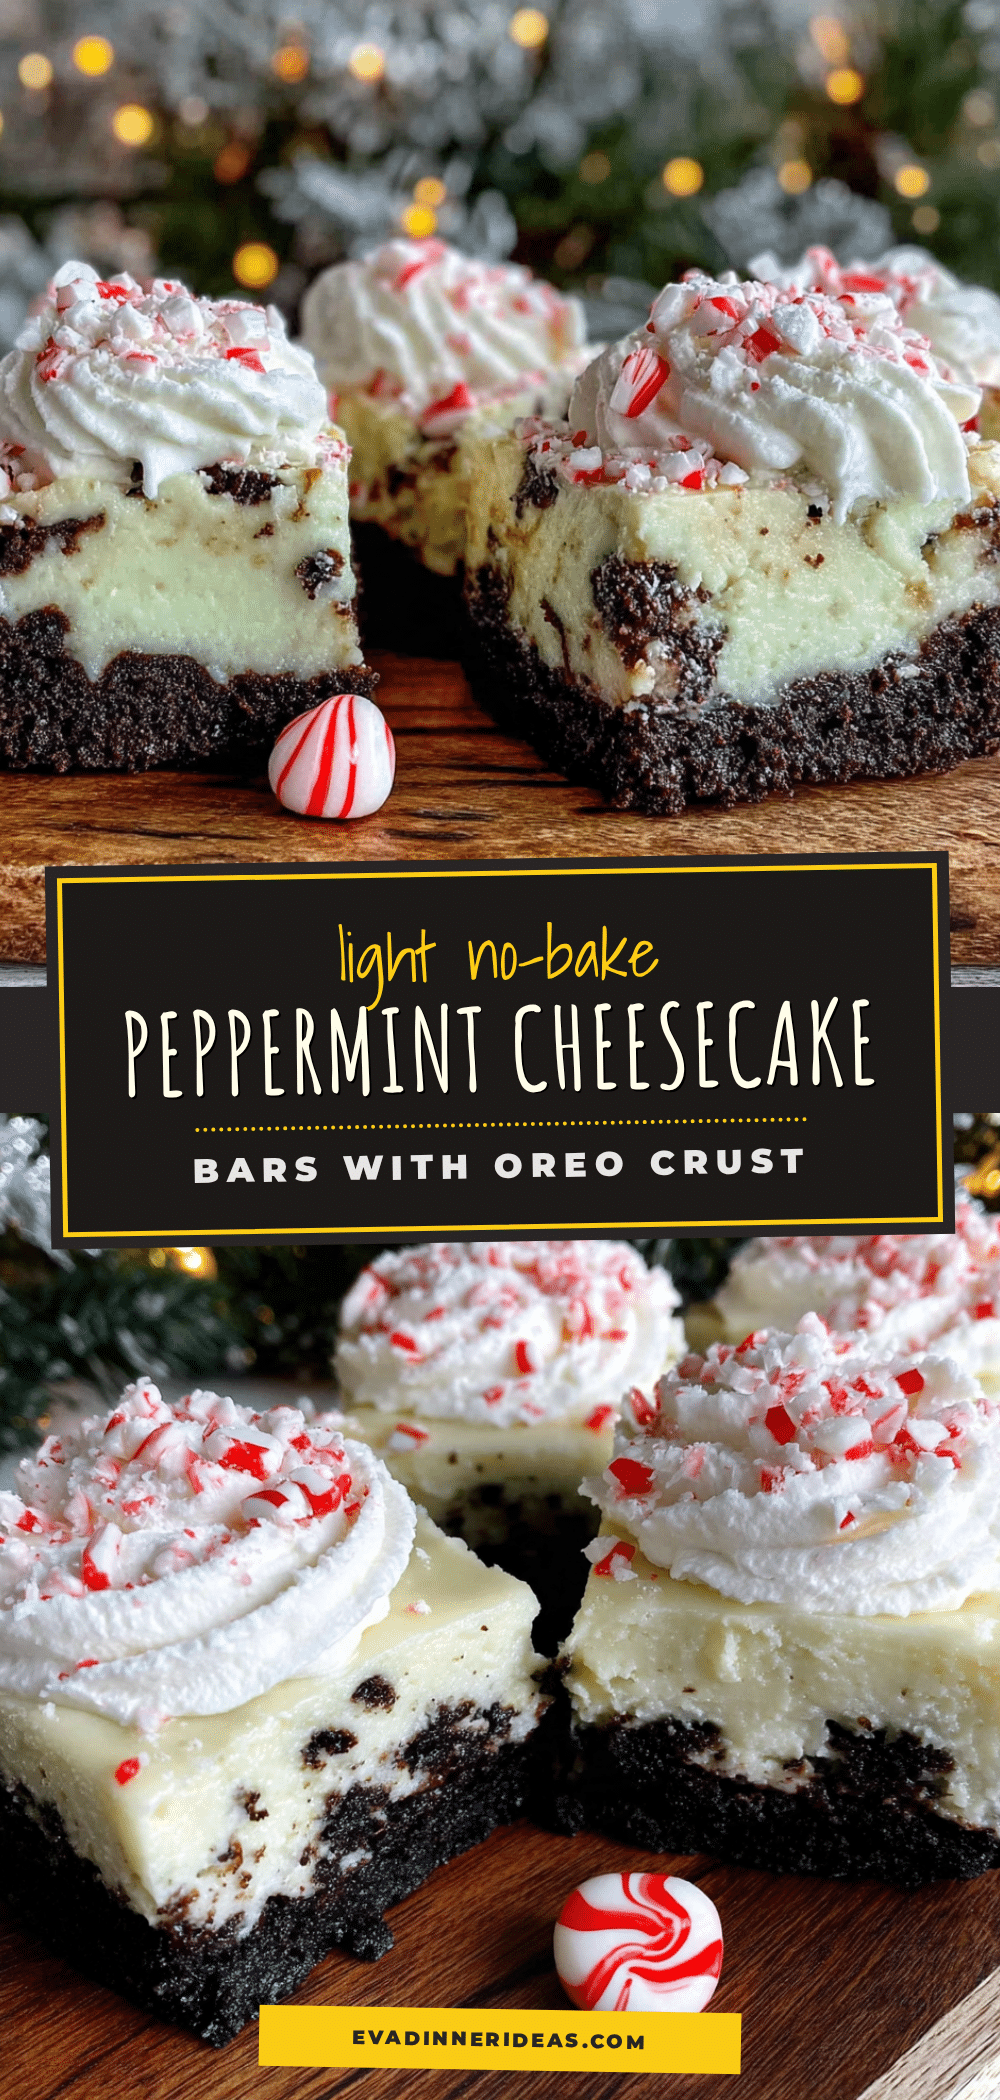
Light No-Bake Peppermint Cheesecake Bars
These light no-bake peppermint cheesecake bars are creamy, refreshing, and perfect for holiday gatherings. Made with a Greek yogurt trick for a mousse-like texture, they’re healthier than traditional cheesecake bars without sacrificing flavor.
- Prep Time: 20 minutes
- Cook Time: 0 minutes
- Total Time: 6 hours 20 minutes (includes chilling)
- Yield: 16 servings 1x
- Category: Dessert
- Cuisine: American
Ingredients
- 1 ½ cups (150g) graham cracker crumbs
- ¼ cup (50g) granulated sugar
- 6 tablespoons (85g) unsalted butter, melted
- Pinch of salt
- 16 oz (450g) block cream cheese, softened
- 1 cup (240g) plain Greek yogurt
- ½ cup (100g) granulated sugar
- 1 teaspoon vanilla extract
- ½ teaspoon peppermint extract
- 2 tablespoons (15g) powdered sugar
- ½ cup (about 6-8) crushed peppermint candies or candy canes
- Optional: ½ cup (120ml) heavy cream, whipped with 1 tablespoon powdered sugar
Instructions
- Prepare the crust: In a medium bowl, combine the graham cracker crumbs, granulated sugar, and a pinch of salt. Pour in the melted butter and stir with a fork until the mixture looks like wet sand. Press this mixture firmly into the bottom of your parchment-lined 8×8 pan. Use the bottom of a flat measuring cup or glass to really compact it. Pop it in the fridge to set while you make the filling.
- Soften the cream cheese: Leave it on the counter for at least an hour. If you’re in a hurry, cut it into cubes and microwave on low power for 10-15 seconds. It should be soft to the touch but not warm.
- Beat the cream cheese: In a large bowl, beat the softened cream cheese with an electric mixer on medium speed until it’s completely smooth—about 2 minutes. Scrape down the sides and the bottom of the bowl with a spatula.
- Add the sugars and extracts: Add the granulated sugar, powdered sugar, vanilla extract, and peppermint extract. Beat on medium-low until everything is combined and smooth. Again, scrape the bowl. Taste the mixture at this point. If you want a stronger peppermint flavor, add another ¼ teaspoon of extract.
- Fold in the Greek yogurt: Add the Greek yogurt and fold it in gently with a spatula. Don’t beat it—just fold until it’s fully combined and the mixture is smooth, thick, and glossy. This should take about 30 seconds of gentle folding.
- Assemble the bars: Take the crust out of the fridge. Spoon the cheesecake filling onto the crust and spread it evenly with your spatula. Give the pan a few gentle taps on the counter to release any air bubbles. Then, smooth the top as best you can.
- Add the topping: Sprinkle the crushed peppermint evenly over the top. Press it in very lightly with your fingers so it sticks to the filling. If you’re adding whipped cream, wait until after the bars have chilled to pipe or spread it on.
- Chill: Cover the pan with plastic wrap or foil and refrigerate for at least 6 hours, but overnight is better.
- Slice and serve: Once fully chilled, use the parchment overhang to lift the entire block out of the pan. Place it on a cutting board. Use a sharp, clean knife to slice into 16 squares. Wipe the knife clean between cuts for the neatest edges. Serve cold, straight from the fridge.
Notes
Don’t overmix the filling once you add the yogurt. Use room temperature ingredients for a smooth texture. Line your pan with parchment paper for easy removal. Crush the peppermint just before using. The 6-hour minimum chill time is non-negotiable. For clean slices, run your knife under hot water and wipe clean between cuts.
Nutrition
- Serving Size: 1 bar
- Calories: 195
- Sugar: 14
- Sodium: 160
- Fat: 12
- Carbohydrates: 18
- Protein: 5
Keywords: no-bake cheesecake, peppermint cheesecake, light cheesecake, holiday dessert, Greek yogurt cheesecake, easy cheesecake bars


