Meredith wasn’t trying to impress anyone. I’d stopped by her place on a random Tuesday afternoon to drop off a casserole dish she’d lent me, and the smell hit me before I even got through the door. It wasn’t cookies baking or a roast in the oven—it was something sweet, creamy, and unmistakably… nostalgic. She was standing at the counter, casually scraping a bowl while her toddler sat on the floor, happily smashing a vanilla wafer into dust. “Oh, it’s just that Christmas tree cake dip everyone’s been making,” she shrugged. Just that. Like she hadn’t just created a dessert that smelled like my childhood December mornings. I mean, honestly, I almost forgot why I’d come over. She handed me a wafer to taste it, and let me tell you—I stood there in her kitchen for another twenty minutes, eating dip off a spoon and pretending I was helping her clean up. Maybe you’ve been there, where a recipe stops you in your tracks and you know you’re going to be making it for years. That’s this dip. It’s the kind of thing you make once, and suddenly it’s the only thing anyone asks you to bring to Christmas parties.
Why You’ll Love This Recipe
This isn’t just another dessert dip that disappears after five minutes—though it definitely will. This is the one that makes everyone stop and say, “Wait, what’s in this?” before going back for thirds. I’ve tested this version about six times now, tweaking the cream cheese ratio and the frosting consistency so it’s perfectly scoopable without being too thin. It’s family-approved in the truest sense: my own picky eater, who usually sniffs at anything that isn’t chicken nuggets, sat down with a bowl of vanilla wafers and ate half the dip before I could blink.
- Quick & Easy: Comes together in under 15 minutes, no oven required. Perfect for those last-minute holiday gatherings or when the kids suddenly announce they want a “Christmas party snack” at 4 PM.
- Simple Ingredients: You likely already have cream cheese, powdered sugar, and vanilla wafers in your pantry. The only special item is the Little Debbie Christmas Tree Cakes, and those are everywhere during the holidays.
- Perfect for Holiday Parties: Great for Christmas Eve, classroom celebrations, cookie exchanges, or just a cozy night in with the family watching Elf for the hundredth time.
- Crowd-Pleaser: Kids absolutely love it because it tastes like a dessert, but adults can’t stop eating it either. It’s the rare recipe that satisfies both groups equally.
- Unbelievably Delicious: The combination of creamy cheesecake-like dip with chunks of frosted cake and crunchy wafers is next-level comfort food. You’ll close your eyes after the first bite—I promise.
What makes this dip different from the other versions floating around online is the texture. I blend the cream cheese and Cool Whip until it’s silky smooth, then fold in the chopped cake just at the end so you get actual chunks of that iconic green icing and yellow cake. It’s not just a flavored dip—it’s a dip that delivers the full Christmas tree cake experience in every scoop. Plus, I add a tiny pinch of salt to balance the sweetness, which is a trick my grandmother taught me that makes everything taste more like itself.
What Ingredients You Will Need
This recipe uses simple, store-bought ingredients that come together to create something surprisingly special. Most of these are pantry staples or easy to find at any grocery store during the holiday season.
- 8 ounces cream cheese, softened to room temperature (I always use Philadelphia brand for the creamiest texture—don’t use the low-fat version, it gets grainy)
- 1/4 cup unsalted butter, softened (let it sit out for about 30 minutes; if you’re in a hurry, cut it into small cubes and let it soften while you gather your other ingredients)
- 1 cup powdered sugar, sifted if you have the patience (lumps won’t ruin it, but sifting makes it smoother)
- 1 teaspoon vanilla extract (use pure vanilla if you have it, but imitation works fine here since there’s so much other flavor going on)
- 8 ounces Cool Whip, thawed (you can use homemade whipped cream if you prefer, but Cool Whip gives it that stable, fluffy texture that holds up well for dipping)
- 4 Little Debbie Christmas Tree Cakes, chopped into small pieces (you want some chunks for texture, but not so big that they’re hard to scoop—aim for bite-sized)
- 1/4 cup green sprinkles or holiday jimmies (optional, but kids love the extra color and crunch on top)
- Vanilla wafers, for serving (Nilla Wafers are my go-to, but any brand works; you can also use graham crackers, pretzels, or even apple slices for a slightly healthier option)
One note on the Christmas Tree Cakes: I’ve found that the fresher they are, the better they hold their shape when chopped. If they’ve been sitting in your pantry for a while, they might crumble more. That’s totally fine—it just means more cake bits throughout the dip, which nobody’s going to complain about. Also, if you can’t find the tree-shaped ones, the regular frosted Christmas cakes work just as well. Nobody will know the difference once it’s all mixed together.
Equipment Needed
You don’t need any fancy gadgets for this recipe, which is part of why I love it so much. Here’s what you’ll need:
- Electric hand mixer or stand mixer—a hand mixer works perfectly and is easier to clean. If you don’t have one, you can mix by hand with a wooden spoon, but it’ll take some elbow grease to get the cream cheese smooth.
- Large mixing bowl—any size works, but I prefer a medium-large bowl so there’s room to mix without splattering.
- Rubber spatula—for scraping down the sides and folding in the cake pieces gently.
- Cutting board and sharp knife—for chopping the Christmas Tree Cakes. A serrated knife works best to cut through the cake without squishing it.
- Serving bowl—a shallow dish works best so the dip is easy to reach. I use a white ceramic pie plate for that cozy holiday look.
- Measuring cups and spoons—nothing fancy, just the basics.
If you don’t have a hand mixer, you can soften the cream cheese really well (microwave it for about 10 seconds) and whisk vigorously. It takes a little longer, but it’s doable. I’ve done it before when my mixer was in the dishwasher, and honestly, it’s a good arm workout.
Preparation Method
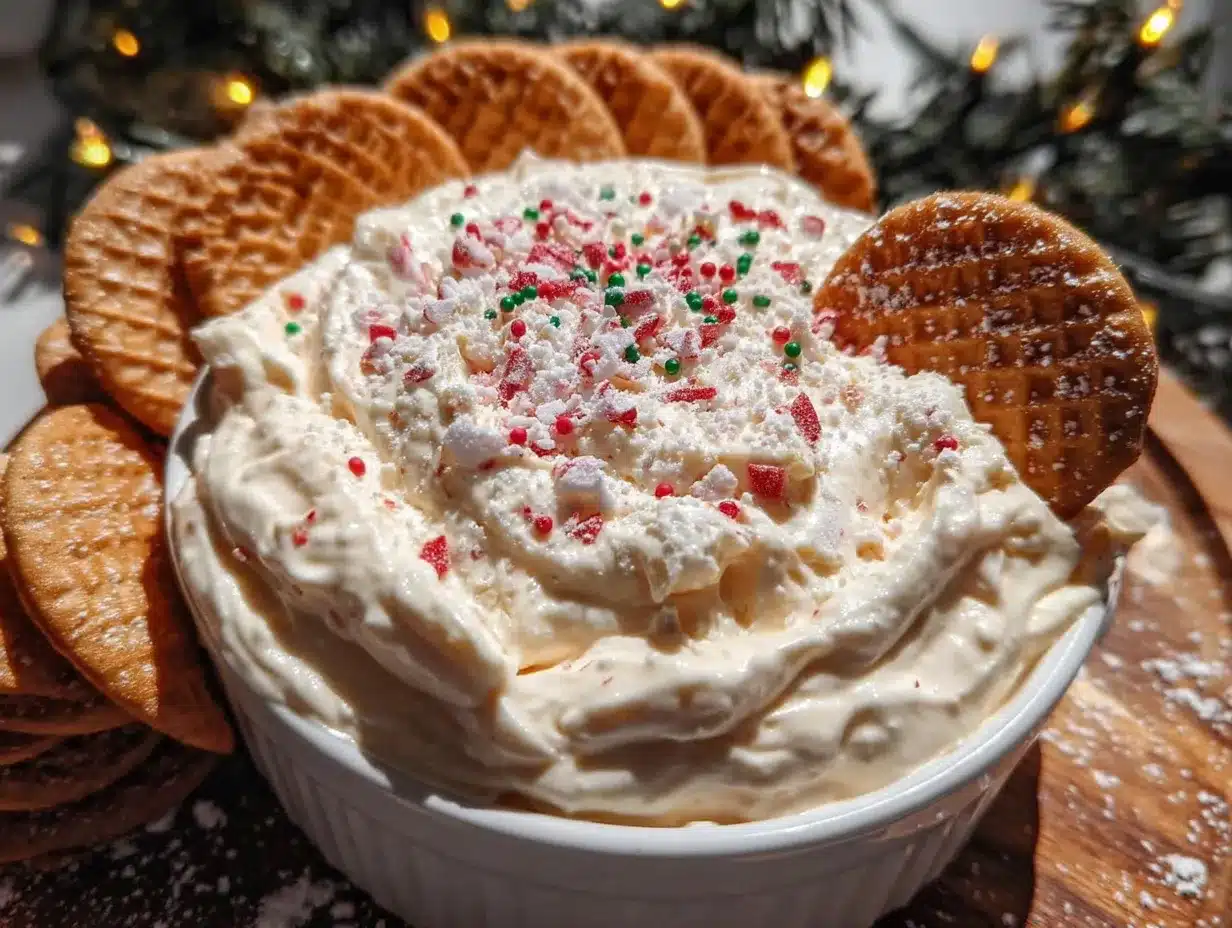
This dip comes together so quickly that you’ll barely have time to open the bag of vanilla wafers before it’s ready. Here’s how to do it:
- Soften your cream cheese and butter. Take them out of the fridge about 30 minutes before you start. If you forgot (which I do about half the time), unwrap the cream cheese and cut it into cubes, then microwave it on low power for 10-15 seconds. Same for the butter. You want them soft but not melted—if they’re shiny or liquidy, you’ve gone too far. Let them cool for a minute before mixing.
- Beat the cream cheese and butter together. Put them in your large mixing bowl and beat on medium speed for about 2 minutes until it’s smooth and fluffy. Scrape down the sides of the bowl with your spatula halfway through. You should see no lumps—if you do, keep beating for another minute. This step is important because lumps of cold cream cheese will ruin the texture of your dip.
- Add the powdered sugar and vanilla. Turn the mixer to low speed so the sugar doesn’t fly everywhere (I learned this the hard way—powdered sugar clouds are not fun to clean up). Add the sugar a little at a time, mixing until it’s fully incorporated. Then add the vanilla and mix for another 30 seconds. Scrape the bowl again.
- Fold in the Cool Whip. Switch to your rubber spatula for this. Gently fold the thawed Cool Whip into the cream cheese mixture until it’s all combined and the color is uniform. Don’t overmix—you want to keep as much air in the Cool Whip as possible for that light, fluffy texture. The mixture should look like a thick, creamy cheesecake filling at this point.
- Chop the Christmas Tree Cakes. Take your cutting board and a sharp knife (serrated works best). Cut each cake into small pieces, about the size of a chocolate chip. You want some smaller bits that will distribute throughout the dip and some slightly larger chunks for texture. Don’t stress too much about uniform size—imperfect pieces look more homemade and appealing. If the icing sticks to your knife, just wipe it off between cuts.
- Fold in the cake pieces. Add the chopped cakes to the dip and fold gently with your spatula until they’re evenly distributed. You’ll see streaks of green icing and yellow cake throughout the white dip—that’s exactly what you want. Save a handful of the cake pieces to sprinkle on top for presentation.
- Chill for at least 30 minutes. This step is optional but highly recommended. The dip firms up and the flavors meld together while it sits. If you’re in a rush, you can serve it immediately, but it will be a bit softer. I usually make it an hour before guests arrive and let it hang out in the fridge.
- Garnish and serve. Transfer the dip to your serving bowl. Sprinkle the reserved cake pieces on top, add some green sprinkles if you’re using them, and arrange the vanilla wafers around the bowl. Serve immediately or keep chilled until you’re ready.
One thing to watch for: if you let the dip sit out for more than an hour, it will start to soften. That’s fine for serving, but if you’re making it ahead of time, keep it covered in the fridge until you’re ready. It actually tastes better the next day, if you can believe it—the flavors get even more pronounced.
Cooking Tips & Techniques
After making this dip about a dozen times (for research purposes, obviously), I’ve picked up a few tricks that make a real difference. First, don’t skip the step of softening your cream cheese. I know it’s tempting to just throw cold cream cheese in the mixer and hope for the best, but you’ll end up with little white lumps throughout the dip. Not the end of the world, but not as smooth as it could be. If you’re in a real hurry, cube the cream cheese and microwave it for 10 seconds—that’s usually enough.
Another thing I learned the hard way: don’t overmix the Cool Whip. I was once talking on the phone while making this (multitasking fail) and I beat the Cool Whip into the cream cheese mixture for way too long. It deflated the whole thing, and the dip came out dense and flat instead of light and fluffy. Just fold it gently until it’s combined, then stop. Your arm will thank you, and your dip will be cloud-like.
For the best texture, chop the Christmas Tree Cakes while they’re still cold from the package. If they’ve been sitting out and the icing is soft, they’ll stick to your knife and make a mess. Pop them in the fridge for 10 minutes before chopping if they seem too sticky. Also, I’ve found that using a slightly serrated knife gives you cleaner cuts through the cake without squishing it.
One more thing—if you’re making this for a party, double the recipe. I’m not kidding. A single batch looks like a lot, but it disappears fast, especially if there are kids around. I made a single batch for our family Christmas gathering last year, and it was gone in 20 minutes. My sister-in-law actually asked me if I had more in the kitchen. I didn’t. Learn from my mistake.
Variations & Adaptations
This dip is surprisingly flexible, and I’ve tried several variations depending on what I have on hand. Here are some of my favorites:
Chocolate version: Swap the Christmas Tree Cakes for frosted brownie cakes or chocolate cupcakes. Use chocolate wafers or Oreos for dipping. Add a drizzle of melted white chocolate on top for that holiday look. My kids actually fought over this version last year, so it’s a winner.
Peppermint twist: Crush up some candy canes and fold them into the dip along with the cake pieces. The peppermint adds a nice crunch and that classic Christmas flavor. Just make sure to crush them finely enough that nobody chips a tooth. I put mine in a ziplock bag and smash them with a rolling pin—it’s also a great stress reliever.
Dairy-free option: Use dairy-free cream cheese (I like Kite Hill or Violife) and coconut whipped cream instead of Cool Whip. The texture will be slightly different—a bit more dense—but it still tastes amazing. I made this for a friend who’s lactose intolerant, and she said it was the best dessert she’d had in months.
Low-sugar version: Substitute the powdered sugar with a powdered monk fruit sweetener or Swerve. Use sugar-free Cool Whip. The dip won’t be quite as sweet, but it’s still delicious, especially with the sweet cake pieces and wafers balancing it out.
Different dippers: Vanilla wafers are classic, but you can use graham crackers, shortbread cookies, pretzel sticks, apple slices, strawberries, or even animal crackers. I’ve served this with all of them at different times, and each combination brings something different to the table. The pretzels add a nice salty contrast that cuts through the sweetness.
Serving & Storage Suggestions
This dip is best served chilled or at room temperature, but not straight out of the fridge if you want that soft, scoopable texture. Let it sit on the counter for about 10 minutes before serving. I like to present it in a shallow bowl or pie plate so the wafers can fan out around the edges. Sprinkle the extra cake pieces and green sprinkles on top right before serving so they stay vibrant.
For a party, set out a variety of dippers so guests can mix and match. I always include vanilla wafers (obviously), but I also add graham crackers and pretzel sticks for variety. If you’re feeling fancy, you can arrange everything on a large platter with the dip bowl in the center—it looks beautiful and encourages grazing.
Storage is simple: cover the dip tightly with plastic wrap or transfer it to an airtight container. It will keep in the refrigerator for up to 4 days. The texture does change slightly as it sits—it becomes a bit firmer and more cheesecake-like—but it’s still delicious. In fact, I kind of prefer it on day two when the flavors have really melded together. Just give it a good stir before serving and let it soften for a few minutes.
You can freeze this dip, but I don’t recommend it. The Cool Whip can get watery when thawed, and the cake pieces will turn mushy. If you absolutely have to freeze it, put it in a freezer-safe container for up to a month, then thaw it in the fridge overnight and stir well before serving. It won’t be as good as fresh, but it’ll still be tasty.
Nutritional Information & Benefits
Let’s be real—this is a treat, not a health food. But here’s the estimated nutritional breakdown for a serving size of about 1/4 cup of dip (without dippers): approximately 280 calories, 18 grams of fat, 28 grams of carbohydrates, and 3 grams of protein. The exact numbers will vary depending on your ingredients and how much you pile on your wafer.
That said, there are a few redeeming qualities. Cream cheese provides a decent amount of calcium and protein, and the vanilla wafers offer a small amount of iron. Plus, if you serve it with apple slices or strawberries, you’re getting some fiber and vitamin C. It’s all about balance, right?
This recipe is vegetarian-friendly, but it does contain dairy, gluten, and eggs. If you’re serving a crowd with dietary restrictions, the dairy-free and gluten-free variations I mentioned earlier work well. Just be sure to check the labels on your Christmas Tree Cakes—they do contain wheat and soy.
From a wellness perspective, I believe in enjoying holiday treats without guilt. This dip is part of what makes the season special—the shared moments, the laughter, the “just one more bite” that turns into three more. I’d rather have a smaller portion of something truly delicious than a larger portion of something that tries to be healthy but isn’t satisfying. So go ahead, enjoy it. Your holiday table deserves a little indulgence.
Conclusion
This Kid-Approved Christmas Tree Cake Dip is the kind of recipe that becomes a tradition after just one try. It’s simple enough to throw together on a busy weekday, but special enough to bring to any holiday gathering. The creamy, sweet dip combined with chunks of frosted cake and crunchy vanilla wafers is pure comfort—the kind of dessert that makes everyone at the table smile, from the youngest kid to the oldest grandparent.
I love this recipe because it reminds me that the best holiday food doesn’t have to be complicated. It’s about sharing something delicious with the people you love, even if that something comes from a box of Little Debbie cakes. There’s no shame in using shortcuts—what matters is the joy it brings. And honestly, watching my kid’s face light up when he sees this dip on the table? That’s what Christmas is all about.
I’d love to hear how this turns out for you! Did you add your own twist? Did your kids go crazy for it? Drop a comment below and let me know—I read every single one. And if you loved this recipe, share it with a friend who needs a last-minute holiday dessert idea. Happy dipping, friends!
Frequently Asked Questions
Can I make this dip ahead of time?
Absolutely! This dip actually tastes better after it’s had time to chill and the flavors meld together. You can make it up to 2 days in advance. Just keep it covered in the fridge, and give it a good stir before serving. Let it sit at room temperature for about 10 minutes so it softens to the perfect dipping consistency.
Can I use homemade whipped cream instead of Cool Whip?
Yes, you can substitute homemade whipped cream. Whip 1 cup of heavy cream with 2 tablespoons of powdered sugar until stiff peaks form, then fold it into the cream cheese mixture. Keep in mind that homemade whipped cream is less stable than Cool Whip, so the dip might be a bit softer and won’t hold up as well if it sits out for a long time. It’s still delicious, though!
What if I can’t find Little Debbie Christmas Tree Cakes?
No worries! You can substitute any frosted snack cake—regular frosted Christmas cakes, frosted sugar cookies, or even frosted brownie bites work great. The key is to use something with that signature frosting-and-cake combo. If you’re feeling ambitious, you could even use homemade pound cake with store-bought frosting. Just chop it up the same way.
How long can this dip sit out at a party?
Because this dip contains cream cheese and dairy, it shouldn’t sit out at room temperature for more than 2 hours. If your party is longer than that, consider putting the dip bowl on a larger bowl filled with ice to keep it chilled. Or just set out smaller batches and refresh the bowl as needed. I usually make two batches and keep one in the fridge until the first one runs low.
Can I make this dip without a mixer?
Definitely! If you don’t have a hand mixer, you can mix everything by hand with a wooden spoon or rubber spatula. The key is to make sure your cream cheese is really soft—almost room temperature—so it blends smoothly. It might take a little more elbow grease, but the result will be just as delicious. I’ve done it before when camping (yes, I brought Christmas Tree Cake dip camping, don’t judge me), and it worked great.
Pin This Recipe!
Kid-Approved Christmas Tree Cake Dip Best Holiday Dessert

A creamy, nostalgic dessert dip made with cream cheese, Cool Whip, and chopped Little Debbie Christmas Tree Cakes. Perfect for holiday parties, this no-bake treat comes together in under 15 minutes and is a guaranteed crowd-pleaser for kids and adults alike.
- Prep Time: 15 minutes
- Cook Time: 0 minutes
- Total Time: 45 minutes (including chilling time)
- Yield: 8 servings 1x
- Category: Dessert
- Cuisine: American
Ingredients
- 8 ounces cream cheese, softened to room temperature
- 1/4 cup unsalted butter, softened
- 1 cup powdered sugar, sifted if possible
- 1 teaspoon vanilla extract
- 8 ounces Cool Whip, thawed
- 4 Little Debbie Christmas Tree Cakes, chopped into small pieces
- 1/4 cup green sprinkles or holiday jimmies (optional)
- Vanilla wafers, for serving
Instructions
- Soften cream cheese and butter by letting them sit out for about 30 minutes, or microwave on low for 10-15 seconds if in a hurry.
- Beat cream cheese and butter together in a large mixing bowl on medium speed for about 2 minutes until smooth and fluffy. Scrape down sides halfway through.
- Add powdered sugar gradually on low speed to avoid clouds, then add vanilla and mix for 30 seconds. Scrape bowl again.
- Gently fold in thawed Cool Whip with a rubber spatula until combined and uniform in color. Do not overmix.
- Chop Christmas Tree Cakes on a cutting board with a serrated knife into small pieces (about the size of a chocolate chip).
- Fold chopped cake pieces into the dip gently until evenly distributed. Reserve a handful for garnish.
- Chill dip for at least 30 minutes to firm up and meld flavors (optional but recommended).
- Transfer to a serving bowl, garnish with reserved cake pieces and green sprinkles, and serve with vanilla wafers.
Notes
For best texture, chop Christmas Tree Cakes while cold. If dip sits out more than 1 hour, it will soften. Can be made up to 2 days ahead and stored covered in the fridge. Double the recipe for parties as it disappears quickly. For dairy-free option, use dairy-free cream cheese and coconut whipped cream.
Nutrition
- Serving Size: 1/4 cup dip (without
- Calories: 280
- Sugar: 22
- Sodium: 180
- Fat: 18
- Saturated Fat: 10
- Carbohydrates: 28
- Protein: 3
Keywords: Christmas tree cake dip, holiday dessert dip, no-bake dessert, kid-friendly dessert, Christmas party dip, easy dessert recipe


