The Friendsgiving potluck was in four hours and I’d completely forgotten. Everyone else would be bringing their signature dishes—Megan’s legendary mac and cheese that takes three hours, Tom’s smoked brisket he’d been babysitting since dawn, and Sarah’s grandmother’s apple pie that required a whole afternoon of lattice work. I had a package of breakfast sausage, a stale loaf of sourdough from Tuesday, and approximately zero culinary ambition left after the week I’d had. Honestly, I almost texted my regrets. But then I remembered the stuffing balls my aunt used to throw together for chaotic holiday gatherings—the ones that disappeared before the turkey even hit the table. I mean, could I really pull this off in under four hours? Let me tell you, I was about to find out.
I started frantically pulling things from the pantry, praying I had enough sage. The kitchen looked like a flour bomb had gone off, and somewhere in the chaos, I knocked over my jar of dried oregano—which, of course, scattered everywhere. I left it. Priorities. I mixed the sausage with the breadcrumbs, added some sautéed onions and celery because that’s what stuffing dreams are made of, and rolled the whole thing into these little golden balls of hope. I popped them in the oven, whipped up a quick sage gravy dip (more hope, less skill at that point), and crossed my fingers.
When I walked into that party with a platter of warm, pull-apart sausage stuffing balls and a bowl of creamy sage gravy dip, I felt like I was bringing a secret weapon. And honestly? They were gone in twenty minutes. People were dipping, dunking, and asking for the recipe before I’d even taken my coat off. Megan’s mac and cheese sat untouched for a solid ten minutes. I’m not saying I won that Friendsgiving—but I’m also not saying I didn’t. These cozy pull-apart sausage stuffing balls with sage gravy dip became my go-to for every gathering after that. Maybe you’ve been there too—the scramble, the panic, the miracle dish that saves the day. This is that recipe.
Why You’ll Love This Recipe
Let me walk you through exactly why these cozy pull-apart sausage stuffing balls with sage gravy dip are about to become your new favorite crowd-pleaser. I’ve tested this recipe about six times now (someone had to eat the mistakes), and each batch taught me something new.
- Quick & Easy: From start to finish, you’re looking at about 45 minutes. That’s it. No overnight soaking, no complicated folds—just mix, roll, bake, and dip.
- Simple Ingredients: I bet you have most of these in your kitchen right now. Sausage, bread, onion, celery, eggs, and a few pantry spices. No trips to specialty stores required.
- Perfect for Gatherings: Whether it’s Thanksgiving, Friendsgiving, a holiday party, or just a cozy Sunday football watch, these little guys fit right in. They’re portable, they’re dippable, and they’re impossible to resist.
- Crowd-Pleaser: Kids love them. Adults love them. Even my picky uncle who “doesn’t do stuffing” ate six. Six! I counted.
- Unbelievably Delicious: The texture is everything—crispy on the outside, soft and savory on the inside. And that sage gravy dip? It’s creamy, herby, and absolutely essential. You’ll want to put it on everything.
What makes this recipe different from the rest? It’s the technique of browning the sausage first, which adds a deep, caramelized flavor that you just can’t get from raw sausage baked into bread. Plus, I use a mix of fresh and dried sage for that layered, earthy warmth that screams comfort food. This isn’t just another stuffing ball recipe—it’s the one that makes you close your eyes after the first bite. It’s comfort food reimagined: faster, simpler, but with the same soul-soothing satisfaction that makes you want to curl up on the couch with a plateful.
What Ingredients You Will Need
This recipe uses simple, wholesome ingredients to deliver bold flavor and satisfying texture without any fuss. Most of these are pantry staples, which is exactly what you want when you’re in a pinch or just craving something warm and comforting.
For the Sausage Stuffing Balls:
- 1 pound (450g) breakfast sausage (I recommend Jimmy Dean or a local butcher’s bulk sausage for best flavor)
- 4 cups (about 200g) stale sourdough bread, torn into small cubes (day-old bread works best; it absorbs the liquid without turning mushy)
- 1 medium yellow onion, finely diced (about 1 cup)
- 2 celery stalks, finely diced (about 1/2 cup)
- 2 cloves garlic, minced
- 2 large eggs, lightly beaten
- 1/2 cup (120ml) chicken broth (low-sodium preferred)
- 1 tablespoon fresh sage, finely chopped (or 1 teaspoon dried sage)
- 1 teaspoon dried thyme
- 1/2 teaspoon dried rosemary
- 1/2 teaspoon salt (adjust based on sausage saltiness)
- 1/4 teaspoon black pepper
- 2 tablespoons unsalted butter (for sautéing)
For the Sage Gravy Dip:
- 2 tablespoons unsalted butter
- 2 tablespoons all-purpose flour
- 1 cup (240ml) chicken broth
- 1/2 cup (120ml) heavy cream (or whole milk for a lighter version)
- 1 tablespoon fresh sage, finely chopped
- 1/4 teaspoon salt
- 1/8 teaspoon black pepper
- Pinch of nutmeg (optional, but adds warmth)
Ingredient Tips & Substitutions:
- Sausage: Use mild or hot Italian sausage if you want more spice. For a turkey version, use ground turkey breakfast sausage—just add a little extra sage and a tablespoon of olive oil for moisture.
- Bread: Sourdough gives the best tangy flavor, but any sturdy bread works. Avoid soft sandwich bread—it turns to paste. Gluten-free bread works fine; just toast it first to dry it out.
- Broth: Vegetable broth works perfectly for a vegetarian version. Use a low-sodium option so you can control the salt.
- Fresh vs. Dried Sage: Fresh sage is milder and brighter; dried is more concentrated. If using dried, reduce the amount by half. I actually use both in this recipe because the fresh adds a pop while the dried gives that deep, earthy backbone.
- Heavy Cream: Swap with half-and-half or whole milk for a lighter gravy. Coconut cream (the thick part from a can of full-fat coconut milk) works for dairy-free.
Equipment Needed
You don’t need a fancy kitchen to make these cozy pull-apart sausage stuffing balls with sage gravy dip. Here’s what you’ll need:
- Large skillet: For browning the sausage and sautéing the veggies. A 12-inch cast iron skillet is my favorite—it gives great browning and goes from stovetop to oven (though you won’t need that here).
- Large mixing bowl: For combining all the stuffing ball ingredients. Go big—you want room to mix without everything spilling over.
- Baking sheet: A standard 13×18-inch sheet pan works perfectly. Line it with parchment paper for easy cleanup. I learned this the hard way after scraping burnt-on bits for twenty minutes.
- Medium saucepan: For the sage gravy dip. A small 2-quart pot is ideal.
- Whisk: Essential for a smooth gravy without lumps. A silicone whisk is gentle on nonstick pans.
- Cookie scoop or tablespoon: For evenly sized stuffing balls. A #40 scoop (about 1.5 tablespoons) gives you perfect, uniform balls that cook evenly.
- Measuring cups and spoons: Accuracy matters, especially for the gravy.
- Chef’s knife and cutting board: For dicing onion, celery, and garlic.
Budget-Friendly Alternatives: No cast iron? Any large nonstick skillet works. No cookie scoop? Use two spoons to shape the balls, or just use your hands (lightly oiled so the mixture doesn’t stick). No whisk? A fork works in a pinch—just whisk vigorously.
Preparation Method
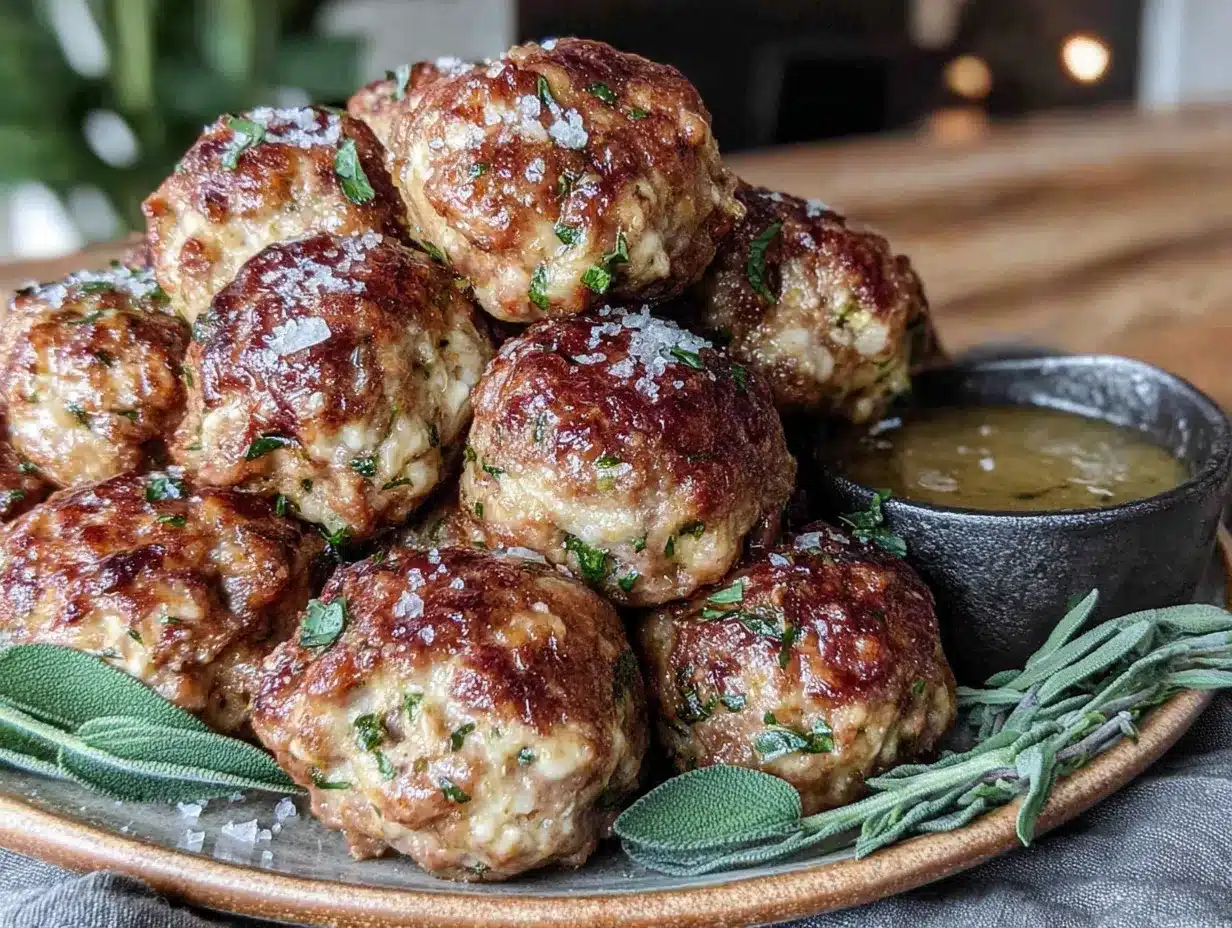
Let’s get cooking. Here’s how to make these cozy pull-apart sausage stuffing balls with sage gravy dip from start to finish. Trust me, your kitchen is about to smell incredible.
Step 1: Preheat and Prep
Preheat your oven to 400°F (200°C). Line a large baking sheet with parchment paper. While the oven heats, tear your stale sourdough into small, bite-sized cubes—about 1/2 inch each. If your bread isn’t stale, spread the cubes on the baking sheet and toast them in the oven for 5-7 minutes while it preheats. Let them cool slightly. (I forgot to do this once and ended up with soggy stuffing balls—not ideal.)
Step 2: Brown the Sausage
In a large skillet over medium-high heat, cook the sausage, breaking it up with a wooden spoon as it browns. This takes about 5-7 minutes. You want it nicely caramelized—those brown bits are flavor gold. Once cooked, use a slotted spoon to transfer the sausage to a plate, leaving about 1 tablespoon of rendered fat in the skillet. If your sausage is lean, add a tablespoon of olive oil or butter.
Step 3: Sauté the Aromatics
Reduce the heat to medium and add the 2 tablespoons of butter to the same skillet. Once melted, add the diced onion and celery. Sauté for 4-5 minutes until soft and translucent—the onion should look like it’s given up all its fight. Add the minced garlic and cook for another 30 seconds until fragrant. Scrape up any browned bits from the bottom of the pan—that’s extra flavor going into your stuffing balls.
Step 4: Combine the Mixture
In a large mixing bowl, combine the bread cubes, cooked sausage, and sautéed vegetables. Sprinkle the fresh sage, dried thyme, dried rosemary, salt, and pepper over the top. Toss gently to distribute everything evenly. In a small bowl, whisk together the beaten eggs and chicken broth. Pour this over the bread mixture and use your hands (yes, get in there) to gently mix until everything is evenly moistened. The mixture should hold together when squeezed—if it’s too dry, add another tablespoon of broth; if too wet, add a few more bread crumbs.
Step 5: Shape the Balls
Using a cookie scoop or your hands, form the mixture into 1.5-inch balls (about the size of a golf ball). You should get around 20-24 balls. Place them on the prepared baking sheet, spacing them about 1 inch apart—they don’t spread, but you want air to circulate for even browning. If you’re using your hands, lightly wet them with water to prevent sticking. I like to roll each one firmly but gently—you want them to hold together without being packed so tight they turn dense.
Step 6: Bake to Golden Perfection
Bake for 18-22 minutes, rotating the pan halfway through. You’re looking for deep golden brown on the outside and a slightly firm feel when gently pressed. The internal temperature should reach 165°F (74°C) if you want to be precise. Let them rest on the baking sheet for 5 minutes—this helps them set and makes them easier to pull apart.
Step 7: Make the Sage Gravy Dip
While the stuffing balls bake, make the gravy. In a medium saucepan over medium heat, melt the 2 tablespoons of butter. Whisk in the flour and cook for 1-2 minutes, stirring constantly—this cooks out the raw flour taste. Slowly pour in the chicken broth while whisking vigorously to prevent lumps. Add the heavy cream and continue whisking. Bring to a gentle simmer, then reduce heat to low. Stir in the fresh sage, salt, pepper, and a pinch of nutmeg if using. Let it simmer for 3-4 minutes until thickened to your liking. Taste and adjust seasoning. Keep warm over low heat until ready to serve.
Step 8: Serve and Enjoy
Arrange the warm stuffing balls on a platter with a bowl of sage gravy dip in the center. Serve immediately while they’re warm and the gravy is creamy. Watch them disappear.
Cooking Tips & Techniques
I’ve made these cozy pull-apart sausage stuffing balls with sage gravy dip more times than I care to admit, and each batch taught me something. Here are the lessons I learned so you don’t have to.
Don’t Overmix the Bread
The biggest mistake I made early on was overworking the mixture. You want the bread cubes to stay somewhat distinct—that’s what gives the balls their light, fluffy interior. If you mix too much, you get a dense, pasty texture. Gently fold until just combined. Think of it like making meatballs: gentle hands, happy stuffing balls.
Toast Your Bread First
Fresh bread turns to mush. I learned this the hard way when I made a batch with fresh sourdough and ended up with sad, soggy blobs. Stale or toasted bread absorbs the liquid without disintegrating. If your bread is fresh, spread the cubes on a baking sheet and toast at 350°F (175°C) for 8-10 minutes. Let them cool completely before mixing.
Brown the Sausage Well
Don’t rush this step. The caramelization on the sausage adds a depth of flavor that you just can’t get from raw sausage baked in the oven. Let it get nice and crispy in spots. Those brown bits? That’s your flavor foundation.
Chill the Mixture If Needed
If your mixture feels too soft or sticky to shape, pop it in the fridge for 15-20 minutes. This firms up the fat and makes the balls easier to roll. I do this especially if I’m using a higher-fat sausage or if my kitchen is warm.
Make the Gravy While They Bake
Timing is everything. Start your gravy when the stuffing balls have about 10 minutes left in the oven. This way, everything is hot and ready at the same time. The gravy also thickens slightly as it sits, so don’t worry if it seems a little thin at first.
Use a Thermometer for the Gravy
If you’re making the gravy ahead, keep it warm over very low heat and stir occasionally. A skin will form on top if you leave it untouched—just whisk it back in. If it thickens too much, thin it with a splash of broth or milk.
Variations & Adaptations
This recipe is wonderfully flexible. Here are some ways to make these cozy pull-apart sausage stuffing balls with sage gravy dip your own.
Vegetarian Version: Swap the sausage for 1 cup of finely chopped mushrooms (cremini or shiitake work great) sautéed with an extra tablespoon of butter and a pinch of smoked paprika. Use vegetable broth in both the stuffing balls and the gravy. The mushrooms give that same savory, umami punch that sausage provides.
Gluten-Free Adaptation: Use gluten-free bread (I like Schär or Canyon Bakehouse) and gluten-free all-purpose flour for the gravy. Toast the bread cubes well—gluten-free bread tends to be softer and needs that extra drying time. Add an extra tablespoon of broth if the mixture seems dry.
Spicy Kick: Use hot Italian sausage instead of breakfast sausage. Add 1/4 teaspoon of red pepper flakes to the sautéed vegetables and a dash of cayenne to the gravy. This version is perfect for those who like a little heat with their comfort food.
Herb Swap: Not a sage fan? Use fresh rosemary and thyme instead. Or try a mix of tarragon and parsley for a lighter, more delicate flavor. The gravy can be made with fresh dill and a squeeze of lemon for a completely different vibe.
Cheese Lover’s Version: Fold in 1/2 cup of shredded sharp cheddar or Parmesan cheese into the stuffing ball mixture. The cheese melts into the bread and adds a salty, creamy element that’s absolutely irresistible. Just reduce the salt slightly to compensate.
Make It a Meal: Serve these over a bed of mashed potatoes or alongside a simple green salad dressed with lemon vinaigrette. They also work great as a topping for a cozy bowl of creamy soup—think butternut squash or tomato bisque.
Serving & Storage Suggestions
These cozy pull-apart sausage stuffing balls with sage gravy dip are best served warm, straight from the oven. Arrange them on a large platter with the gravy in a small bowl in the center. Garnish with a sprinkle of fresh sage leaves or chopped parsley for a pop of color. They’re perfect for dipping, so make sure everyone has access to the gravy.
Complementary Dishes:
- Roasted Brussels sprouts with balsamic glaze
- Cranberry sauce (the tartness cuts through the richness beautifully)
- Mashed potatoes or creamy polenta
- A crisp green salad with apple slices and walnuts
- Warm apple cider or a glass of dry Riesling
Storage: Store leftover stuffing balls in an airtight container in the refrigerator for up to 4 days. The gravy should be stored separately in a sealed container. The flavors actually meld and deepen overnight—some might say they’re even better the next day.
Reheating: To reheat, place the stuffing balls on a baking sheet and warm in a 350°F (175°C) oven for 8-10 minutes. This restores their crispy exterior. Avoid the microwave—it makes them soggy. For the gravy, reheat gently on the stovetop over low heat, whisking occasionally. Add a splash of broth or milk if it’s too thick.
Freezing: These freeze beautifully. Arrange the unbaked stuffing balls on a baking sheet and freeze until solid (about 2 hours). Transfer to a freezer-safe bag or container for up to 3 months. To bake from frozen, add 5-8 minutes to the baking time. You can also freeze the baked balls—just thaw overnight in the fridge and reheat as directed. The gravy can be frozen separately for up to 2 months.
Nutritional Information & Benefits
Per serving (about 3 stuffing balls with 2 tablespoons of gravy):
- Calories: 320
- Protein: 16g
- Fat: 20g
- Carbohydrates: 22g
- Fiber: 2g
- Sugar: 4g
- Sodium: 680mg
Health Benefits: This recipe isn’t health food, but it has some redeeming qualities. Sausage provides protein and B vitamins (especially B12 for energy). Celery and onion add fiber and antioxidants. Sage is known for its anti-inflammatory properties and has been used traditionally to support digestion. The sourdough bread offers some prebiotics, which are good for gut health. And hey, comfort food has mental health benefits too—there’s something deeply satisfying about a warm, savory bite shared with people you love.
Dietary Considerations: This recipe contains gluten, dairy, and eggs. For gluten-free, use gluten-free bread and flour. For dairy-free, use plant-based butter and coconut cream in the gravy. For egg-free, substitute with 2 tablespoons of flaxseed meal mixed with 6 tablespoons of water (let it sit for 5 minutes to gel).
Potential Allergens: Wheat, dairy, eggs. Always check your sausage label for any additional allergens.
Conclusion
These cozy pull-apart sausage stuffing balls with sage gravy dip are the kind of recipe that saves the day—whether you’re scrambling for a potluck, hosting a holiday gathering, or just craving something warm and comforting on a cold evening. They’re simple enough for a weeknight, impressive enough for a party, and forgiving enough for a beginner. I’ve made them in a panic, I’ve made them with love, and every single time, they’ve delivered.
I hope you give this recipe a try and make it your own. Maybe you’ll add extra sage, or swap in spicy sausage, or serve them over mashed potatoes like I did last Thanksgiving. Whatever you do, I’d love to hear about it. Drop a comment below and tell me how yours turned out—did you add any twists? Did the gravy disappear before the balls? Share your photos on Pinterest and tag me so I can see your beautiful creations. Happy cooking, friend. You’ve got this.
Frequently Asked Questions
Can I make these ahead of time?
Absolutely. You can prepare the stuffing ball mixture up to 24 hours in advance and store it covered in the fridge. Shape and bake just before serving. You can also bake them fully, then reheat in a 350°F oven for 8-10 minutes.
Can I use ground pork instead of breakfast sausage?
Yes, but you’ll need to season it well. Add 1 teaspoon of sage, 1/2 teaspoon of thyme, 1/2 teaspoon of salt, 1/4 teaspoon of pepper, and a pinch of nutmeg to mimic breakfast sausage flavor. Brown it the same way.
Why did my stuffing balls fall apart?
This usually happens if the mixture is too dry or if you didn’t press them firmly enough. Add an extra tablespoon of broth and make sure the bread is well-moistened. Also, let them rest for 5 minutes after baking—they firm up as they cool.
Can I air fry these instead of baking?
Yes! Preheat your air fryer to 375°F (190°C). Arrange the stuffing balls in a single layer in the basket (you may need to work in batches). Spray lightly with cooking spray. Air fry for 10-12 minutes, shaking the basket halfway through, until golden and crispy.
How do I make the gravy thicker?
If your gravy is too thin, mix 1 tablespoon of cornstarch with 2 tablespoons of cold water to make a slurry. Whisk it into the simmering gravy and cook for another minute until thickened. Alternatively, let it simmer longer to reduce naturally.
Pin This Recipe!

Cozy Pull-Apart Sausage Stuffing Balls with Sage Gravy Dip

These cozy pull-apart sausage stuffing balls with sage gravy dip are the perfect crowd-pleaser for any gathering. Made with simple ingredients and ready in about 45 minutes, they’re crispy on the outside, soft and savory on the inside, and served with a creamy, herby sage gravy dip.
- Prep Time: 15 minutes
- Cook Time: 30 minutes
- Total Time: 45 minutes
- Yield: 4 servings 1x
- Category: Appetizer
- Cuisine: American
Ingredients
- 1 pound (450g) breakfast sausage
- 4 cups (about 200g) stale sourdough bread, torn into small cubes
- 1 medium yellow onion, finely diced (about 1 cup)
- 2 celery stalks, finely diced (about 1/2 cup)
- 2 cloves garlic, minced
- 2 large eggs, lightly beaten
- 1/2 cup (120ml) chicken broth (low-sodium preferred)
- 1 tablespoon fresh sage, finely chopped (or 1 teaspoon dried sage)
- 1 teaspoon dried thyme
- 1/2 teaspoon dried rosemary
- 1/2 teaspoon salt
- 1/4 teaspoon black pepper
- 2 tablespoons unsalted butter (for sautéing)
- 2 tablespoons unsalted butter (for gravy)
- 2 tablespoons all-purpose flour
- 1 cup (240ml) chicken broth (for gravy)
- 1/2 cup (120ml) heavy cream (or whole milk for a lighter version)
- 1 tablespoon fresh sage, finely chopped (for gravy)
- 1/4 teaspoon salt (for gravy)
- 1/8 teaspoon black pepper (for gravy)
- Pinch of nutmeg (optional, for gravy)
Instructions
- Preheat your oven to 400°F (200°C). Line a large baking sheet with parchment paper. Tear stale sourdough into small, bite-sized cubes (about 1/2 inch each). If bread is fresh, spread cubes on baking sheet and toast for 5-7 minutes while oven preheats. Let cool slightly.
- In a large skillet over medium-high heat, cook the sausage, breaking it up with a wooden spoon, until nicely caramelized (about 5-7 minutes). Use a slotted spoon to transfer sausage to a plate, leaving about 1 tablespoon of rendered fat in the skillet.
- Reduce heat to medium and add 2 tablespoons of butter to the same skillet. Once melted, add diced onion and celery. Sauté for 4-5 minutes until soft and translucent. Add minced garlic and cook for 30 seconds until fragrant. Scrape up any browned bits from the bottom of the pan.
- In a large mixing bowl, combine bread cubes, cooked sausage, and sautéed vegetables. Sprinkle fresh sage, dried thyme, dried rosemary, salt, and pepper over the top. Toss gently to distribute. In a small bowl, whisk together beaten eggs and chicken broth. Pour over the bread mixture and use your hands to gently mix until everything is evenly moistened. The mixture should hold together when squeezed.
- Using a cookie scoop or your hands, form the mixture into 1.5-inch balls (about the size of a golf ball). You should get around 20-24 balls. Place them on the prepared baking sheet, spacing them about 1 inch apart.
- Bake for 18-22 minutes, rotating the pan halfway through, until deep golden brown on the outside and slightly firm when gently pressed. Internal temperature should reach 165°F (74°C). Let rest on the baking sheet for 5 minutes.
- While the stuffing balls bake, make the gravy. In a medium saucepan over medium heat, melt 2 tablespoons of butter. Whisk in flour and cook for 1-2 minutes, stirring constantly. Slowly pour in chicken broth while whisking vigorously to prevent lumps. Add heavy cream and continue whisking. Bring to a gentle simmer, then reduce heat to low. Stir in fresh sage, salt, pepper, and a pinch of nutmeg if using. Let simmer for 3-4 minutes until thickened. Keep warm over low heat.
- Arrange the warm stuffing balls on a platter with a bowl of sage gravy dip in the center. Serve immediately.
Notes
For best results, use stale or toasted bread to avoid soggy stuffing balls. Brown the sausage well for deeper flavor. If mixture is too soft, chill for 15-20 minutes before shaping. Gravy can be made ahead and reheated gently. Leftover stuffing balls can be stored in the refrigerator for up to 4 days and reheated in a 350°F oven for 8-10 minutes. Unbaked balls can be frozen for up to 3 months.
Nutrition
- Serving Size: 3 stuffing balls wit
- Calories: 320
- Sugar: 4
- Sodium: 680
- Fat: 20
- Saturated Fat: 8
- Carbohydrates: 22
- Fiber: 2
- Protein: 16
Keywords: sausage stuffing balls, sage gravy dip, pull-apart stuffing balls, holiday appetizer, Friendsgiving recipe, easy stuffing balls, comfort food


