My neighbor Marco asked why I couldn’t just toss the chicken thighs in the air fryer without breading them first. I was mid-sentence explaining the science of crispy skin—something about moisture barriers and oil temperature—when I stopped. The thing is, Marco is a retired plumber who once made lasagna using cottage cheese and crushed Ritz crackers, and it was the best thing I’d ever eaten from his kitchen. So I shut my mouth, handed him the paprika, and let him do his thing.
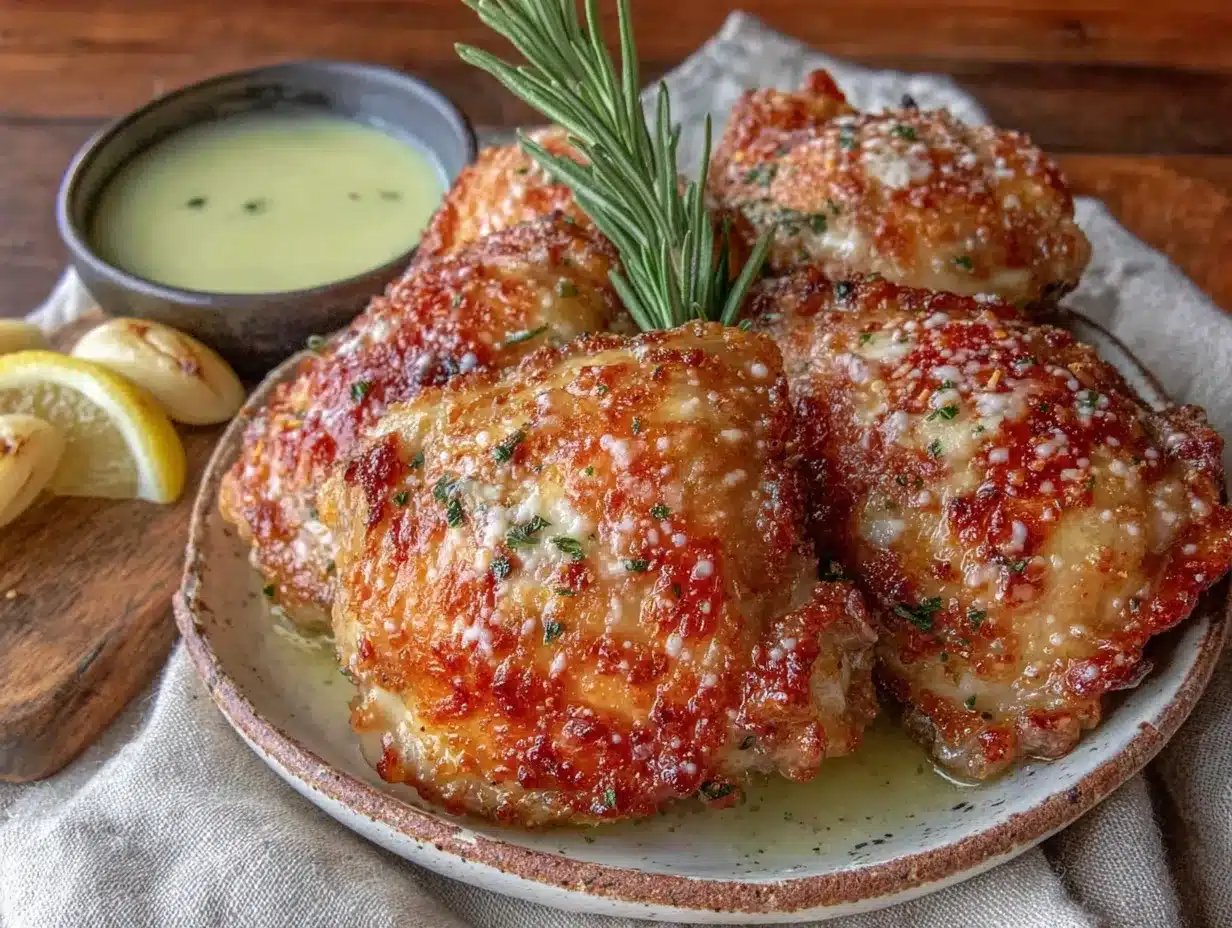
What came out of that air fryer fifteen minutes later was a total surprise. The skin was crackling, the meat was stupidly juicy, and there was this accidental layer of garlic and Parmesan that had melted into something almost caramelized. I stood there eating one straight from the basket, burning my fingers and not caring one bit.
Honestly, I’d been overcomplicating chicken thighs for years. Brining them, flipping them halfway, using wire racks inside sheet pans—the works. Marco just patted them dry, seasoned them like he meant it, and let the air fryer do the heavy lifting. That moment reminded me that sometimes the best cooking advice comes from someone who doesn’t know they’re giving it.
This recipe for cozy crispy air fryer chicken thighs (garlic parmesan) is the direct result of that Wednesday evening lesson. It’s become my go-to for those nights when I need something warm and satisfying without spending an hour in the kitchen. Maybe you’ve had one of those days where takeout sounds good but you want something that actually feels like a meal? That’s exactly when these thighs save the day.
Why You’ll Love This Recipe
Let me tell you why these cozy crispy air fryer chicken thighs (garlic parmesan) have earned a permanent spot in my weekly rotation. I’ve tested this recipe at least a dozen times, tweaking temperatures and seasoning ratios until it felt just right.
- Quick & Easy: From fridge to plate in under 30 minutes. No marinating overnight, no complicated techniques—just straightforward cooking that works every time.
- Simple Ingredients: You probably have everything already. Garlic powder, Parmesan, paprika, salt, pepper—these are pantry staples that come together beautifully.
- Perfect for Cozy Evenings: Cold weather, rough days, or those quiet nights when you want something that feels like a hug on a plate. This is comfort food without the guilt.
- Crowd-Pleaser: I’ve served these to picky kids, skeptical in-laws, and friends who swear they don’t like dark meat. Every single person went back for seconds.
- Unbelievably Delicious: The skin gets shatteringly crisp while the meat stays tender and juicy. That garlic-Parmesan crust is next-level good—salty, savory, and just a little bit addictive.
What makes this recipe different from all the other air fryer chicken recipes out there? It’s the combination of technique and seasoning. Instead of a wet batter that steams the skin, we use a dry rub that lets the air fryer’s circulating heat work its magic. The Parmesan creates a crispy, cheesy crust that locks in moisture, while the garlic infuses every bite with warmth. It’s not just another version—it’s the version I keep coming back to.
This recipe is the kind that makes you close your eyes after the first bite. It’s comfort food reimagined—faster, easier, but with the same soul-soothing satisfaction that makes you feel like everything is going to be okay.
What Ingredients You Will Need
This recipe uses simple, wholesome ingredients that come together to create something truly special. Most of these are pantry staples, which makes this dish perfect for those nights when you need dinner on the table without a trip to the store.
For the Chicken
- 4 bone-in, skin-on chicken thighs (about 1.5 pounds total) — The skin is crucial for that crispy texture. Bone-in adds flavor and keeps the meat juicy.
- 1 tablespoon olive oil — Helps the seasoning stick and promotes browning. You can use avocado oil if you prefer.
- 1 teaspoon salt — I use fine sea salt for even distribution. Kosher salt works too, just use a bit more.
- ½ teaspoon black pepper — Freshly ground is best, but pre-ground works in a pinch.
- 1 teaspoon garlic powder — Not garlic salt. We want pure garlic flavor without extra sodium. I prefer the brand McCormick for consistent quality.
- 1 teaspoon onion powder — Adds depth without being overpowering.
- 1 teaspoon smoked paprika — This is my secret weapon. It adds a subtle smokiness that makes the chicken taste like it cooked low and slow all day.
- ½ teaspoon dried oregano — A little herbaceous note that complements the garlic beautifully.
For the Garlic Parmesan Crust
- ¼ cup grated Parmesan cheese — Buy the real stuff, not the green can. Freshly grated melts better and has more flavor. Look for Parmesan Reggiano if you want to be fancy, but a good domestic Parmesan works fine.
- 2 cloves garlic, minced — Fresh garlic is non-negotiable here. The pre-minced stuff in jars has a different flavor that doesn’t caramelize the same way.
- 2 tablespoons melted butter — Adds richness and helps the Parmesan mixture stick. I use salted butter and adjust the salt in the rub accordingly.
- 2 tablespoons chopped fresh parsley — For garnish and a fresh finish. Dried parsley won’t give you the same pop of color or flavor.
Substitution Guidance: If you’re avoiding dairy, you can skip the Parmesan and butter. The chicken will still be crispy from the dry rub, just without that cheesy crust. For a dairy-free option, use a tablespoon of nutritional yeast mixed with the dry rub for a similar savory flavor. If you don’t have smoked paprika, regular paprika works—just add a tiny pinch of cumin to mimic that smokiness.
Look for chicken thighs that are similar in size so they cook evenly. If one is significantly larger than the others, it might need an extra minute or two in the air fryer. I usually grab my chicken from the local butcher shop because they trim the thighs nicely, but supermarket packs work just fine.
Equipment Needed
You don’t need much for this recipe, which is part of why I love it. Here’s what you’ll need:
- Air fryer — Any brand works. I use a 5.8-quart Cosori, but I’ve tested this recipe in a smaller 3-quart model and it worked fine. Just don’t overcrowd the basket.
- Paper towels — For patting the chicken dry. This step is more important than you think.
- Mixing bowls — One small bowl for the dry rub, another for the Parmesan mixture.
- Tongs — For flipping the chicken without burning your fingers. Silicone-tipped ones won’t scratch your air fryer basket.
- Meat thermometer — Not strictly necessary, but highly recommended. An instant-read thermometer takes the guesswork out of doneness. I’ve had a Thermapen for years and it’s worth every penny.
- Cutting board and knife — For mincing the garlic and chopping parsley.
- Pastry brush — For brushing the melted butter onto the chicken. A silicone brush is easier to clean than a natural bristle one.
If you don’t have a meat thermometer, you can check doneness by piercing the thickest part of the thigh with a knife. The juices should run clear, not pink. But honestly, a thermometer gives you peace of mind and prevents dry chicken.
Preparation Method
Let’s get cooking. This whole process takes about 25 minutes from start to finish, and most of that is hands-off time while the air fryer does its thing.
- Prep the chicken (5 minutes): Take the chicken thighs out of the fridge and pat them dry with paper towels. This is crucial—wet skin won’t get crispy. I usually use three or four paper towels per thigh, pressing firmly to absorb as much moisture as possible. Let them sit on a plate while you mix the seasoning.
- Make the dry rub (2 minutes): In a small bowl, combine the salt, black pepper, garlic powder, onion powder, smoked paprika, and dried oregano. Stir with a fork to break up any clumps. The color should be a warm reddish-brown from the paprika.
- Season the chicken (3 minutes): Drizzle the olive oil over the chicken thighs and use your hands to coat them evenly. Then sprinkle the dry rub over both sides, patting it gently so it sticks. Don’t rub too hard or you’ll push the seasoning off. I like to do this on a cutting board so I can see if I’ve missed any spots.
- Preheat the air fryer (3 minutes): Set your air fryer to 380°F. Let it preheat for about 3 minutes. Some air fryers don’t need preheating, but I’ve found that starting with a hot basket gives you better browning from the get-go.
- Arrange the chicken (2 minutes): Place the seasoned thighs in the air fryer basket, skin side down. Make sure they’re not touching—leave a little space between each piece for air to circulate. If your air fryer is small, cook them in batches. Overcrowding leads to steaming instead of crisping.
- First cook (12 minutes): Cook at 380°F for 12 minutes. Don’t open the basket during this time. Let the air fryer work its magic. You’ll start smelling that garlic and paprika around the 8-minute mark—that’s a good sign.
- Flip and add the Parmesan mixture (3 minutes): While the chicken is cooking, mix the grated Parmesan, minced garlic, and melted butter in a small bowl. It should form a thick, paste-like consistency. When the 12 minutes are up, carefully open the air fryer and use tongs to flip each thigh so the skin side is up. Spoon the Parmesan mixture over the top of each thigh, spreading it gently with the back of the spoon. Don’t press too hard—you want it to sit on top, not get smeared off.
- Final cook (5-7 minutes): Cook for another 5 to 7 minutes at 380°F. The chicken is done when the internal temperature reaches 165°F in the thickest part, and the Parmesan crust is golden brown and bubbling. If you want extra browning, you can broil for the last minute, but watch it closely so the cheese doesn’t burn.
- Rest and garnish (3 minutes): Remove the chicken from the air fryer and let it rest on a plate for 3 minutes. This lets the juices redistribute so every bite is moist. Sprinkle with fresh parsley right before serving.
Sensory cues: At step 6, the chicken should look golden brown on the skin side with some darker spots from the paprika. The kitchen should smell smoky and savory. At step 8, the Parmesan should be melted and slightly darker around the edges, like a good grilled cheese sandwich. When you poke the thickest part of the thigh, it should feel firm but give slightly—like a well-cooked piece of meat.
Troubleshooting: If the Parmesan is browning too quickly but the chicken isn’t done, reduce the temperature to 360°F for the final cook. If the skin isn’t crispy enough, pat the chicken even drier before seasoning, or add an extra minute to the first cook time.
Cooking Tips & Techniques
I’ve made this recipe enough times to learn what works and what doesn’t through trial and error. Here are the things I wish someone had told me earlier.
Don’t skip the drying step. I know it seems fussy, but moisture is the enemy of crispy skin. Those paper towels are doing more work than any seasoning could. One time I was in a rush and just blotted the chicken quickly—the skin came out chewy and sad. Never again.
Let the chicken come to room temperature. If you take the thighs straight from the fridge, the outside will cook faster than the inside. Let them sit on the counter for 15 minutes before seasoning. This small step makes a surprising difference in even cooking.
Use bone-in, skin-on thighs. I tried this recipe with boneless thighs once because that’s what I had. The meat was still good, but it dried out faster and the skin didn’t crisp the same way. The bone adds flavor and helps regulate cooking temperature. Trust me on this one.
Don’t overcrowd the basket. I made this mistake the first time I tested the recipe. I crammed six thighs into a small air fryer basket because I was impatient. They came out steamed instead of crispy, and the Parmesan mixture slid off in sad, greasy clumps. Give your chicken room to breathe.
Preheat your air fryer. Some recipes say you don’t need to, but I’ve tested both ways. Preheating gives you that initial blast of heat that sets the skin and starts the crisping process immediately. It’s a small extra step that pays off big.
Multitask wisely. While the chicken is cooking in the air fryer, use that time to make a quick side dish. I often toss some broccoli or green beans with olive oil and salt, then add them to the air fryer during the last 5 minutes of cooking. Two dishes, one appliance, zero extra cleanup.
Watch the internal temperature. Chicken thighs are forgiving because they have more fat than breasts, but they can still dry out if overcooked. Pull them at 165°F and let them rest. The carryover cooking will bring them up a few more degrees.
Variations & Adaptations
This recipe is flexible, and I’ve tried several variations over the months. Here are some of my favorites.
Spicy Buffalo Version: Replace the smoked paprika with cayenne pepper (start with ½ teaspoon and adjust from there). After cooking, toss the finished thighs in a mixture of 2 tablespoons melted butter and 2 tablespoons hot sauce. The Parmesan crust gets a little melty and spicy, and it’s absolutely incredible with blue cheese dip on the side.
Lemon Herb Adaptation: Add the zest of one lemon to the dry rub, and swap the oregano for fresh thyme. After the final cook, squeeze fresh lemon juice over the chicken and top with extra parsley. This version is brighter and feels lighter, perfect for spring evenings when you want comfort food without the heaviness.
Dairy-Free Option: Skip the Parmesan and butter entirely. Instead, mix 2 tablespoons of nutritional yeast with the dry rub for a cheesy, savory flavor. Brush the chicken with olive oil instead of butter before the final cook. The texture won’t be exactly the same, but the flavor is surprisingly close. I tested this for a friend with a dairy allergy and she couldn’t tell the difference.
Honey Garlic Twist: Before the final cook, brush the chicken with a mixture of 1 tablespoon honey and 1 teaspoon soy sauce instead of the melted butter. The honey caramelizes in the air fryer and creates a sweet-savory crust that pairs beautifully with the garlic. Just watch it carefully because honey can burn quickly.
Herb Crust Variation: Add 2 tablespoons of finely chopped fresh herbs (rosemary, thyme, and sage work well) to the Parmesan mixture. The herbs get crispy in the air fryer and add an earthy flavor that’s perfect for fall and winter meals.
Serving & Storage Suggestions
These cozy crispy air fryer chicken thighs (garlic parmesan) are versatile enough to serve with almost anything. Here’s how I like to enjoy them.
Serving Temperature: Serve the chicken hot, straight from the air fryer. That Parmesan crust is at its crispiest within the first 10 minutes. If you let it sit too long, the crust softens from the steam. If you’re making a big meal, time the chicken so it finishes right when everything else is ready.
What to Serve With It: I love these thighs with simple sides that don’t compete with the flavor. Mashed potatoes are a classic choice—the creamy texture contrasts perfectly with the crispy skin. Roasted vegetables like asparagus, Brussels sprouts, or carrots work beautifully. For something lighter, a crisp green salad with lemon vinaigrette cuts through the richness. And honestly, a hunk of crusty bread to soak up any leftover garlic butter from the pan is never a bad idea.
Beverage Pairings: A light beer like a pilsner or lager complements the garlic and Parmesan without overwhelming it. For wine drinkers, a crisp Sauvignon Blanc or an unoaked Chardonnay works well. If you’re in a cozy mood, a warm mug of apple cider is surprisingly good with these savory flavors.
Storage Instructions: Leftover chicken keeps in the refrigerator for up to 4 days in an airtight container. The skin will soften as it sits, but the flavor stays delicious. I usually store the chicken without any sauce or garnish to keep it from getting soggy.
Reheating Methods: The air fryer is your best friend for reheating. Pop the thighs back in at 350°F for 3 to 4 minutes, and the skin will crisp right back up. You can also reheat in a 375°F oven for about 8 minutes. Avoid the microwave—it will make the skin rubbery and the meat dry.
Freezer Tips: These thighs freeze well for up to 3 months. Let them cool completely, then wrap each thigh individually in plastic wrap and place them in a freezer bag. To reheat, thaw in the refrigerator overnight, then reheat in the air fryer at 350°F for 5 to 6 minutes. The texture won’t be quite as good as fresh, but it’s still a solid meal on a busy night.
Nutritional Information & Benefits
Here’s the estimated nutritional breakdown for one serving (one chicken thigh with Parmesan crust):
| Nutrient | Amount |
|---|---|
| Calories | 320 |
| Protein | 28g |
| Fat | 22g |
| Saturated Fat | 7g |
| Carbohydrates | 2g |
| Fiber | 0g |
| Sugar | 0g |
| Sodium | 680mg |
Chicken thighs are a great source of protein, iron, and B vitamins. They have more fat than chicken breasts, which is what makes them so juicy and flavorful, but that fat also helps keep you full and satisfied. The Parmesan adds calcium and a little extra protein, while the garlic offers anti-inflammatory benefits.
Dietary Considerations: This recipe is naturally low-carb and keto-friendly (about 2g net carbs per serving). It’s also gluten-free and nut-free. If you’re watching your sodium, you can reduce the salt in the dry rub to ½ teaspoon, but the flavor will be less punchy. For a lower-fat option, you can remove the skin before eating, but honestly, that’s where all the magic happens.
Potential Allergens: This recipe contains dairy (butter and Parmesan). It does not contain eggs, soy, or gluten. If you have a dairy allergy, check the dairy-free variation in the section above.
Conclusion
These cozy crispy air fryer chicken thighs (garlic parmesan) have become my go-to for those nights when I need something warm, satisfying, and unfussy. They remind me that good food doesn’t have to be complicated—sometimes it’s just about using the right technique and letting simple ingredients shine.
I love this recipe because it works every single time. Whether I’m cooking for myself on a quiet Tuesday or serving a crowd on a Sunday afternoon, these thighs deliver. The crispy skin, the tender meat, that irresistible garlic-Parmesan crust—it’s the kind of meal that makes you slow down and actually enjoy your food.
I’d love to hear how yours turn out. Did you try one of the variations? Did you come up with your own twist? Drop a comment below and let me know—I read every single one and I’m always looking for new ideas to test in my kitchen.
Go ahead, give these a try. Your air fryer is waiting, and I promise you won’t regret it.
Frequently Asked Questions
Can I use boneless, skinless chicken thighs for this recipe?
You can, but the results won’t be as crispy or juicy. The skin is what gets that shatteringly crisp texture, and the bone helps keep the meat moist. If you use boneless thighs, reduce the cooking time by about 5 minutes and check the internal temperature early.
How do I prevent the Parmesan from burning in the air fryer?
The key is adding the Parmesan mixture during the last 5 to 7 minutes of cooking, not at the beginning. If your air fryer runs hot, reduce the temperature to 360°F for the final cook. You can also cover the Parmesan lightly with a small piece of foil if it’s browning too fast.
Can I make this recipe without an air fryer?
Absolutely. Bake the chicken at 400°F on a wire rack set inside a baking sheet for 35 to 40 minutes. Add the Parmesan mixture during the last 10 minutes of baking. The skin won’t be quite as crispy as the air fryer version, but it’s still delicious.
How do I know when the chicken is fully cooked?
The safest way is to use an instant-read meat thermometer. Insert it into the thickest part of the thigh without touching the bone. The chicken is done at 165°F. If you don’t have a thermometer, pierce the thigh with a knife—the juices should run clear, not pink.
Can I double this recipe for a crowd?
Yes, but you’ll need to cook the chicken in batches. Overcrowding the air fryer basket will lead to steaming instead of crisping. For a large group, I recommend using a conventional oven instead. Bake at 400°F for 35 to 40 minutes, and you can fit up to 12 thighs on a single sheet pan.
Pin This Recipe!

Cozy Crispy Air Fryer Garlic Parmesan Chicken Thighs

These air fryer chicken thighs are perfectly crispy on the outside, juicy on the inside, and coated with a savory garlic Parmesan crust. A quick and easy weeknight dinner that’s full of flavor.
- Prep Time: 10 minutes
- Cook Time: 20 minutes
- Total Time: 30 minutes
- Yield: 4 servings 1x
- Category: Main Course
- Cuisine: American
Ingredients
- 4 bone-in, skin-on chicken thighs (about 1.5 pounds total)
- 1 tablespoon olive oil
- 1 teaspoon salt
- ½ teaspoon black pepper
- 1 teaspoon garlic powder
- 1 teaspoon onion powder
- 1 teaspoon smoked paprika
- ½ teaspoon dried oregano
- ¼ cup grated Parmesan cheese
- 2 cloves garlic, minced
- 2 tablespoons melted butter
- 2 tablespoons chopped fresh parsley
Instructions
- Prep the chicken: Pat the chicken thighs dry with paper towels. Let them sit on a plate while you mix the seasoning.
- Make the dry rub: In a small bowl, combine salt, black pepper, garlic powder, onion powder, smoked paprika, and dried oregano. Stir to combine.
- Season the chicken: Drizzle olive oil over the chicken thighs and coat evenly. Sprinkle the dry rub over both sides, patting gently to adhere.
- Preheat the air fryer to 380°F for about 3 minutes.
- Arrange the chicken: Place the seasoned thighs in the air fryer basket, skin side down, leaving space between each piece.
- First cook: Cook at 380°F for 12 minutes. Do not open the basket during this time.
- While the chicken cooks, mix grated Parmesan, minced garlic, and melted butter in a small bowl to form a paste.
- Flip and add Parmesan mixture: After 12 minutes, flip the chicken so skin side is up. Spoon the Parmesan mixture over the top of each thigh.
- Final cook: Cook for another 5 to 7 minutes at 380°F, until internal temperature reaches 165°F and the Parmesan crust is golden brown.
- Rest and garnish: Remove from air fryer and let rest for 3 minutes. Sprinkle with fresh parsley before serving.
Notes
Pat the chicken very dry for maximum crispiness. Let chicken come to room temperature for 15 minutes before cooking for even results. Do not overcrowd the air fryer basket. If Parmesan browns too quickly, reduce temperature to 360°F for the final cook.
Nutrition
- Serving Size: 1 chicken thigh
- Calories: 320
- Sodium: 680
- Fat: 22
- Saturated Fat: 7
- Carbohydrates: 2
- Protein: 28
Keywords: air fryer chicken thighs, garlic parmesan chicken, crispy chicken thighs, easy chicken dinner, keto chicken


